

About
A personalized note, no paper required!
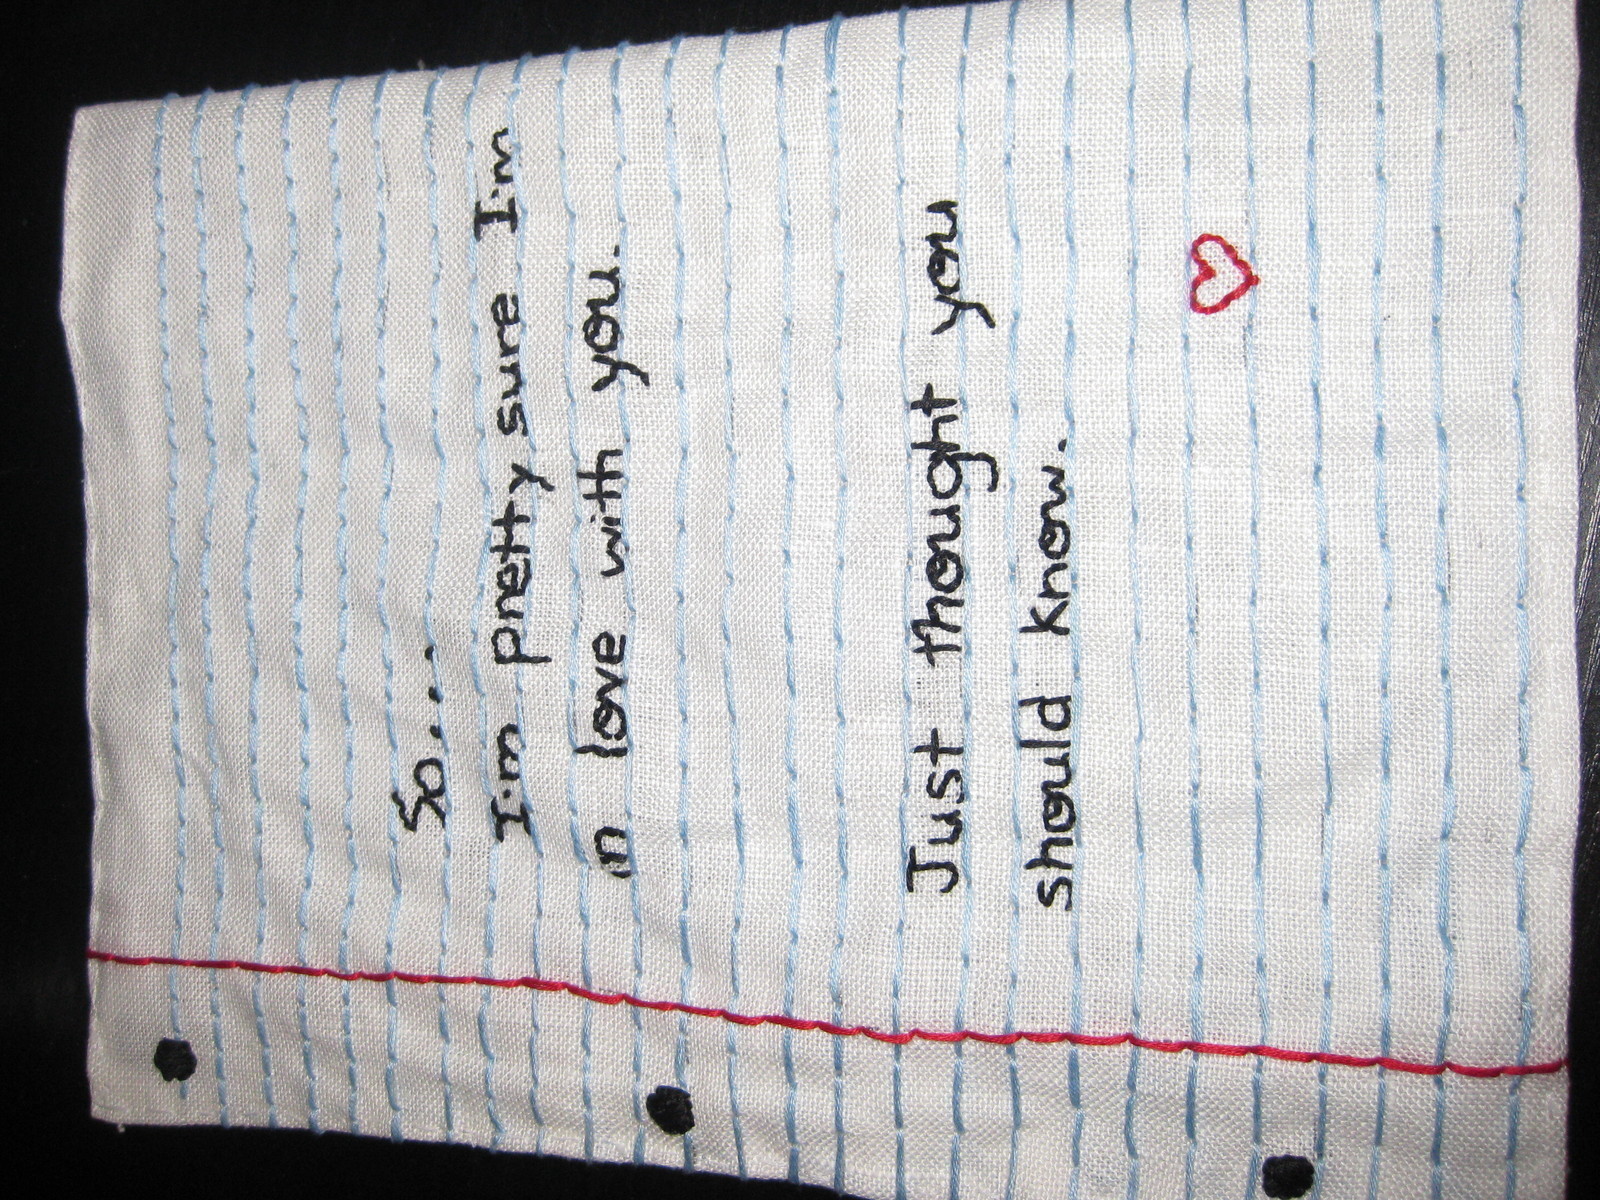
Here's a little project I whipped up to send to my boyfriend. (who sadly, lives in different city than me at the moment) I figured, no one gets enough mail these days, but really, a plain old paper note seems a little bit boring, don't you think? :)
Tags
-
 Miss_Fit favorited Hand Stitched Note
08 Jul 19:32
Miss_Fit favorited Hand Stitched Note
08 Jul 19:32
-
 RareJewel favorited Hand Stitched Note
01 Jun 06:25
RareJewel favorited Hand Stitched Note
01 Jun 06:25
-
 D. Samone favorited Hand Stitched Note
22 Apr 13:15
D. Samone favorited Hand Stitched Note
22 Apr 13:15
-
 Brenda L. favorited Hand Stitched Note
02 Apr 00:04
Brenda L. favorited Hand Stitched Note
02 Apr 00:04
-
 Gretchen G. favorited Hand Stitched Note
15 Jul 15:06
Gretchen G. favorited Hand Stitched Note
15 Jul 15:06
-
 Hester A. favorited Hand Stitched Note
12 Jul 13:42
Hester A. favorited Hand Stitched Note
12 Jul 13:42
-
 Sally B. favorited Hand Stitched Note
24 Jun 14:01
Sally B. favorited Hand Stitched Note
24 Jun 14:01
-
ida h. favorited Hand Stitched Note
05 Jun 18:24
-
Miss_Fit added Hand Stitched Note to Next Steps
17 May 23:32
-
 crazycatlady added Hand Stitched Note to i want to try this!
10 May 20:45
crazycatlady added Hand Stitched Note to i want to try this!
10 May 20:45
-
Step 1
Cut your fabric to the size of note you want to send. I decided to make mine as close to a regular piece of notebook paper as possible, so wanted it to end up around 8 1/2 x 11 inches in the end. Because I wanted to eventually cover up all the stitching on the backside of my note, I made my fabric a little more than twice as long as I needed, so somewhere around 19 x 11 inches. (you'll want to leave about an inch of allowance on top of these measurements so ends can be stitched under)
-
Step 2
Figure out your line spacing. As I was sticking with a regular piece of paper, I simply used that spacing. I used my pencil to mark a couple of notches on each line I needed to stitch so things didn't get too crooked as I went. Make sure you mark in both the horizontal (blue) lines, as well as the vertical (red) line. Remember, if you are wanting to cover your stitching after, you only need to stitch your blue lines over half the cloth. (although all the way around would look good, I just didn't have the patience...)
-
Step 3
Start stitching! I used a basic backstitch for everything in this project due to my lack of embroidery prowess. If you're not too sure how to do this, here's a really simple video I found on YouTube to explain it. Googling "how to backstitch" will bring up tons of other help if you need it too!
http://www.youtube.com/watch?v=1GFFTgKay8g
-
Step 4
I really wanted my lines to show up well so I used a 6 strand DMC floss. (827 for the blue lines and 321 for the red line) Any blue or red will work though, and you could modify your number of strands depending on how prominent you want your lines to be. I used pretty large stitches, not only because it made things go a lot quicker, but I found it made the lines look smoother and more realistic.
-
Step 5
I also sewed in the 3 black holes along the left side. Once again, I just used approximate measurements off a piece of standard notebook paper, but just do whatever spacing you need to make it work for your project! (even though there is probably a more advanced stitch that could be used here, I just filled the black holes in with a frenzy of backstitching as well)
-
Step 6
Now that your note looks like, well, a piece of paper, it is time to fill in your message! Obviously, you can write whatever you feel like. I simply used my pencil to write my message in, and then went over it in backstitch, using the same black floss as I did for the side holes. There are probably tons of fancy ways to stitch in lettering, but I wanted mine to look like my actual writing to add a little personal touch.
-
Step 7
Once your message is stitched in, you're done the letter! I took the extra material on the right side of my note and folded it around the back, meeting it up with my original side and stitching it (with plain thread that matched my linen) to make a sort of tube. After that side was done, I went the rest of the way around so that it was closed on all 4 sides. (the flipping it around from the right meant that I didn't have to stitch that side though! :) )This meant that you couldn't see the messy backside of my note. However, this step is totally optional if you don't really feel like going to the extra effort.
-
Step 8
DONE!


Yes, the sewing IS very neat, it really does look like real writing, good job