About
Beautiful and stylish pillow!
Upgrade your home decor in style with this cute pillow! Download the PDF patter and start making this amazing project. Petals templates are attached :)
Tags
Downloads
- 103974_2F2014-10-17-160346-daisy_pillows.pdf 263 KB [ Download ]
-
 Meta H. added Daisy Pillow to sewing
19 Dec 03:33
Meta H. added Daisy Pillow to sewing
19 Dec 03:33
-
 Chachee.rayna added Daisy Pillow to Sew, Sew!
17 Dec 23:13
Chachee.rayna added Daisy Pillow to Sew, Sew!
17 Dec 23:13
-
Pat B. published her project Daisy Pillow
18 Aug 19:12
You Will Need
-
 Step 1
C U T T I N G I N S T R U C T I O N S
Cut 1 (one) 13" square of fabric A
Cut 4 (four) 1½"×19½" strips of fabric A
Cut 1 (one) 16½" square of fabric B
Cut 1 (one) 14½" square of fabric B
Cut 3 (three) 1½"×22" strips of fabric C
Cut 1 (one) 10½" square of fabric C
Cut 1 (one) 13" square of Steam a Seam 2 interfacing
Cut 1 (one) 10½" square of Steam a Seam 2 interfacing -
 Step 2
Step 1. Trace template on fabric
Fold a 10" square piece of paper in half to make a
rectangle. Fold the rectangle again in half lengthwise to
make a 5" square.
• Using the “small petals” template to full size (provided
on the last page of the pattern instructions), cut it on the
line.
• Align the 90° angle of the paper
template with the CENTER
of the double folded paper.
Pin together all paper layers.
• Cut on the line again, following the template. Unfold
the paper, revealing the final template.
• Trace the final template on one side of the 10½" interfacing
square.
• Peel the paper of the interfacing (on the opposite
side that you traced) and fuse it to the WRONG side
of 10½" fabric C square. Following the interfacing
manufacturer’s instructions.
• Cut through the line, and set piece aside.
• Repeat previous steps with a 12½" square piece of
paper, the “big petals” template and the corresponding
13" fabric A and interfacing squares -
 Step 3
Step 2. Construct front unit of pillow
Pin together all paper layers.
• Cut on the line again, following the template. Unfold
the paper, revealing the final template.
• Trace the final template on one side of the 10½" interfacing
square.
• Peel the paper of the interfacing (on the opposite
side that you traced) and fuse it to the WRONG side
of 10½" fabric C square. Following the interfacing
manufacturer’s instructions.
• Cut through the line, and set piece aside.
• Repeat previous steps with a 12½" square piece of
paper, the “big petals” template and the corresponding
13" fabric A and interfacing squares -
 Step 4
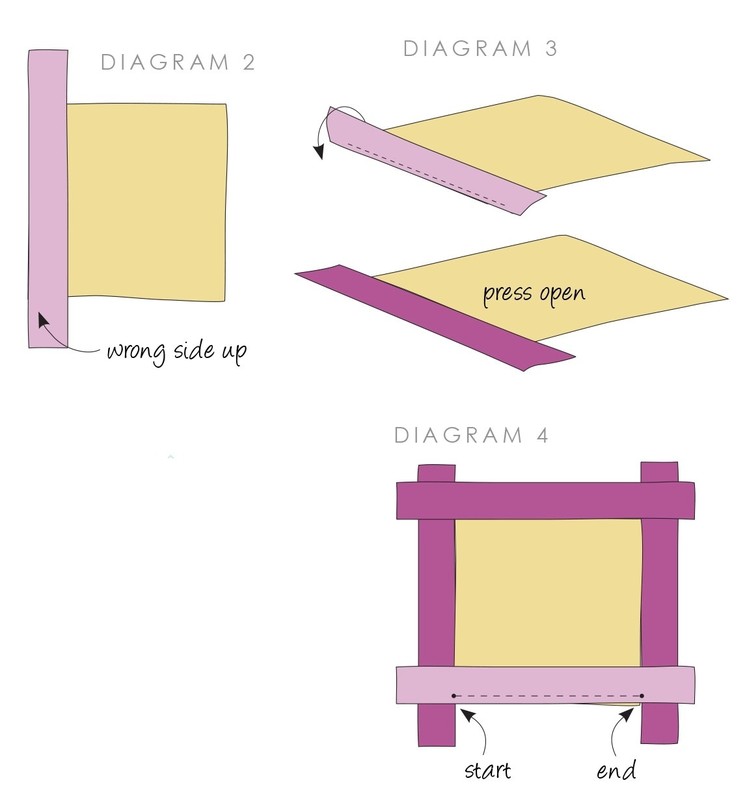
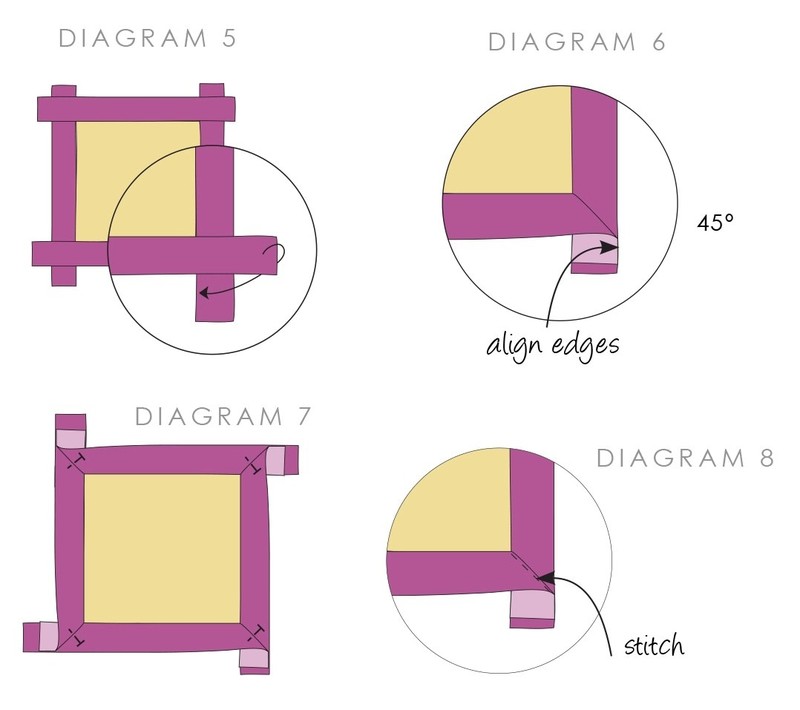
Step 3. Create miter corners
• Grab the front unit you previously created. Place it
on your ironing board RIGHT side up.
• Working from the bottom right corner, pull down
one end of the top strip, folding it inwards toward
the edge of the bottom strip.(DIAGRAM 5)
• Make sure the two edges are aligned and the fold
makes a 45˚ angle. Press. (DIAGRAM 6) Pin over
the diagonal fold.
• Repeat previous steps with the other 3 corners.
(DIAGRAM 7) Edge stitch each of the diagonals
1/8” from the fold. (DIAGRAM 8)
• Working from the wrong side of the unit, trim excess
fabric from each corner, to a ¼” of the seam. Press
Step 4. Add flowers to front unit
Place the unit previously created unit on your ironing
board, RIGHT side up.
• Center the fabric A flower RIGHT side up on top of the
pillow unit. Remove the other side paper. Fuse it following
the interfacing manufacturer’s instructions.
• Now, center and fuse the fabric C flower, rotating it a
little bit to allow the other petals to show.
• To protect the raw edges of the fabric, make applique
or decorative stitch around the entire perimeter
of the flower or petals. -
 Step 5
Step 5. Make rounded corners
On the wrong side of the front unit, measure and mark
1¼" from one corner (down, and then to the right), and
½" inwards, toward the center of the square.
• Connect dots with a pencil, and cut through the line.
(DIAGRAM 9)
• Repeat on remaining corners and also on the 16½" fabric
B square (back of the pillow). Set pieces aside.
Step 3. Create miter corners
Step 4. Add flowers to front unitStep 6. Make piping piece
• Join three 1½"×22” fabric C strips together on the short
sides, with a ¼" seam allowance. Press seams open.
• Lay this long strip flat, RIGHT side down. Place the
cording piece along the center, aligning the beginning
of both.
• Wrap the fabric around the cording as you work.
Using your zipper foot attachment for your sewing
machine, baste down the entire length of the strip
roughly 1₈" from the fabric edge to make the piping. -
 Step 6
Step 7. Attach piping cord
• Place the front unit (the one with the fused flowers)
RIGHT side up. Pin the piping piece around the sides,
with raw edges aligning.
• With the piping or zipper foot on the machine, stitch
the piping piece to the fabric slightly ¼" from the
edge. Begin stitching on the middle of one pillow side
leaving a loose tail on the piping of about 1".
• Remove pins as you stitch. When you get close to a
corner, stop stitching and make two slits on the piping
fabric (exactly on the corner) with a pair of scissors a
bit less than ¼” deep (be careful not to cut into the
stitching line). This step is to help you pivot 90° your
stitching on each corner.
• Stitch all the way around and stop 1” before the meeting
point. Unwrap the fabric covering the cord. Overlap
the ending tail over the starting tail and cut the
excess piece where they meet. Wrap the fabric back
again and cut it ½" passing the cord. Fold the end ¼"
inwards and wrap over the starting tail. Make sure the
fabric covers the piping cord. Stitch the open section
and backstitch both ends to secure.
• Keep this unit RIGHT side up, place the 16½" fabric
B square on top (RIGHT side down). With raw edges
aligned, start sewing with ¼" seam, sandwiching the
piping.
• Sew all the way around, starting from one of the sides,
and leaving a 4" opening to insert the pillow form.
(DIAGRAM 10)
• Turn the pillow right side
out and insert the pillow
form, and close by
hand.