


About
Gold Rush Bolero
You will need:
- Material (preferably a bit stretchy)
- An old tshirt, or jersey or stretch knit for edging
- Chalk
- Scissors
- Pins
- Sewing Machine! Though you can handsew if you wanted.
-
 C.Rami favorited Gold Rush Bolero
19 Oct 20:18
C.Rami favorited Gold Rush Bolero
19 Oct 20:18
-
 cristinakilljoyway favorited Gold Rush Bolero
24 Jan 17:11
cristinakilljoyway favorited Gold Rush Bolero
24 Jan 17:11
-
 Meg Blattner favorited Gold Rush Bolero
08 Dec 19:12
Meg Blattner favorited Gold Rush Bolero
08 Dec 19:12
-
 AXYL favorited Gold Rush Bolero
01 Dec 07:01
AXYL favorited Gold Rush Bolero
01 Dec 07:01
You Will Need
-
 Step 1
Find a shirt that fits you well, you will use this to make a bit of a pattern. I used a shirt that I know is a little big for me, and chose it because it has sleeves that are ruffled a little. Sorry I don’t have pictures for this- I only decided to make a tutorial halfway through making the bolero.
MAKING SURE(!!) that the stretch is horizontal to your shirt, trace around the back of the tshirt, leaving a seam allowance. I make mine 1cm-1.5cm depending on the material. Since the stuff I used was really stretchy and I’ve never worked with it before, I left 1.5cm.
-
 Step 2
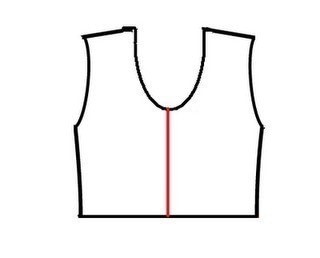
Trace around the front part of the shirt, again leaving a seam allowance. You’ll probably want to adjust the collar at the front. I cut out a nice deep scoop neckline at the front. Like in my crappy picture below!
Since I didn’t want my bolero to actually button up at the front- I just wanted it to hang open- I just cut exactly up the middle of the front. If you want yours to button up at the front, you will need to add a few more centimetres at the front, obviously do this BEFORE cutting. A good way to judge how much you have to add is to hold the shirt you are using as a pattern against you; put the armpit seams in your armpits, and measure how much the shirt stretches to cover your boobs.
-
 Step 3
Sew the sides and the back of the bolero together, then the shoulder seams. Make sure you’re sewing the right sides of the fabric together! Try it on, and make sure that the arm holes aren’t wonky or cutting into you. If you used a really stretchy tshirt as your pattern base, you may find that you need to cut a little more out from the arm holes. If you need to do this, remember to KEEP IT IN MIND when your cutting out your sleeves. Otherwise they won’t match up!
-
 Step 4
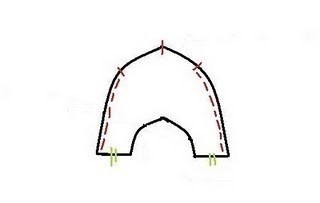
Time for the sleeves. Lay your tshirt that you’re copying the shape of on you fabric and trace around it. Make sure to leave your seam allowance around the bottom edges. For ruffled sleeves (I think they may be called muttontop sleeves? But I don’t care) you need to make the sleeve about 4cm longer at the top (more than 4cm if you want more ruffly thingies). You’ll also need to alter the new top of the sleeve- make it a little flatter; less curving.
-
Step 5
Sew the sleeve closed- match up the green lines on the picture for Step 4.
-
 Step 6
Pin the sleeves to the bodice, starting at the armpit seam. Pin up (pins are the little red lines!) one side and finish 6-10cm from the shoulder seam. Do the same for the other side of the same sleeve. See the picture below if you’re getting a bit lost (I’m just using a picture of the sleeve before it’s sewn together just because it’s easier).
Also put one pin in at the top, joining the very middle of the top of the sleeve with the shoulder seam of the bolero. Then, make your ruffles by finding the middle of each section and pinning, until you're satisfied with the ruffles. If you don’t know how to gather like this, there are some good tutorials out there.
Sew all the ruffles/gathering down by sewing the sleeve to the bolero! -
 Step 7
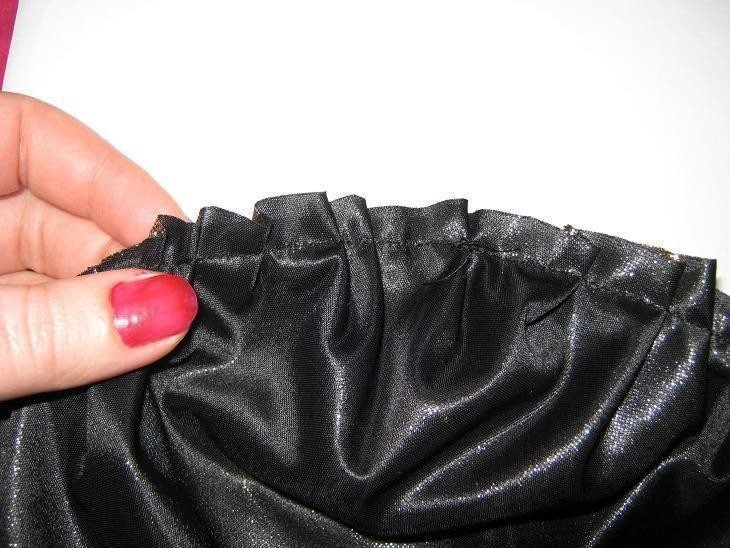
Sew all the ruffles/gathering down by sewing the sleeve to the bolero! It should look like this.
-
 Step 8
Try the bolero on! If you don't like the length you can make it shorter at this stage. If you’re finding that the sleeves are a little tight you can solve this by taking some of the length off them.
(Left: sleeves that are a little toooooo tight- just cut a few cm from them and it should sort itself out)
-
 Step 9
Edging: cut strips from your old tshirt/stretch knit to use as edging. I wanted edging about 2cm wide. So I cut my strips 5.5cm wide- 4cm + 1.5cm for seam allowance.
Iron the strip in half, right-side out. Then tuck in the raw edges (a little less than 1cm) and iron that down too.Sandwich the raw edge of the bolero inside the edging material and sew. Pin it first though, otherwise it could get ugly!
Sorry I don't have a photo of this step. If you get confused you can message me about it.
Edge the sleeves first, then the collar, then the bottom edge, and then the front edges. It's neater that way. Your edging should look something like this <-


Comments


