About
If the hallway to your apartment is pitch black at night like mine and you end up struggling to find the right key, this DIY is for you!
At night the entry way for my place is completely dark, and I'm often to lazy to turn on the light, which is some distance away and takes a few seconds to turn on (palace, my place, really). I love to craft and always wanted to decorate my keys somehow, and since I had some glow in the dark paint around, I thought I would put it to use for practical purposes! Now I don't need to fish around for the light while heading into my place, i can easily tell which key I need to open the door!
NOTE: since the tops of my keys are different shapes and sizes, I didn't need to make them distinguishable in the dark. If yours all look similar, you may want to use washi tape/pretty paper/something else that will cover the paint in order to make differing designs/patterns in order to make the glowing bits distinguishable in the dark.
-
 Kaliya favorited Glow In The Dark Diy Key Coverings
19 Jan 23:32
Kaliya favorited Glow In The Dark Diy Key Coverings
19 Jan 23:32
-
 Hydie Linn T. favorited Glow In The Dark Diy Key Coverings
11 Sep 23:11
Hydie Linn T. favorited Glow In The Dark Diy Key Coverings
11 Sep 23:11
-
 this one laydi favorited Glow In The Dark Diy Key Coverings
06 Apr 22:01
this one laydi favorited Glow In The Dark Diy Key Coverings
06 Apr 22:01
-
 Jessica S. added Glow In The Dark Diy Key Coverings to How To
27 Jan 10:45
Jessica S. added Glow In The Dark Diy Key Coverings to How To
27 Jan 10:45
-
 Knee Key published their project Glow In The Dark Diy Key Coverings
03 Jan 13:26
Knee Key published their project Glow In The Dark Diy Key Coverings
03 Jan 13:26
-
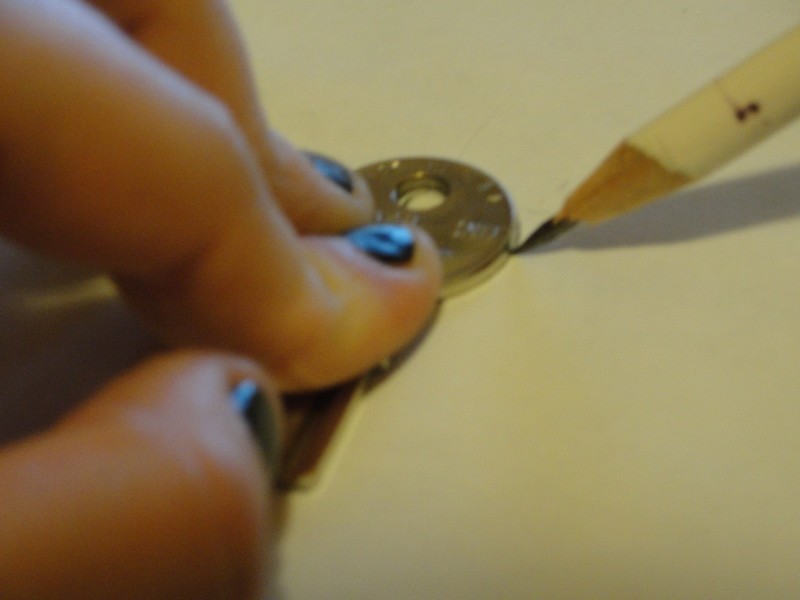
 Step 1
Begin by tracing the tops of each key that you want to paint using the pencil and paper. If you want to cover one side, only trace once, but if you want to cover both, turn the key over and trace the other side as well (should be the same so don't necessarily have to turn over, but may be useful to hide pencil marks!)
-
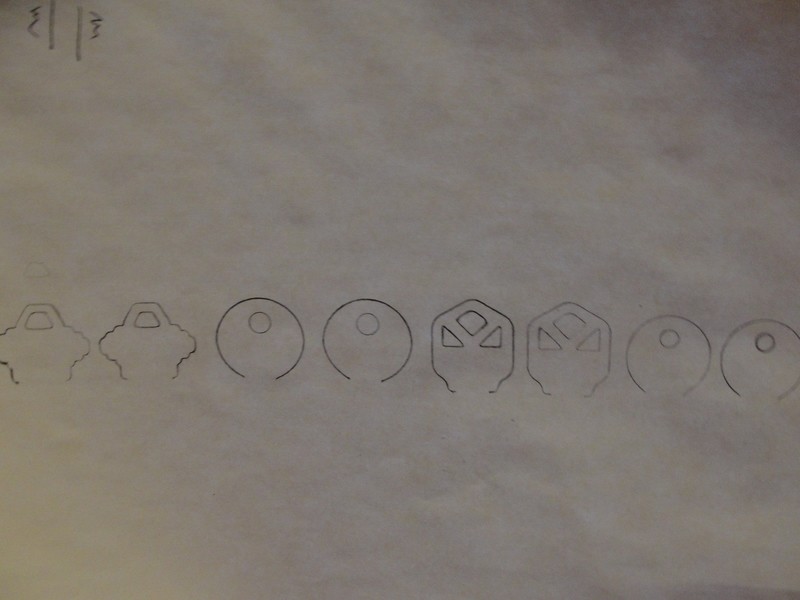
 Step 2
Continue until you've traced each of the keys you will be glowifying.
-
 Step 3
Use the exacto knife to carefully and precisely cut out each key shape along the pencil marks. Slice a straight line on the bottom where you could not trace. Make sure you cut the holes where the keys will go through as well!
-
 Step 4
Once all the shapes are cut out and separated from the paper, get them ready next to the key's you will be using. Take one of your keys and use the paintbrush to coat one side in Mod Podge, and apply the shape.
-
 Step 5
Repeat the application of Mod Podge and shape to the other side of the key. Smooth out bubbles from both sides, align the shape and key, and press them down to set in place.
Repeat this process for each of the keys until they are all covered in paper.
-
 Step 6
You might find that after gluing them, the edges of the paper may still be poking out, or maybe some dried Mod Podge is visible on the sides of the keys.
Once the keys have dried, use your exacto knife (or sandpaper if you have some) to polish the edges as much as you can. Repeat for all the keys.
-
 Step 7
Now comes the fun part--decorating! Paint each of the key paper coverings with your glow in the dark paint, in several coats so it's nice and visible!
Once they're dry, you may want to test them in the dark to see how well they glow. If some glow better than others, you can paint them again.
-
 Step 8
Once the glow in the dark paint has dried, you might want to add some pizzazz to the keys using nail polish! But take care not to use polish that is opaque or you'll cover up the glow effects! I recommend nail polish that is clear with glitters, and matches the paint or complements it! If you don't want to add pizzazz, I would still recommend painting them with clear polish to finish--the paint has a rough and unfinished look/texture.
-
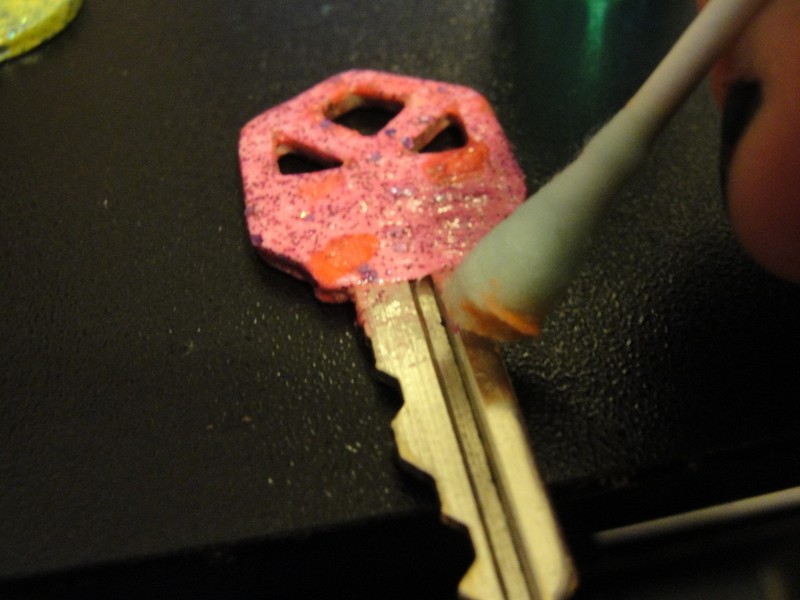
 Step 9
Let the keys dry. Then use the nail polish remover and Q Tips to scrub off any paint or nail polish that got on the rest of your keys.
And you're done!! :) Enjoy, and please post up pictures of your versions; I would love to see them!