


About
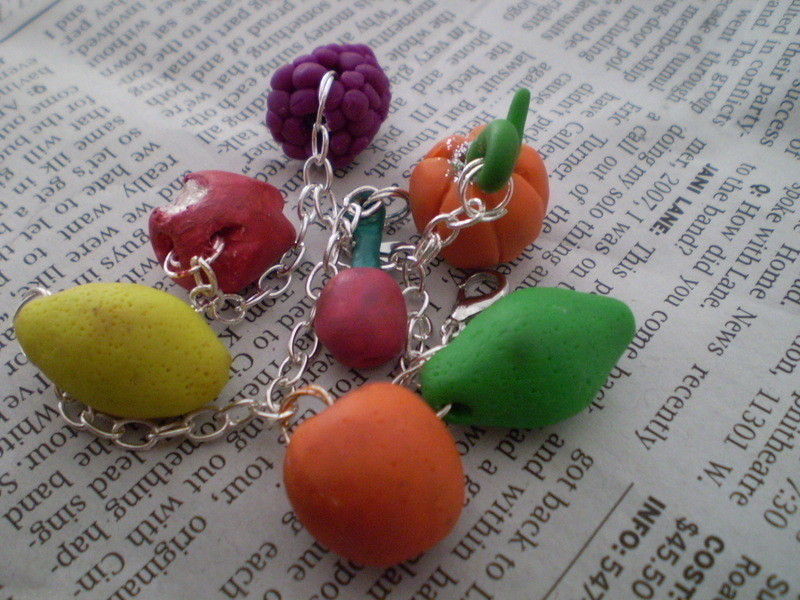
Using Clay, and the Basic Bracelet Necessities, Make a One of a Kind Charm Bracelet.
I got the idea from the Poly Apples by Em. E.
I saw her apple, with a bite out of it, and I KNEW I had to make a favorites fruit charm bracelet... it just came into my head. So I went out to michaels today, got some chain, some Premo clay [a knockoff of fimo], got some hooks, new needlenose pliers, and some split rings [kinda like a slip ring, they work the same], and that was that.
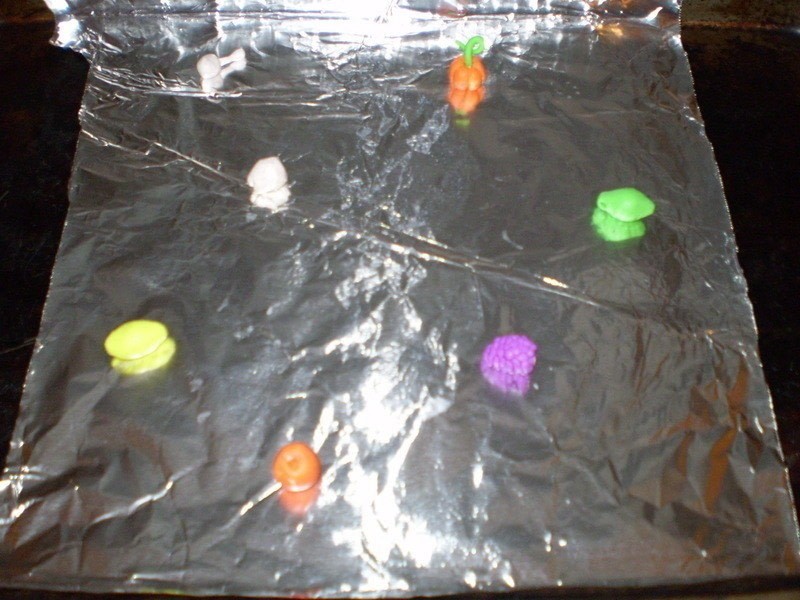
OOPS! On some of the pictures, and throughout the how-to, there is no grape...
I found out that when I was Putting all the charms on, the grapes had rolled under the bed and I haddn't even noticed. Well I just fixed it, I moved all the charms a few places to they were seperated equally, and its all good.
-
 Sprinklez favorited Fruity Charm Bracelet From Scratch
21 Jun 20:16
Sprinklez favorited Fruity Charm Bracelet From Scratch
21 Jun 20:16
-
 DIS.AR.RAY entered her project Fruity Charm Bracelet From Scratch to Mix Tape Zine
03 Aug 10:04
DIS.AR.RAY entered her project Fruity Charm Bracelet From Scratch to Mix Tape Zine
03 Aug 10:04
You Will Need
-
 Step 1
First, get whatever color baking clay you need to make your fruits or whatever you want, or white if you'd rather paint them. Then, mold the fruits into shapes. I used a safety pin, and the backend of a thin paintbrush.
Grapes : round up a small piece of purple clay, mold it into a pear shape. Start rolling tiny tiny pieces of purple clay into little balls and the smallest ones, smoosh lightly onto the larger part of the "pear" shape [the bigger grapes on the bottom]. Do this until the "pear" is full. Then, with your safety pin, poke a small hole between to of the smaller grapes, and angle it up towards the top of the grape bundle. Then gently wiggle the safety pin until you have a large enough hole for a split ring.
Cherry : Roll a smallish ball of red clay, then take your paintbrush and poke a hole in what is now the top of your cherry, deep enough to set the stem in. Take a piece of green clay, roll it up, then roll it into a stem. Take the end, then twist it around to create a "9" shape, then gentle smooth the end with the rest of the clay. Be sure to make the hole big enough for a split ring. Then, push the other end into the hole in your cherry, and with your safety pin, gently push the stem farther into the cherry, making them more stable.
Apple: If you want a bite, round up a piece of white clay, if you don't, use red [or green I suppose], then gently make one side a bit thinner. Poke a hole in the top with the end of your paintbrush, and round off the edges. Take your safety pin, and with the side, pake a small indentation at the bottom to create the bottom two "legs" of the apple. Shape how you'd like.
Then take your nails, and pull a TINY chunk out of the side of the top of the soon-to-be apple, and that will be your bite mark [so if you don't want a bite, don't do this]then, opposite the bite, make a tiny hole with your safety pin from the top hole, to the side, not to far away to slip a split ring in.
Lemon/Lime : Roll the Green or Yellow clay into a ball, and slowly start making the ends smaller and longer, slightly football shaped. At one end, punch a hole with your saftey pin through the smallest part of the end. Gently wiggle it to great a good sized hole for the split ring. If you want [its what I did] you can take your safety pin, and poke tiny itty bitty little holes everywhere , close together, to make the skin of the Lemon/Lime more real, the texture.
Orange : Ball up some orange clay, poke a hole with the end of your paintbrush 1/4th the way down. Round off the edges of the hole to make it less severe. Then, with your safety pin, poke a hole from that larger hole, into the side of the orange, not to far away from large hole, so you can fit the split ring there. Then, for texture again, you can poke tiny tiny little holes with your safety pin all over, for the texture and so on
Pumpkin : This is the hardest, at least for me. Round up some orange clay, then make small holes where your safety pin where the top and bottem are. At the top, use your paintbrush to make the hole for your stem to go into. Round off the corners to create a less severe look. Then, with your safety pin, draw two lines, opposite eachother, from the top hole, to the bottom. Make them slightly deep, and round them off. In between these two draw two lines on one side, and two more on the other. Make them just as deep, and round them off as well. You should have six "wedge" type things. Then roll up some green clay into a line and have one side a little thinner than the other. Creat a loop-de-loop with the stem, then stick the thicker side into the large hole on the pumpkin. Gently push the stem farther in with your safety pin to secure it. Make sure your loop-de-loop is thin enough to be able to hole a split ring.
And those are all the fruits I did.
-
 Step 2
Then, preheat your oven to 275 degrees, and for every 6mm of thickness, bake it for 30 minutes. Try not to overbake it!
-
 Step 3
Take them out of the oven [Don't forget to turn the oven off! :D ] and let cool for around 5 minutes. They should be nice and hard.
If you make your apple with a bite mark, paint your apple red or green, but be carefull around the edges of the bite. If you want, You can take some slightly offwhite paint, and paint the edges of the inside of the bite, giving it the left-out apple look :D
Slip the split hooks into place
-
 Step 4
Take your chain, and cut it off to wear it will fit comfortable on your wrist, but not fall off. Open up the end ring with your needlenose pliers to attach the clip and hook.
Then, take six [or however many charms you have] more rings from the chain [NOT the chain you just attached the clips to]
-
 Step 5
Honestly, you can just eyeball it, but I am too much of a perfectionist.
Count how many rings are in your chain on your bracelet, then divide by the number of charms. My number was 8, so I’ll go with that. Apply a charm to every 8 rings. For the first one, I hooked the charm onto the ring 4 away from the end, so I wouldn’t end up hooking the last charm into the hook that holds the clip.
Take one hook from off the 6 extra you have, open it, hook it onto the split hook attached to a charm, then to the designated ring on your charm. Do this for all of your charms. -
 Step 6
VOILA! You have your very own, handmade, fruity charm bracelet.


Btw I dont think premo is a fimo knock off lol just similar names