


About
a new twist on the friendship bracelet!
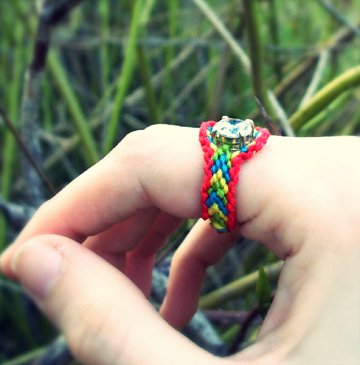
These are my kind of friendship bracelets; they've got major sparkle! I love how Frieda and Nellie incorporate gems into their designs, which adds another dimension to these bracelets; it instantly makes them more elegant!
I knew I could make a tutorial for these. However, I didn't want to spend hours knotting to make a bracelet, so I made a ring! What's great about making rings is that they come together way quicker than a bracelet, which means you have time to make more!
Tags
-
 A for ALIEN!! favorited Frieda And Nellie Friendship Ring
06 Apr 11:31
A for ALIEN!! favorited Frieda And Nellie Friendship Ring
06 Apr 11:31
-
 mykki favorited Frieda And Nellie Friendship Ring
17 Jan 21:30
mykki favorited Frieda And Nellie Friendship Ring
17 Jan 21:30
-
 SilverLupe favorited Frieda And Nellie Friendship Ring
05 Dec 03:17
SilverLupe favorited Frieda And Nellie Friendship Ring
05 Dec 03:17
-
 zombieminna favorited Frieda And Nellie Friendship Ring
17 Oct 17:22
zombieminna favorited Frieda And Nellie Friendship Ring
17 Oct 17:22
-
 zoegirl221 added Frieda And Nellie Friendship Ring to Jewelry
20 Jul 06:29
zoegirl221 added Frieda And Nellie Friendship Ring to Jewelry
20 Jul 06:29
-
 reneedarnell favorited Frieda And Nellie Friendship Ring
07 Jan 23:13
reneedarnell favorited Frieda And Nellie Friendship Ring
07 Jan 23:13
-
 victoria.joneskeeling favorited Frieda And Nellie Friendship Ring
24 Nov 17:42
victoria.joneskeeling favorited Frieda And Nellie Friendship Ring
24 Nov 17:42
-
 ribbit D. favorited Frieda And Nellie Friendship Ring
12 Nov 04:10
ribbit D. favorited Frieda And Nellie Friendship Ring
12 Nov 04:10
-
 aviiry G. favorited Frieda And Nellie Friendship Ring
14 Oct 21:16
aviiry G. favorited Frieda And Nellie Friendship Ring
14 Oct 21:16
-
cat g. favorited Frieda And Nellie Friendship Ring
27 Jul 19:39
You Will Need
-
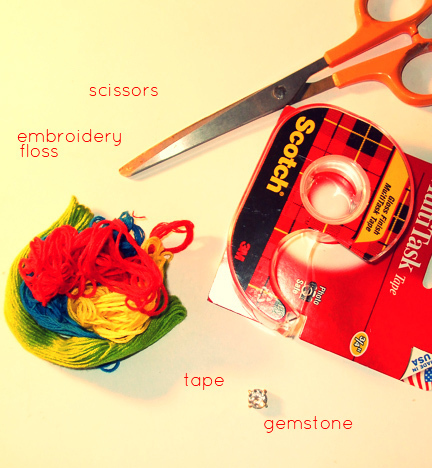
 Step 1
Step 1: Gather materials. Needed are scissors, four colors of embroidery floss, tape, and a gemstone with a setting; I got mine from a broken necklace.
-
 Step 2
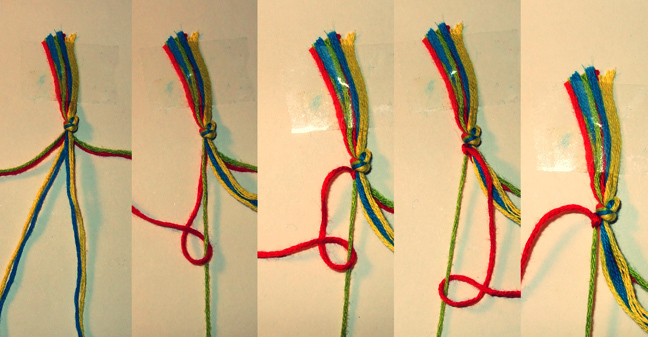
Step 2: You will need to cut two 3' lengths of each color of thread. This should be enough thread for you, I had some left over at the end. If you have a bigger ring size use a little more thread though.
Tie all the lengths together at the top with an overhand knot. Tape down.
For the sake of this tutorial, I will label threads R (red thread) G (green thread) Y (yellow thread) and B (blue thread). If you are using different colors, just assign these names to them as well to not confuse yourself!
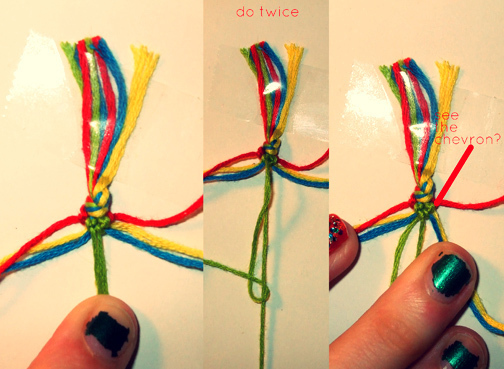
Arrange the threads: R, G, Y, B, 2B, 2Y, 2G, 2R.Step 2.5: Take R, bring over G, then behind G and through that loop to the left and front (second pic). Pull tight to make a knot. Now, take R, bring over G but bring thread to the right and front (third pic). Pull tight again. It should look like the last pic, with the thread naturally ending up on the left side of G again.
-
 Step 3
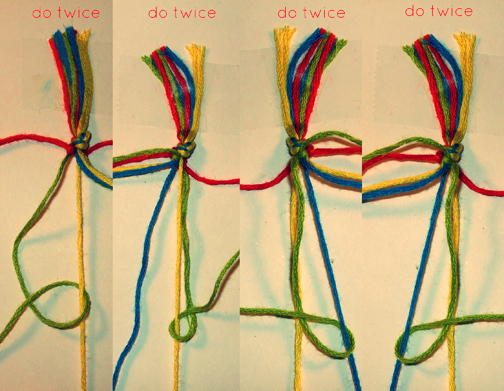
Step 3: Now, you will be doing this same sequence but with 2R and 2G. Take 2R, bring over then behind 2G but bring thread to the right and front. Pull tight. Take 2R, bring over then behind 2G but bring thread to the left and front (second pic). This is the exact same thing you did in the last step, but the directions are reversed. Pull tight. You should have the last pic, with 2R naturally falling to the right of 2G.
-
 Step 4
Step 4: Take G, bring over and then behind Y, through that loop to the left and front. Repeat.
Take 2G, bring over and behind and through the loop 2Y to the right and front. Repeat.
Take G, bring over and behind and through the loop B to the left and front. Repeat.
Take 2G, bring over and behind and through 2B to the right and front. Repeat. -
 Step 5
Step 5: You should have something that looks like this first pic. Then, take G, bring over and behind 2G to the left and front. Repeat.
You should have one complete chevron, looking like a V-shape. See the last pic? -
 Step 6
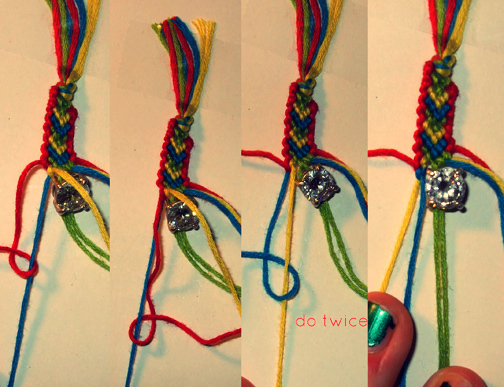
Step 6: Now, we will repeat steps 2.5 through 5. However, instead of knotting the G's all the way across the other threads, since the yellows are next to the outer red thread (you will NEVER knot reds across any other threads than the one next to them; they are your outlines for your ring), we will knot across the threads with yellows. Start by knotting R and 2R in the way of step 2.5, but knotting on the yellows next to them instead of greens. Continue with the steps, but use Y and 2Y in place of G and 2G.
You will be knotting both Y's over blues first, then greens. Remember to finish the yellow chevron in the manner of Step 5. Your completed chevron should look like the first pic.
Keep repeating steps 2.5 through 5, changing out the color names as needed. Your next chevron will use the reds to outline (as always), then the blues to knot the chevron (second pic).
Then, it will be back to reds for outline and green for the chevron.
Keep with the pattern until you are at about halfway of the length you need for the ring.
Take the two center threads (in this case, it's greens) and thread on your gem, through the bottom of the setting. Look at the last pic for reference. -
 Step 7
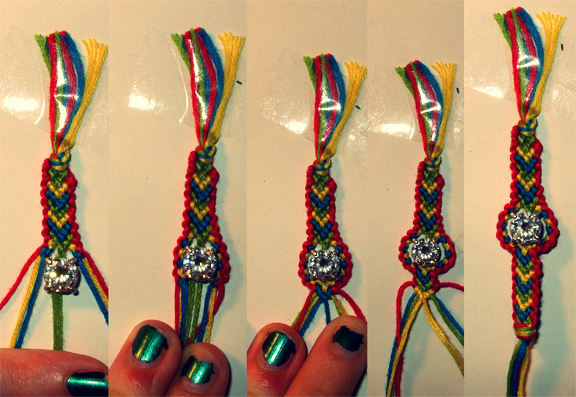
Step 7: Take R, bring over and behind Y to the left and font, pull tight to make a knot. Bring R over and behind Y to the right and front, pull tight.
Take Y, bring over and behind B then thru loop to left and front. Repeat.
Take R again, but now over and behind B to the left and font, pull tight to make a knot. Bring R over and behind B and thru loop to the right and front, pull tight.
Take B, bring over and behind Y then thru loop to left and front. Repeat. You should have something looking like the last pic. -
 Step 8
Step 8: Now repeat step 7, but working with 2R, 2Y and 2B. This is how the knots will go.
Take 2R, bring over and behind 2Y to the right and font, pull tight to make a knot. Bring 2R over and behind 2Y to the left and front, pull tight.
Take 2Y, bring over and behind B then thru loop to right and front. Repeat.
Take 2R again, but now over and behind 2B to the right and font, pull tight to make a knot. Bring 2R over and behind 2B and thru loop to the left and front, pull tight.
Take 2B, bring over and behind 2Y then thru loop to right and front. Repeat.
Yours should look like the first pic.
Repeat steps 7 and 8 until you have long enough knotted pieces so that the gem can be encased (second pic.)
Now, to close in the gem, continue with our original chevron knotting pattern, which starts back in Step 2.5. Remember, you may have to substitute the color names depending on what thread you end up re-beginning the chevron with, but always knot the thread to the one directly next to it.You will be back to knotting chevrons just like before, which will hold the gem in place (pic 3 and 4).
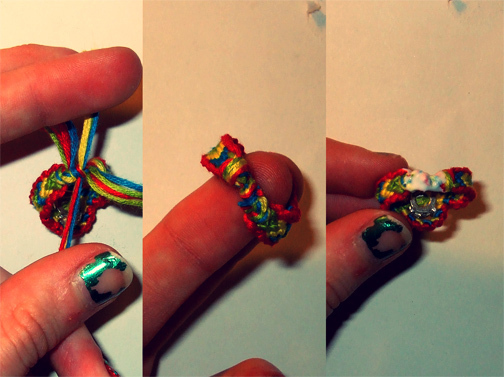
Keep with the chevron pattern till the ring is long enough to fit around your finger. Once long enough, overhand knot all threads to secure. -
 Step 9
Step 9: Finishing. Tie both ends together, cut, and glue this knot.


Amazing