


About
The beauty you could produce with a little patience and imagination:) AND ITS LIKE A PEACOCK ON YOUR FINGER!! ;D
This is my first project so bear with me! However, it's been my favorite thing that I've created so far. I was pleasantly surprised at how much I liked it when I was finished. I took alot of time, yes, but it allowed me to freeform and use my imagination to make it look as good as it did. Have fun! Any questions, comment or message me, and please leave your comments on what you think :)
-
 Key West Witch added Freeform Multibead Wire Ring to Rings
30 Jun 07:34
Key West Witch added Freeform Multibead Wire Ring to Rings
30 Jun 07:34
-
 Kathy C. favorited Freeform Multibead Wire Ring
13 Dec 07:21
Kathy C. favorited Freeform Multibead Wire Ring
13 Dec 07:21
-
 Shula G. added Freeform Multibead Wire Ring to wire rings
02 Sep 22:44
Shula G. added Freeform Multibead Wire Ring to wire rings
02 Sep 22:44
-
Shula G. favorited Freeform Multibead Wire Ring
02 Sep 22:44
-
 Werk.eht.bro favorited Freeform Multibead Wire Ring
10 Jun 22:16
Werk.eht.bro favorited Freeform Multibead Wire Ring
10 Jun 22:16
-
 Danielle M. added Freeform Multibead Wire Ring to Rings
11 May 06:23
Danielle M. added Freeform Multibead Wire Ring to Rings
11 May 06:23
-
 Sara M. added Freeform Multibead Wire Ring to jewlery
17 Dec 06:26
Sara M. added Freeform Multibead Wire Ring to jewlery
17 Dec 06:26
-
Sara M. favorited Freeform Multibead Wire Ring
17 Dec 06:25
-
 Conner W. added Freeform Multibead Wire Ring to gift ideas
31 Jul 21:00
Conner W. added Freeform Multibead Wire Ring to gift ideas
31 Jul 21:00
-
Conner W. added Freeform Multibead Wire Ring to craft ideas
31 Jul 21:00
You Will Need
-
 Step 1
To start the project off, you need any kind of beads you wouold like to use (I used 4 different colors; clear, pearl, gold, and blueish), scissors, white string, beading wire(thick enough to twist), superglue, and small needlenose pliers.
-
Step 2
Cut a long piece of wire string to use as the ring itself. I would recommend using about an inch and a half just to be safe.
You can never have enough, but it's easy to have too little.
-
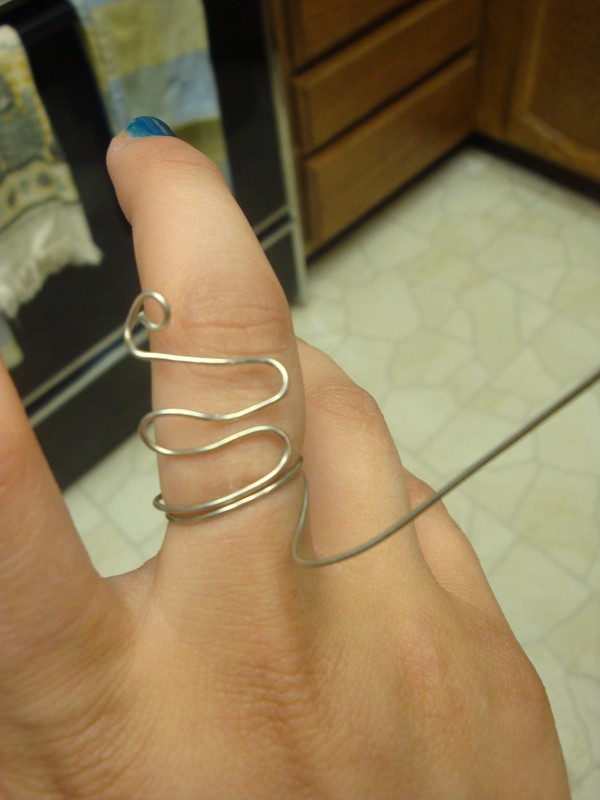
 Step 3
Start at the tip of the ring that won't be around your finger. This gives you the freedom to mold it without messing up the circular part.
It can be any design you want, and it does not have to be perfect right away, just something you can work with.
-
 Step 4
When you are done molding the wire into the shapes you would like, wrap the remaining wire around you finger two or three times, and stop wrapping at the center of your finger on the top side.
Cut the remaining wire you do not wish to use.
-
Step 5
Mold the wire so that there are no more creases and dents and make it smooth.
It doesnt need to be completely perfect since most of it will be hidden by beads anyway.
-
 Step 6
Slightly undo the swirled top part of the ring, and attach a bead to the tip. Secure it with superglue.
At the bottom part of the ring, add another bead.
-
 Step 7
Now the fun creative part kicks in!
This part is a little more tricky, but just play around with it until you get what you like.I started with the middle loop:
1) with the thread, secure it in the spot you want to start with by making a knot and adding a drop of super glue.
2) slide on the ball you want.
3) With the rest of the thread, loop it around the closest part of metal to the ball on the oppisite side of where you originally knotted it.
4) once looped, secure it with another dab of super glue.Contine this with the next bead and until you are content.
-
Step 8
Repeat the last step on the next couple of loops.
-
 Step 9
Enjoy :)


Braidenstone
Thanks's for sharing it.