


About
DIY Fashionista
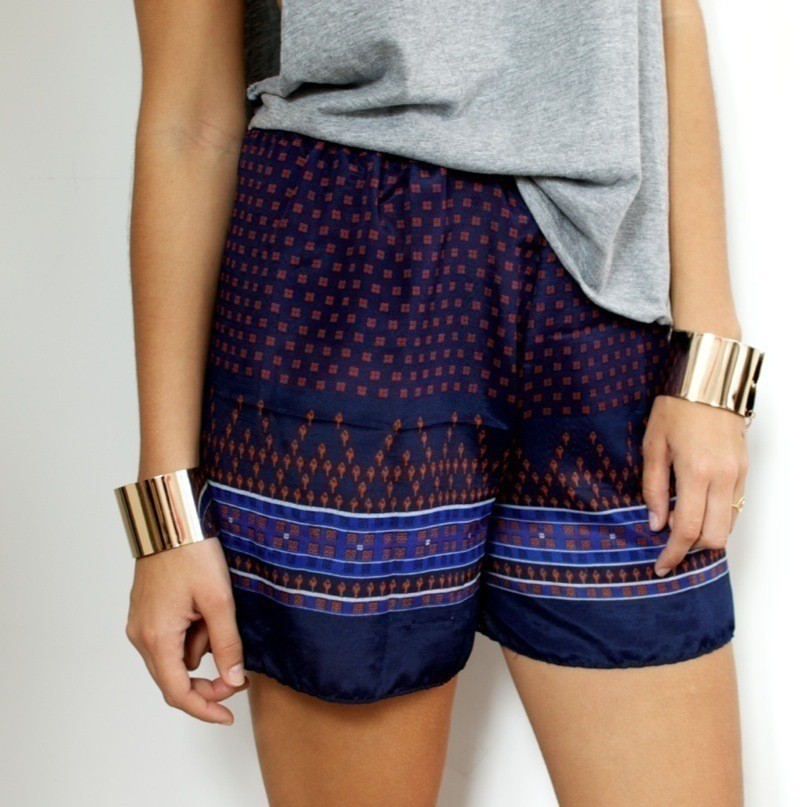
Wear It: Let the floral print blossom by styling this pretty pair with a simple white T-shirt and blazer.
Every season, printed fabrics and patterns take centre stage in some shape or form. Whether delicate paisley prints or oversized checks, designers the world over inte- grate them into collection after collection. This project will show you how to create a pair of chic shorts that can easily be recreated in on-trend fabrics with every season change.
Making a pair of elasticated shorts is an entry-level sewing project that’s simple enough for even the most amateur sewing-machine user to try. Once made in a printed fabric and embellished with lace, pom-poms or anything else you choose, these shorts take on a life of their own and integrate easily into any fashionista’s summer wardrobe.
The concept of working with a pattern can be daunting, so in this project you make a simple pattern out of a pair of shorts you already own – no complicated in- structions or searching for your size on the pattern sheet. And because the pattern is made from something you already wear, you know it will fit you perfectly.
Tip: I recommend using a sewing machine for this project. Beg, borrow or steal – this project is worth it
Tip: If you have a selvedger, you should use that to finish the edges. If you don’t have one, use a zig-zag stitch on the raw edges of the seams to stop fraying and to reinforce them.
Tags
© 2024 Geneva Vanderzeil / Carlton Books · Reproduced with permission. · DIY Fashionista, by Geneva Vanderzeil, published by Carlton Books, available to buy from carltonbooks.co.uk.
-
 Luna D. favorited Floral Shorts
24 Apr 17:03
Luna D. favorited Floral Shorts
24 Apr 17:03
-
Rhonda G. favorited Floral Shorts
12 Sep 06:28
-
 Nunnah H. commented on Floral Shorts
19 Oct 14:39
Nunnah H. commented on Floral Shorts
19 Oct 14:39
-
 RareJewel favorited Floral Shorts
29 Mar 07:25
RareJewel favorited Floral Shorts
29 Mar 07:25
-
 Pimke added Floral Shorts to Upcycling
14 Mar 11:39
Pimke added Floral Shorts to Upcycling
14 Mar 11:39
-
 Meesh N. added Floral Shorts to Lucy Liu
23 Feb 19:44
Meesh N. added Floral Shorts to Lucy Liu
23 Feb 19:44
-
 Free Series added Floral Shorts to Stella McCartney
14 Nov 15:48
Free Series added Floral Shorts to Stella McCartney
14 Nov 15:48
-
Martha M. favorited Floral Shorts
24 Jul 13:24
-
christina c. favorited Floral Shorts
19 May 02:24
-
Maxine M. added Floral Shorts to To-make list
10 Apr 00:52
-
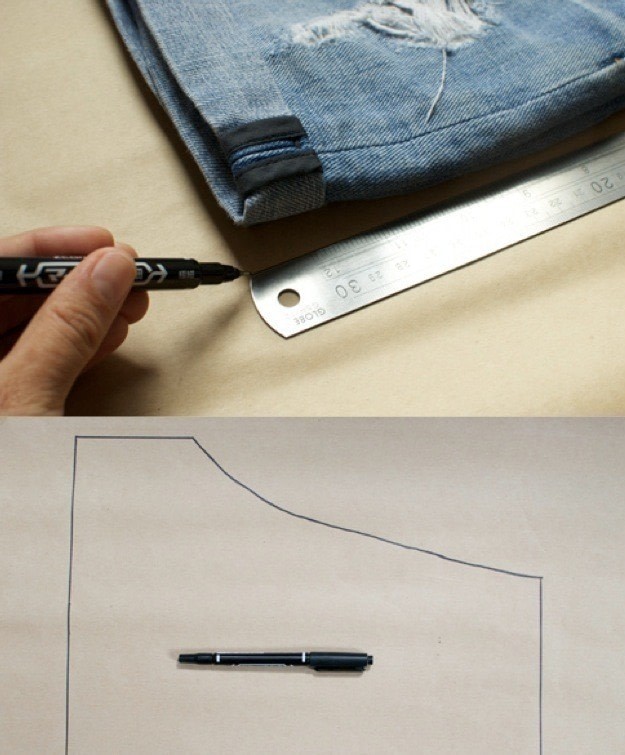
 Step 1
First make the pattern. Fold your existing shorts in half (front pockets on the outside). Lay shorts on top of craft paper and draw round them with a pen and ruler.
-
 Step 2
Add 2 cm (1 in) to the bottom and sides of the pattern, and 4 cm (11/2 in) to the top (waistband) of the pattern. Cut out the pattern.
-
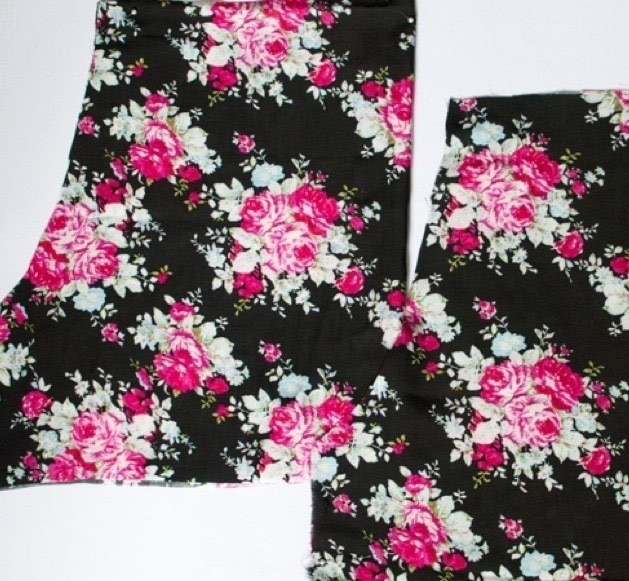
 Step 3
Fold the fabric in half, wrong sides together, bearing in mind where you want your pattern to sit. Then pin the long straight edge of the pattern along the fold.
-
 Step 4
Cut out the fabric along the pattern.
-
 Step 5
Repeat steps 3 and 4 with the second piece of fabric so you have two identical pieces.
-
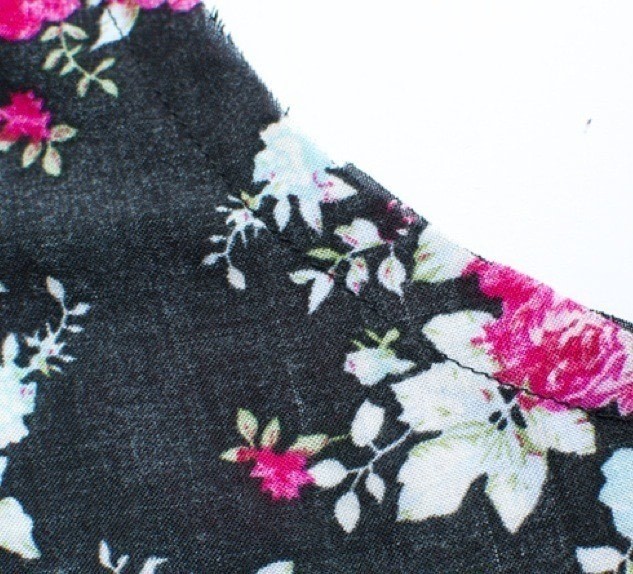
 Step 6
With right sides facing, pin the two pieces together along the two curved seams.
-
 Step 7
Machine-stitch the fabric together along the two curved edges using a straight stitch, following the pin line.
-
 Step 8
Fold the shorts so the two sewn curved seams are together. Pin and stitch the short.
-
 Step 9
Turn under a small hem along the leg openings, then press, pin and stitch to hem the leg openings.
-
 Step 10
Now open out the shorts and pin the short inside leg seams together.
-
 Step 11
To make the elasticated waistband, fold over the waistband about 3 cm (1 1/4 in) and stitch along the edge using a straight stitch, leaving a gap for the elastic.
-
 Step 12
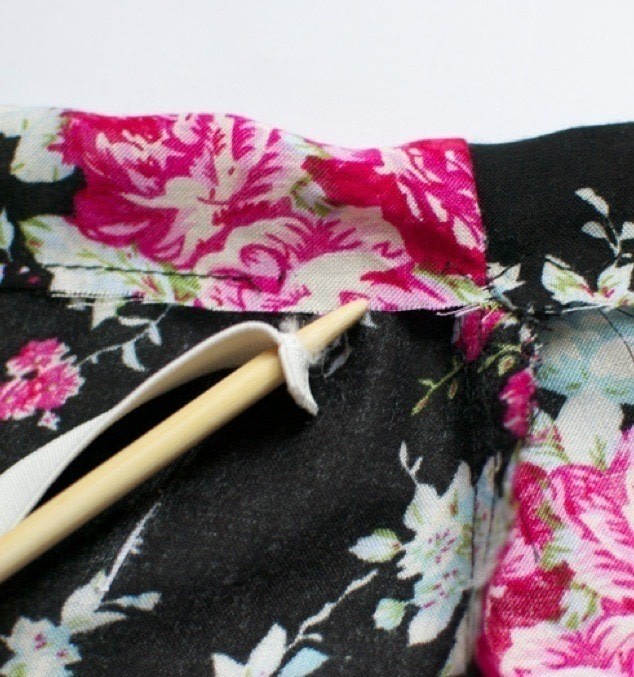
Push the elastic onto a knitting needle to make threading easier, and thread through the waistband.
-
Step 13
Stitch the elastic ends together and then close the waistband gap with a few stitches.
-
Step 14
Finally, finish all the raw edges with a zigzag stitch to reduce fraying and stop the shorts from splitting.


Comments


