About
Create a fun spring look with this floral manicure tutorial!
This floral manicure will take some time and a steady hand, but you'll love the results!
You'll need dotting tools and preferably a very thin striping brush to create this look, though you might be able to make the thin lines with a toothpick.
Tags
-
 RareJewel favorited Floral Nail Art
02 Jun 20:54
RareJewel favorited Floral Nail Art
02 Jun 20:54
-
 Xirimpi favorited Floral Nail Art
31 May 17:29
Xirimpi favorited Floral Nail Art
31 May 17:29
-
 Bertha M. favorited Floral Nail Art
20 Jun 14:33
Bertha M. favorited Floral Nail Art
20 Jun 14:33
-
 buttercup303 added Floral Nail Art to make up accessories
02 Apr 16:23
buttercup303 added Floral Nail Art to make up accessories
02 Apr 16:23
-
 Rachael H. added Floral Nail Art to Ideas and Techniques
21 Dec 22:20
Rachael H. added Floral Nail Art to Ideas and Techniques
21 Dec 22:20
-
 Sarah Kim added Floral Nail Art to Beauty
18 Dec 18:54
Sarah Kim added Floral Nail Art to Beauty
18 Dec 18:54
-
 Fashion Diva Crochet favorited Floral Nail Art
01 Oct 20:29
Fashion Diva Crochet favorited Floral Nail Art
01 Oct 20:29
-
 Yadira R. favorited Floral Nail Art
01 Sep 20:26
Yadira R. favorited Floral Nail Art
01 Sep 20:26
-
 foodismyfamily favorited Floral Nail Art
30 Aug 20:50
foodismyfamily favorited Floral Nail Art
30 Aug 20:50
-
Sarah J. favorited Floral Nail Art
27 Aug 19:12
-
 Step 1
Apply your base color. I always use a top coat between my base color and my nail art.
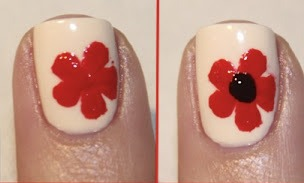
Create your first petal using a dotting tool or small brush. The location and size of the petal is up to you.
-
 Step 2
Add more petals to create your flower shape. I went with 5 petals but play around with a number you like.
Use a dark polish and your dotting tool to add a dot at the center of your flower.
-
 Step 3
Using the same polish as your base color and a THIN striping brush, create thin lines coming from the very center of your flower out towards the petals. Play around with how many lines you want.
Use your smallest dotting tool to add dots to the very end of each of the lines you made in the previous step.
-
 Step 4
Add a dot of yellow polish at the very center of your flower.
If you'd like, you can end your manicure here, or move on through the next steps to add some stems and leaves.
-
 Step 5
To create the leaves, draw a thin line away from the flower. This is the stem. The leaves are made up of tiny lines branching off of the original thin line you created.
Add as many leaves in varying colors as you'd like. Mix up the type of leaves and shapes as well if you're feeling up to it.
-
 Step 6
Using the same base polish color, draw thin lines down the very center of your leaves and stems.
Repeat this proces on every leaf you have drawn. This isn't mandatory, but I think it makes the colors pop a bit more.
Finally, add your favorite top coat AFTER you've waited at least 5-10 minutes for your polish to dry. You don't want to smudge your hard work.