About
Create a flattering woven pencil skirt!
This quick and simple skirt has a flattering flat-front waistband but pulls on easily with the help of an elastic back!
Note about fit: This skirt fits over my 39″ hips (widest part of my bottom) with plenty of movement, but if you’re significantly smaller or larger than me, you’ll want to subtract or add some to the width (35″).
-
 Elena B. favorited Flat Front Elastic Waist Pencil Skirt
03 Nov 03:30
Elena B. favorited Flat Front Elastic Waist Pencil Skirt
03 Nov 03:30
-
 BonnieWhiskem published her project Flat Front Elastic Waist Pencil Skirt
02 Nov 09:00
BonnieWhiskem published her project Flat Front Elastic Waist Pencil Skirt
02 Nov 09:00
-
 Step 1
STEP 1: Cut your front and back skirt pieces. My fabric was 44″ wide, so I cut it it down to 35″ long, then cut it in half again to get two pieces measuring 35″ x 22″. Run 2 parallel gathering stitches along the top of one piece (this will be your front). If you start and stop your gathering stitches about 3-4″ away from the sides, this will reduce the look of bulk around your hips.
**If you’d like to add pockets like I did, now’s the time! (Or if you want to place yours over the side seams like I did, do it at the very end!)
I cut 2 rectangles, each measuring 7.75″ x 9″, then pressed the raw edges under on all 4 sides. I then topstitched along one short end (the top of pocket) and finally pinned and stitched them to the front skirt piece, along the other 3 folded edges. -
 Step 2
STEP 2: Pull your gathering threads until your skirt front is as wide as half your waist measurement + 1.5″ for seam allowances. For example, if your waist is 30″, you’ll gather your front piece until it is about 16.5″ wide (30/2 = 15; 15 + 1.5 = 16.5). Make note of this measurement, it is “length A” in the next step!
NOTE: After trying my skirt on, I didn’t love the gathering on my body so I ended up taking it out. Then I cut my front piece down to 17″ wide at the top, with the bottom just slightly wider (about 20″). It’s up to you which look you prefer!
-
 Step 3
STEP 3: Cut your waistband pieces. Your FRONT band will measure: length A (i.e. 16.5″ from the example) x 5″. Your BACK waistband will be 35″ (or the width of your back piece) x 5″.
Next, stitch your skirt pieces together along the side seams (the 22″ sides) and the waistbands together along the 5″ sides; press seams.
Fold the waistband in half lengthwise, WRONG sides together. You will have a big circle with a fold down the center. -
 Step 4
STEP 4: Lay your skirt flat, right sides out, with the BACK facing you. Slip your waistband circle over the top of the skirt, with the fold down and raw edges up. Making sure the BACK waistband piece is touching the BACK skirt piece, line up the raw edges of your skirt and waistband and pin together, matching up side seams. Stitch waistband and skirt together; press seam and neaten raw edges.
**Leave the front waistband UNSEWN to the skirt at this point! -
 Step 5
STEP 5: Flip your skirt around so that the front is facing you. Cut your elastic to about 1/2 your waist measurement (it stretches so no need to be exact!) and then insert it into the waistband casing you just created in step 4. Pull it all the way through the back waistband until it comes out the other side (near the side seam). Pin place and try your skirt on! Adjust elastic as necessary.
-
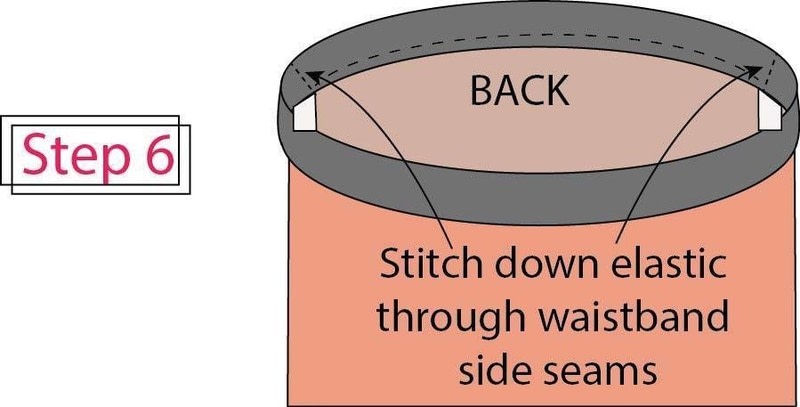
 Step 6
STEP 6: With the raw ends of your elastic sticking out of the casing, stitch through the waistband and elastic right on top of the side seams. This secures your elastic in place! Now, flip your waistband down over the outside of skirt again and stitch the front skirt to waistband. Press and neaten raw edges. Hem to desired length and voila – all done!