


About
Because I NEED one of those bags!
Sorry if this tutorial is bad or too wordy- It's my first one! This will definitely be one of the things I keep in my Jump From Paper bag if I win the contest!
Disclaimer: I do not own any rights to Jump From Paper nor do I affiliate with them. I just wanted to make a cute wallet!
Tags
-
 Chinese_Food_Product favorited Faux Jump From Paper Wallet
18 Jun 16:45
Chinese_Food_Product favorited Faux Jump From Paper Wallet
18 Jun 16:45
-
 WindStrider favorited Faux Jump From Paper Wallet
21 Apr 19:25
WindStrider favorited Faux Jump From Paper Wallet
21 Apr 19:25
-
 Advitha K. favorited Faux Jump From Paper Wallet
10 Mar 08:47
Advitha K. favorited Faux Jump From Paper Wallet
10 Mar 08:47
-
Annika G. favorited Faux Jump From Paper Wallet
19 Feb 01:28
-
 Anna J. favorited Faux Jump From Paper Wallet
17 Feb 15:20
Anna J. favorited Faux Jump From Paper Wallet
17 Feb 15:20
-
 siberian ice river favorited Faux Jump From Paper Wallet
09 Feb 03:09
siberian ice river favorited Faux Jump From Paper Wallet
09 Feb 03:09
-
 Dead4CEREALZ replied to a comment on her project Faux Jump From Paper Wallet
08 Feb 04:33
Dead4CEREALZ replied to a comment on her project Faux Jump From Paper Wallet
08 Feb 04:33
-
Dead4CEREALZ replied to a comment on her project Faux Jump From Paper Wallet
08 Feb 04:33
-
 Cupcake_Warrior =) favorited Faux Jump From Paper Wallet
07 Feb 13:08
Cupcake_Warrior =) favorited Faux Jump From Paper Wallet
07 Feb 13:08
-
Cupcake_Warrior =) commented on Faux Jump From Paper Wallet
07 Feb 13:08
-
 Step 1
First, lay out your bill on one of the cards with the middle of the dollar on the fold of the card. If your dollar doesn't have a crease down the middle already, making one will make this step easier. Then, draw a dotted line about 1/4 inch bigger than the bill. Cut the rectangle out and repeat with the other card.
-
 Step 2
Tape the cards together like this, with the folds lining up.
-
 Step 3
Next, take the taped cards and trace two outlines of them on your fabric. Cut the two squares of fabric like this. The first square is the same size as the outline, and the second square is about 1/4 inch bigger on all sides than the outline. As you can see, the cuts don't have to be perfectly straight :P
-
Step 4
After you have your fabric cut, take the smaller square of fabric and sew it onto one side of your taped cards. Then, take the larger square of fabric and sew it onto the other side with the edges folded over.
-
 Step 5
As you can see... mine looked... well... pretty horrible! This is where the edging comes in.
-
 Step 6
Tahdah! Now you are almost finished. Feel for where the cards are taped together underneath the fabric. Fold it there and then sew the short edges of the whole thing together. After you do that, fold it in half where the cards originally folded and it finally resembles a wallet!
-
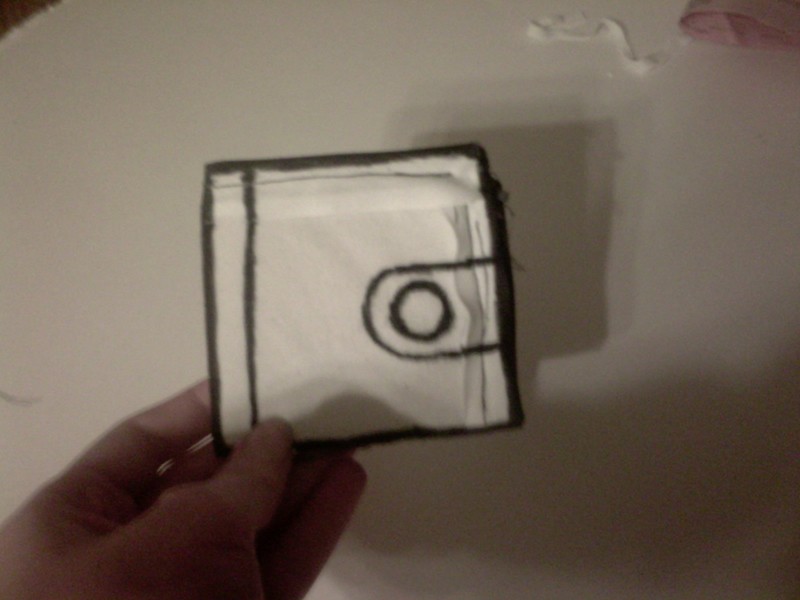
 Step 7
Now is the fun part! Start drawing your design on in big, bold black lines with a fabric marker. I drew a cartoon-like snap buckle on mine but you could do something different. However, no matter what design you choose, make sure each edge of the wallet is outlined as if it were actually a cartoon. Also, on the left side of the wallet where it folds, draw another outline about 1/2 inch from the real edge. This adds to the cartoon look.
-
 Step 8
The last step is coloring. To get the bright colors that you need for this, I suggest using Sharpie's "Stained" fabric markers because they come in bright colors and are also affordable. This is very important! Don't just use plain colors! You have to mix them together to get the brightest colors. For example, I used hot pink for the base coat of the wallet and orange for the base of the buckle. Then, I went over the hot pink with orange and recolored the buckle with yellow. The button on the buckle is just plain old blue. You can also touch up the black lines and add stitching after this step and then you are done!
-
Step 9
Have fun receiving second glances from the cashier as you pull out your new wallet to pay!


Good luck with the contest; I think that your wallet will fit the image quite well!1