About
Because everyone needs a last minute card idea for Father's Day.
So of course its the day before father's day and I'm sitting in my room going I have nothing for my dad internet HELP ME PLEASE
And I came across this really simple, easy card.
Mine didn't turn out quite as well as I would have liked it to, just because of the paper I used and the fact that my glue sucks, but it still looks pretty good in my opinion :)
Downloads
- fathers-day-card-shirt-tie-template.pdf 75.9 KB [ Download ]
- fathers-day-card-shirt-tie-template.pdf 75.9 KB [ Download ]
- fathers-day-card-shirt-tie-template.pdf 75.9 KB [ Download ]
- fathers-day-card-shirt-tie-template.pdf 75.9 KB [ Download ]
-
 WerewolfCas favorited Father's Day Tie Card
29 Mar 09:16
WerewolfCas favorited Father's Day Tie Card
29 Mar 09:16
-
 Jenna Joy favorited Father's Day Tie Card
11 Jan 08:07
Jenna Joy favorited Father's Day Tie Card
11 Jan 08:07
-
 Lee B. favorited Father's Day Tie Card
18 Aug 04:07
Lee B. favorited Father's Day Tie Card
18 Aug 04:07
-
 myikap favorited Father's Day Tie Card
26 Oct 00:05
myikap favorited Father's Day Tie Card
26 Oct 00:05
-
 FORFangXD added Father's Day Tie Card to wanna do a thing
27 Sep 18:08
FORFangXD added Father's Day Tie Card to wanna do a thing
27 Sep 18:08
-
 LaKayRo added Father's Day Tie Card to Cutie Bug Things
18 Aug 03:44
LaKayRo added Father's Day Tie Card to Cutie Bug Things
18 Aug 03:44
-
LaKayRo favorited Father's Day Tie Card
18 Aug 03:44
-
 Zombie Babe favorited Father's Day Tie Card
06 Jul 05:54
Zombie Babe favorited Father's Day Tie Card
06 Jul 05:54
- Josaurus20 favorited Father's Day Tie Card 16 Jun 14:55
-
Step 1
What you need for this is:
-Assorted paper
You will need paper for the tie portion, and the card portion. You don't need anything fancy, but It does help if you get scrapbook paper or something for the card part, the kind that has a pattern on one side and is blank on the other. I did have any of this, so I glued a piece of blue paper (Outside) to a piece of white paper (inside). You don't need think paper or anything for it, thin (normal?) paper actually works better (At least for the card part) just because of how its put together)-Scissors
-A ruler (You don't NEED this one, but it helps a lot)
-Glue
A glue stick or white glue will work, though mine didn't stick that well because I was using thicker paper, and my glue stick was not very good (Just a really cheap store brand one). So I would suggest you don't use sucky glue because its not fun to work with-Embellishments (Optional)
I didn't use any on mine, but the on the tutorial I used for it, they did. You can use buttons or jewels, whatever you want. -
 Step 2
(I'm sorry about these next few pictures, I decided it would be confusing without them, this is just a random piece of blank paper so you can get a better idea of whats going on. You also probably should make marks in pencil, not red pen. The pen was just so you could see better.)
Get your paper. Right now I mean the blue paper in the picture. As I've said its best if you can get paper with one side a pattern and one side white. I didn't have any of this stuff so I glued a white piece to the inside of a blue piece which worked just fine.
Once you are done sorting that all out, fold it in half, short sides together.
(You can do the next bits on the outside or the inside of the card, it doesn't matter, as long as its where the front part of your card will be)
Then, take where ever will be your front portion, and measure half way across the top of the front (We know where half way is on the whole card because we folded it in half...)
Measure 3cm down the card from your half way mark, and cut along that line.
-
 Step 3
Go to the front of your card and fold down the corners you have cut so that the fold goes from the top corner of the card, to the middle cut line.
This will be your collar
The red pen is the edge of the paper you folded, and the blue is where its folded. -
Step 4
Go to the attachments, on here, and there should be a simple tie. You can trace this, or print it out onto coloured paper or whatever you like, it doesn't really matter.
If my attachment isn't working, then try going to the original tutorial and getting it there.
Cut your tie out on whatever paper you want. I used white paper, and drew stripes on it. One thing to keep in mind with striped ties, is that the stripes change directions at the knot part. -
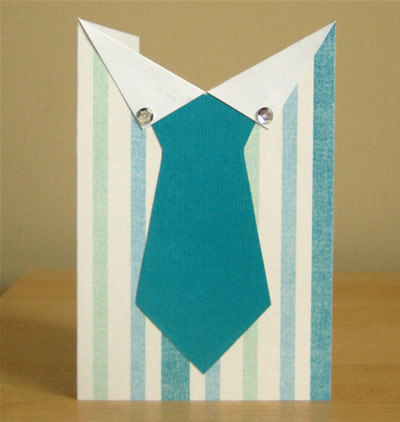
 Step 5
Glue on your tie, and glue down the collar part, and voila! You have a tie card! :D
Now all you have to do is write something nice on the inside and you are ready to give it to whoever you think deserves it! :D
Good luck, and hopefully yours will turn out just as good (Well hopefully better) then mine!(This picture is the one from the original tutorial, so you can see what other ones look like, with other papers)