


About
Mini Hoop Embroideries
Guess what? This particular technique was the reason that I started stitching again in 2011. I wanted something a little different from the traditional family photo portrait; so, I thought I should stitch us up (so to speak). I started sketching our family in the way I saw us, in cartoon style, and began creating an embroidered, appliquéd version of us. I was so happy with the result that I showed lots of my friends, and then they wanted one too. It surprised the pants off me. I then began sharing my designs on Instagram and they were a hit. I have stitched hundreds of portraits for beautiful people around the world, and now I get to share this technique with you! Let’s stitch up your family and friends.
Suggested Stitches:
The stitches you use will be dependent on the look that you are trying to achieve. I like to use straight or satin stitches for straight hair and detached chain stitches for curly hair.
Back stitch
Detached chain stitch
Running stitch
Satin stitch
Straight stitch
-
 gettothepoint added Family Portrait to make one day
12 Jul 20:09
gettothepoint added Family Portrait to make one day
12 Jul 20:09
-
gettothepoint added Family Portrait to FOOD
12 Jul 20:09
-
gettothepoint added Family Portrait to CRAFT ideas
12 Jul 20:08
-
Barbara M. favorited Family Portrait
21 Jul 10:39
-
Julie R. favorited Family Portrait
10 Feb 03:45
-
 Kimya J. favorited Family Portrait
13 Dec 02:53
Kimya J. favorited Family Portrait
13 Dec 02:53
-
Laura W. commented on Family Portrait
30 Nov 10:39
-
Laura W. favorited Family Portrait
30 Nov 10:36
-
 Basil Staples favorited Family Portrait
28 Nov 11:17
Basil Staples favorited Family Portrait
28 Nov 11:17
-
 Super Shanimal favorited Family Portrait
16 Nov 18:48
Super Shanimal favorited Family Portrait
16 Nov 18:48
You Will Need
-
Step 1
First things first. You will need to sketch up your family or friends in a format that you can stitch, and in a Dande-style. You can use a photo as a reference, or work from real life – just remember that these are simple representations of your loved ones, so no intensive details are needed!
With your Dandelyne™ hoop of choice – I am using a 5.5cm (2¼in) hoop – and a pencil, draw a circle onto your fabric using the inner edge of the hoop to create a perimeter for your design. Using your photo (or life models) as a reference, draw circles for the heads in the positions you would like them to appear in your design along with their clothes (you can use the templates provided below right instead, if you prefer). You can then add facial features and hair. You will see that the Dande-style includes a little ‘V’ for the mouth and two small straight lines for the eyes. This will be your sketch to work from.
-
 Step 2
Using your sketch as a reference or to trace from, create the head templates for your people.
-
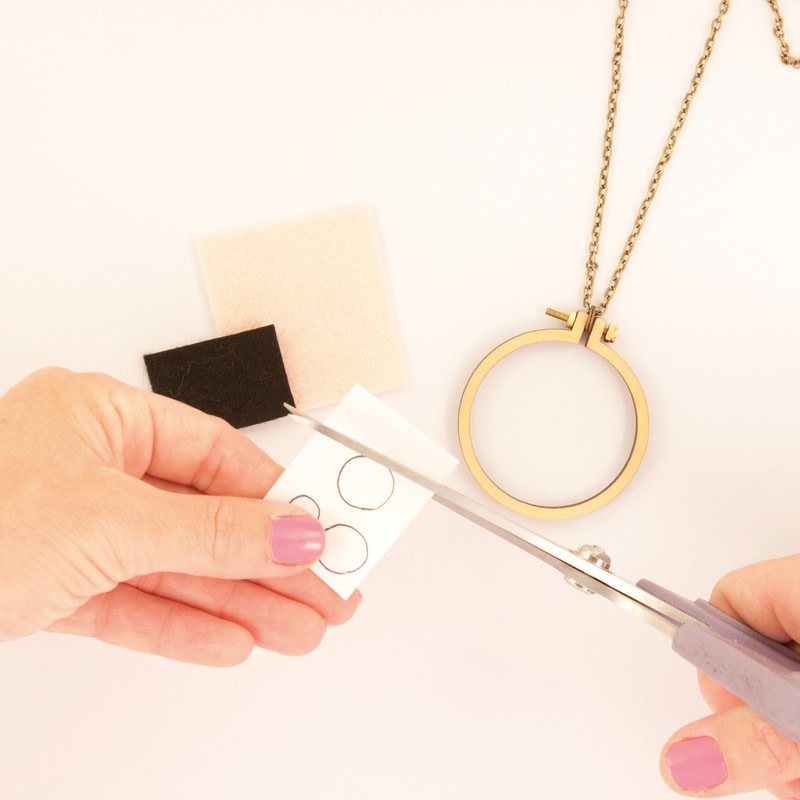
 Step 3
With your templates, cut out each head in your chosen felt colour. You can use clear sticky tape to ensure smooth edges on your felt.
-
 Step 4
Once you have cut out all of the heads, place them in your frame to check sizing and placement.
-
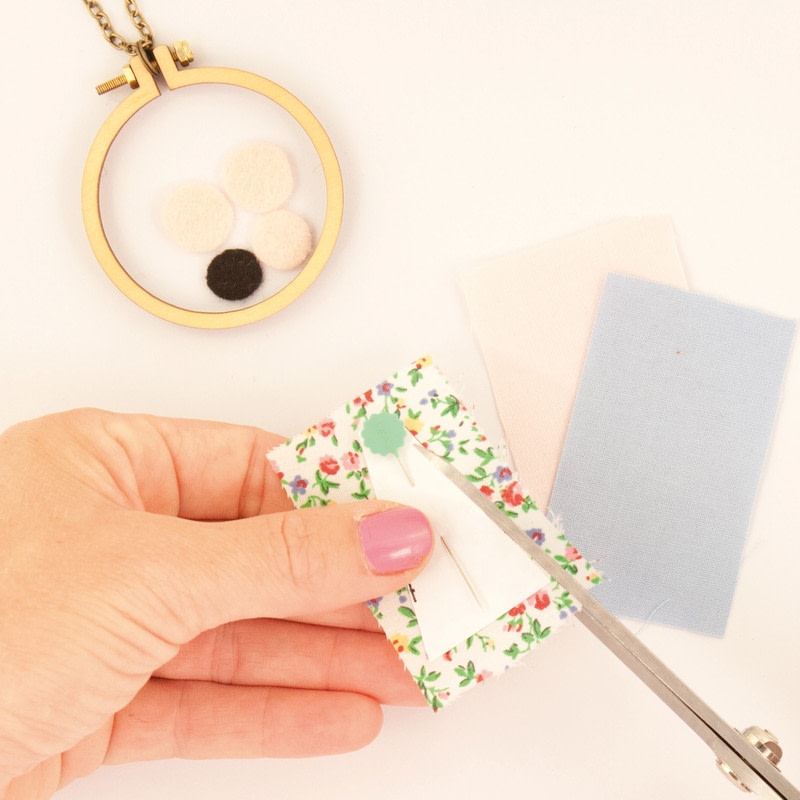
Step 5
Using your felt heads as a reference for size, or your earlier sketch as a guide or to trace from, create clothes templates for your people and cut them out. Place your templates onto their corresponding fabric scraps and cut them out. You can use a pin to hold them in place as you cut, if necessary.
-
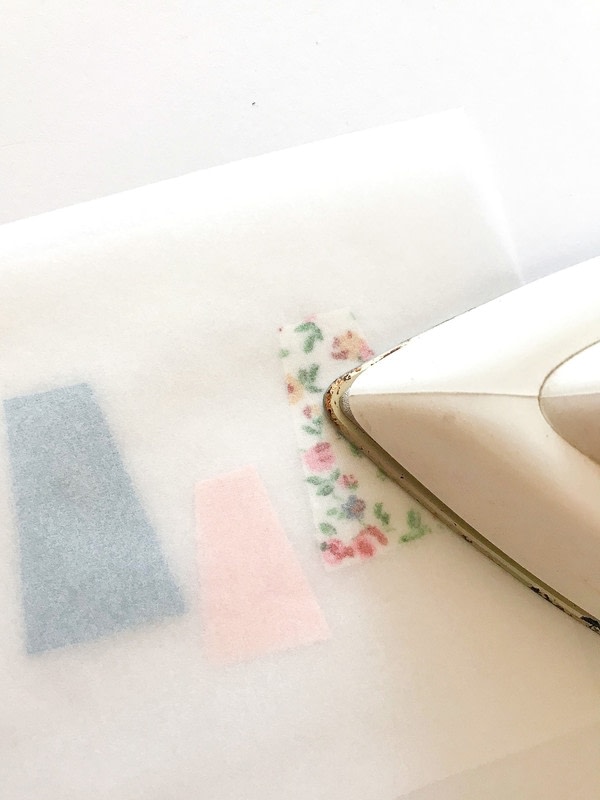
 Step 6
Cut a piece of double-sided fusible web, approx. 10cm (4in) square. Grab your clothes and place them on the double-sided fusible web, pattern side facing up. You will then need to cut a piece of baking paper, a little larger than the fusible web, and place it on top. Iron over the baking paper to stick your pieces to the fusible web. Leave it to work its adhesive magic for approx. 10 minutes, then peel away the baking paper and cut out your clothes. You can then peel off the double-sided fusible web; to do this, use your fingernail to tickle open a corner and then gently peel it off.
-
 Step 7
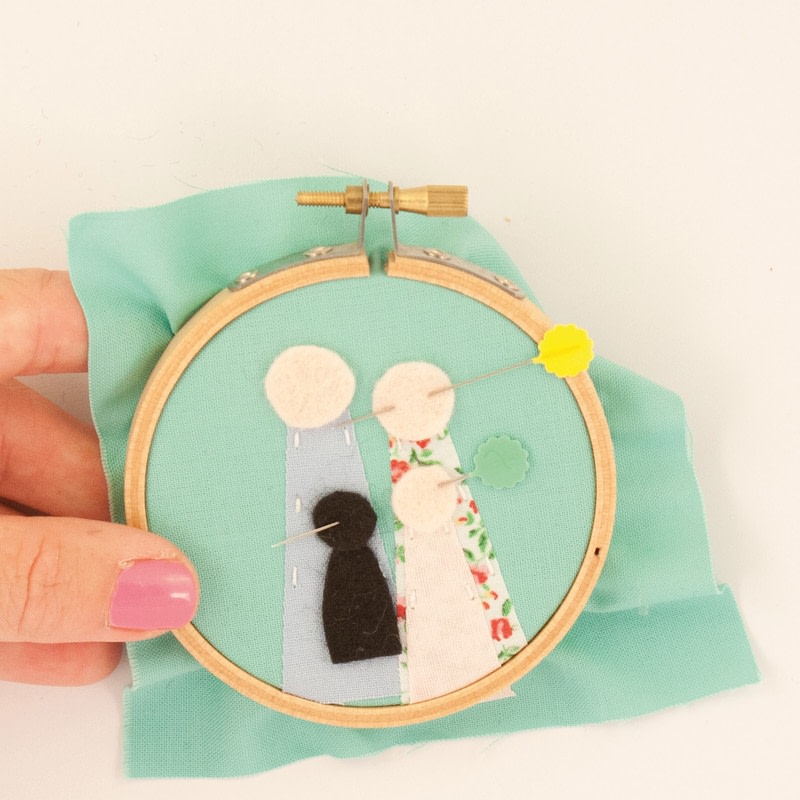
Lay your clothes on your base fabric, using your sketch as a guide for placement. Iron these onto your fabric. Now, you can pop this into your 8cm (3in) embroidery hoop and get ready to stitch.
-
 Step 8
Use running stitch to secure the clothes to your base.
-
 Step 9
I like to use stitches approx. 2–3mm (⅛in) in size.
-
 Step 10
Position your felt heads. You can either pin these or simply hold them in place – felt does tend to behave and stay where you like it. Then, stitch your felt heads over your clothes pieces using running stitch. I like to use four stitches, at 2, 4, 8 and 10 o’clock.
-
 Step 11
With your pen, mark the places where you’ll stitch the eyes and mouths for your people (and their fur babies), using your earlier sketch as a reference.
-
 Step 12
Stitch your features. Use straight stitches to create the mouth: start at the bottom, in the centre and work in a little ‘V’. For the eyes, stitch two small straight stitches.
-
 Step 13
Now for the hair – super fun: start in the middle and work your way out, depending on the hair style. Get messy, keep it tidy, add curls, go wild. Repeat for each person.
-
 Step 14
Family Portrait complete! Punch the air, high five your friends – YOU HAVE DONE IT! You can now proudly frame in your Dandelyne™ miniature embroidery hoop.
A family portrait may not be complete without your fur babies. You can include them too. Yes you can. Felt heads, felt bodies, stitched ears, whiskers and any other cute little features can all be added.


Comments


