About
Make your own beautiful DIY fabric flowers!
Create beautiful fabric flowers from organza, chiffon, and satin. They're perfect for weddings, bouquets, Mother's Day gifts, and home decor.
-
 Key West Witch favorited Fabric Flowers
03 Aug 00:35
Key West Witch favorited Fabric Flowers
03 Aug 00:35
-
 MischievousRaven added Fabric Flowers to Mad hatter - tea room
04 Feb 11:20
MischievousRaven added Fabric Flowers to Mad hatter - tea room
04 Feb 11:20
-
 Victorian Dreamer favorited Fabric Flowers
24 Jan 06:12
Victorian Dreamer favorited Fabric Flowers
24 Jan 06:12
-
 Rebecca M. favorited Fabric Flowers
14 Jun 15:37
Rebecca M. favorited Fabric Flowers
14 Jun 15:37
-
 tyler s. favorited Fabric Flowers
08 Jun 00:19
tyler s. favorited Fabric Flowers
08 Jun 00:19
-
 mmotse03 favorited Fabric Flowers
30 May 07:28
mmotse03 favorited Fabric Flowers
30 May 07:28
-
 Retta Kerry H. added Fabric Flowers to flowerw
06 May 01:41
Retta Kerry H. added Fabric Flowers to flowerw
06 May 01:41
-
JJ W. favorited Fabric Flowers
03 Sep 15:48
-
Mireya R. favorited Fabric Flowers
17 Jan 13:14
-
 Kleyd added Fabric Flowers to Want to Do
27 Dec 23:11
Kleyd added Fabric Flowers to Want to Do
27 Dec 23:11
-
 Step 1
You'll need 100% polyester fabric in different textures (organza, chiffon, satin, etc.) and colors that match your wedding/home decor. Since we’ll be burning/melting the edges, 100% polyester fabric (it’s basically plastic) is a must.
The time it takes to complete this project totally depends on the number of flowers you intend to make. I had to make 60 for my wedding (and attach each to stems and wrap them into bouquets), and it took quite a while (I worked on it over the course of a couple months). Smaller projects will go by much quicker.
-
 Step 2
My wedding was different shades of blue with ivory, lace, and burlap accents, so I picked out five different shades of blue and a lot of ivory fabric. Be sure to check out the remnant bin at your fabric store! Depending on how many flowers you’re making, you’ll need less than one yard of each fabric type, so remnants are perfect. Better yet, the remnants at JoAnn Fabrics (where I purchased my stuff) are 50% off the price of the regular fabric, which can be a super, super sweet deal if the fabric is on sale! I got lucky and found most of mine in one trip, but you might need to scope out the bin for a couple weeks. I paid less than $50 for all of my fabric, and I had waayyyy too much.
-
 Step 3
Separate your fabric by color. For mine, I put all of the ivory together, then separated the blues into navy, royal, cornflower, and two lighter shades. Begin cutting out a bunch of 4″ circles and some 3″ circles (you’ll need about half as many of these smaller circles). Don’t worry, they don’t have to be perfect! To make your flowers look more interesting, be sure to vary the types of fabric you use. You can do this however you like, but I found it easier to do all of one color of flower before starting the process over for the next color. I feel more accomplished when I’ve totally finished one color of flower, instead of being 1/4 done with all the flowers.
-
 Step 4
Set aside a bowl of water (in case of accidental fires), move to a well ventilated area, and light a tea light. The polyester will give off a weird, melt-y plastic smell as it burns, so try not to inhale too much.
-
 Step 5
Carefully melt the edges of the circle, slowly rotating as each section melts. Make sure you start way above the flame and move down until you’ve found a good spot. Fabrics like organza will melt really quickly and easily, and some, like chiffon, can burn or turn weird, ugly colors if held too close to the fire. I recommend using two hands and not trying to take pictures of yourself while doing this part. If you do burn a flower, assess the damage. If it’s minor, you can cut off a part and re-melt the edge, but some might be too far gone.
-
 Step 6
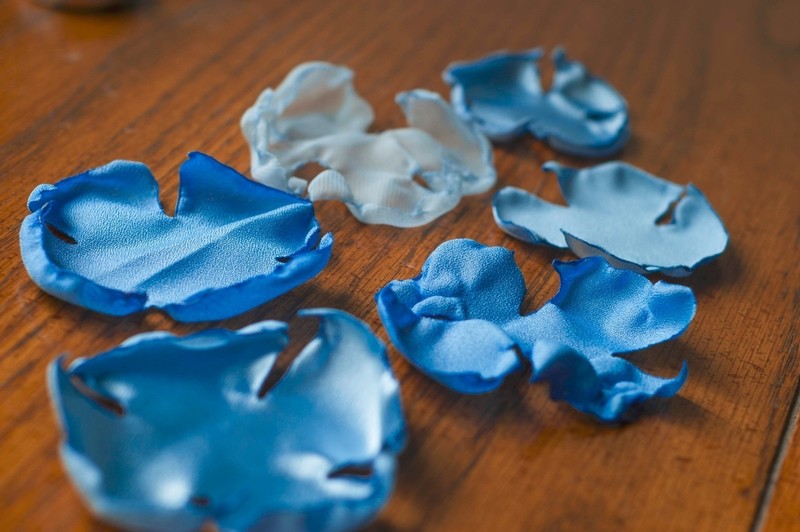
Once the edges of your flower have been melted, cut four slits in your flower. The slits should be pretty close to evenly spaced, as they’ll be forming the flower petals.
-
 Step 7
Using two hands, hold each slit open and carefully melt the edges. Be sure to hold the flower as far above the flame as possible. Some of the more fragile fabrics will melt straight through the middle of the flower.
-
 Step 8
Be sure to keep your finished flower layers organized by color and size!
-
 Step 9
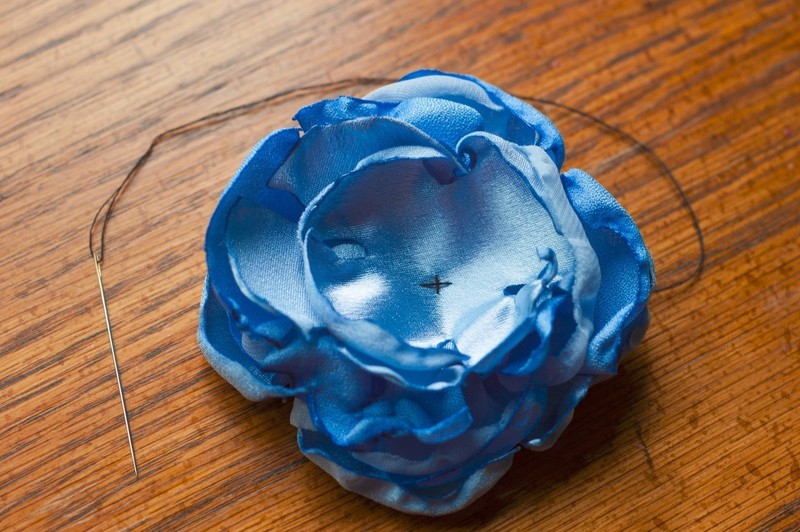
When a large group of flower layers is completed, arrange 5 or 6 of one color. You will need 3-4 of the larger pieces made from the 4″ circles, and 2-3 of the smaller pieces made from the 3″ circles.
-
 Step 10
Now we’ll begin to start to stack the flower layers, alternating the position of each layer. The petals from the top piece should lay on the slits from the previous layer. Place the larger pieces on the bottom of the stack, and the 2-3 smaller pieces on the top.
-
 Step 11
Once you’re satisfied with the layer arrangement, hold the flower together and sew a small “X” in the center.
-
 Step 12
I used black thread for visibility, but you will want to use a thread color that matches your fabric flower.
-
 Step 13
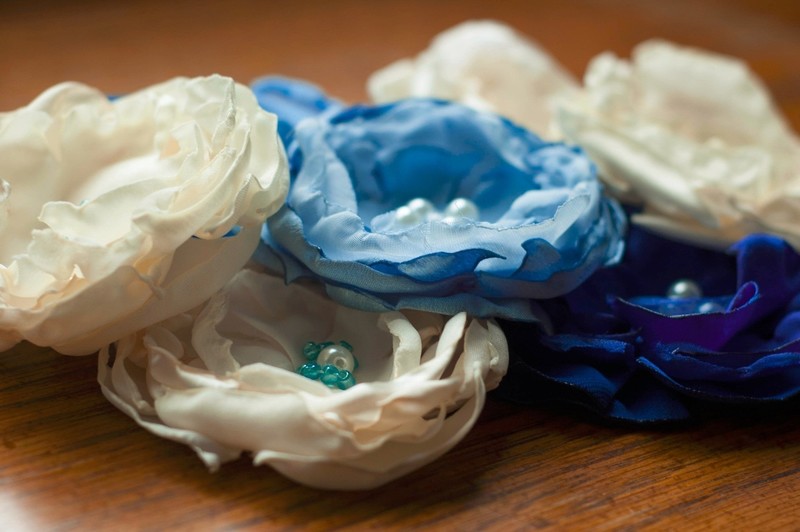
Now that a few flowers have been made, it’s time decorate the centers. For my wedding flowers, I sewed different patterns using pearls, glass beads in various shades of blue, and crystal beads. Each flower in my bridal bouquet was unique. What should you use for your flowers? Anything you want! Antique brooches, beads, pearls, buttons, ribbons — they would all look awesome! Just be sure to use a coordinating color of thread when you sew down your centers.
-
 Step 14
That's it! Make 10 or 1,000, it's totally up to you!
-
 Step 15
My bridal bouquet (shown here) was made up of 30 flowers and my bridesmaid bouquets each had 10.