About
Ultimate Art Bible
An eraser is perhaps not the most obvious drawing tool, but it can be used very effectively to remove graphite, coloured pencil, charcoal and even soft pastel to create light areas and highlights.
The technique works best with subjects that contain both very dark and very light tones. Kneaded erasers can easily be moulded into specific shapes simply by pulling them into shape with your fingers, making it possible to use them for very tiny, precise marks, but they do get dirty very quickly.
Plastic erasers are harder and can be used with softer drawing materials such as charcoal without becoming completely clogged. If the eraser picks up pigment as you use it, take care not to transfer the pigment to areas where it is not wanted.
Eraser ‘drawing’ techniques
‘Drawing’ with an eraser is very simple: just hold it in the same way as a pencil and wipe it across the paper to remove pigment. You can also pull dark lines out from a patch of charcoal onto clean, white paper using a torchon, paint shaper or even your fingertips.
Kneaded eraser
Wipe a kneaded eraser across an area of charcoal or pastel to remove the dust or pigment and create white lines. For finer lines, either use the chisel-shaped edge or pull the eraser out into a sharp point with your fingertips.
Paint shaper
To pull dark lines out of a patch of charcoal or soft pastel onto white paper, ‘draw’ into the pigment with a rubber-tipped paint shaper.
Silhouetted tropical plants in charcoal
This scene in a hothouse of tropical plants has a wide tonal range, from the dense blacks of the plants to the bleached-out sky and its reflections on the wet pathway. Applying a covering of charcoal dust and then wiping out the light areas and highlights allows you to work in a bold, spontaneous fashion that would be difficult to achieve in any other way. This exercise uses a kneaded eraser, as it can easily be moulded to a fine point.
The scene
The sculptural leaves of tropical plants in a hothouse silhouetted against a blank, featureless sky cry out for a bold, dynamic treatment; given the almost monochromatic nature of the scene, charcoal is the obvious choice. Note how the wet pathway leads the eye through the picture.
-
 Shirin L. favorited Eraser ‘Drawing’
21 Jan 12:34
Shirin L. favorited Eraser ‘Drawing’
21 Jan 12:34
-
 sabrina p. favorited Eraser ‘Drawing’
11 Jan 02:00
sabrina p. favorited Eraser ‘Drawing’
11 Jan 02:00
-
 Anova published her project Eraser ‘Drawing’
18 Nov 15:04
Anova published her project Eraser ‘Drawing’
18 Nov 15:04
-
 Step 1
Using the side of a medium stick of charcoal, block in the darkest areas of the scene, leaving the sky and pathway with only a light coverage. Don’t press too hard: these areas will need to be much darker still and all you’re trying to do at this stage is establish the overall tonality. Put in some more linear marks for the edges of the raised beds alongside the path.
-
 Step 2
Using your fingertips, blend the charcoal on the pathway to create a softer, mid-toned area.
-
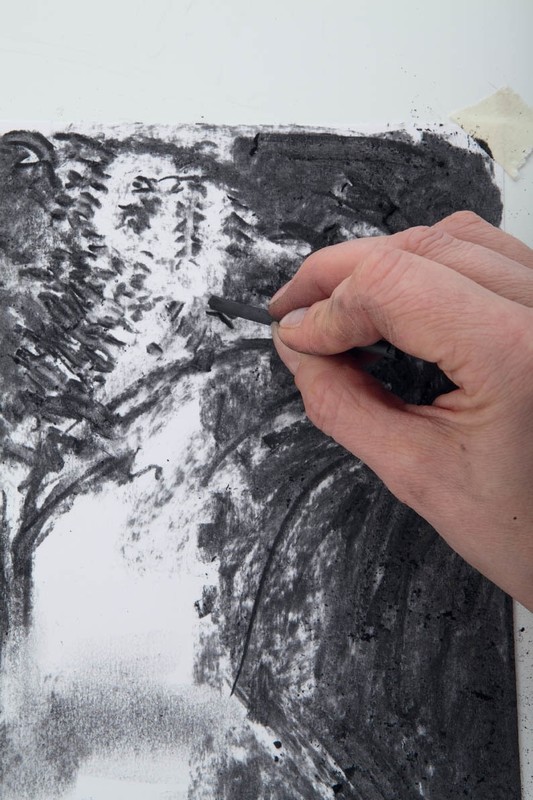
 Step 3
Using a thin stick of charcoal, draw in the main trunks and branches of the trees overhanging the pathway, scribbling in the lines quite vigorously.
-
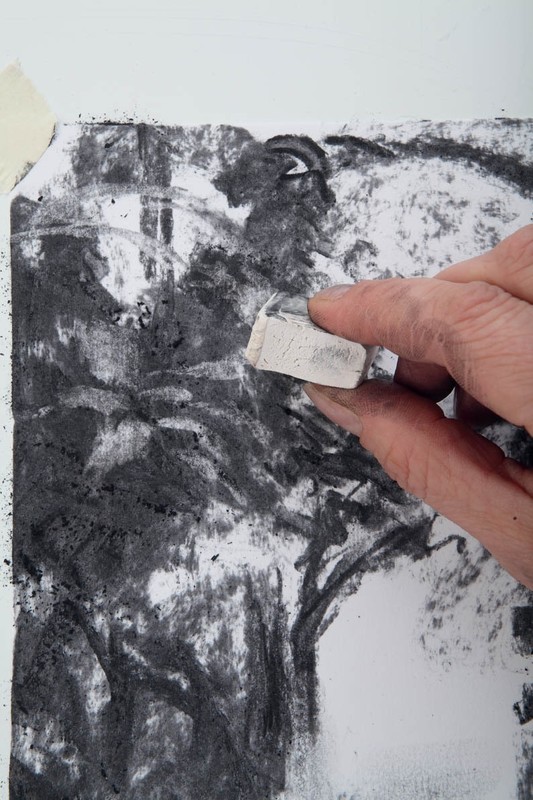
 Step 4
Pull a piece of kneaded eraser to a fine point and ‘draw’ the shapes of the broad leaves on the left of the image, pulling off charcoal dust to reveal mid- toned shapes.
-
 Step 5
Using small strokes and dots, scribble in the silhouetted leaves at the very top of the picture. Up to this point, you’ve mostly been applying broad areas of tone; here you need to be a little more precise and look at the shapes and sizes of the leaves in more detail.
-
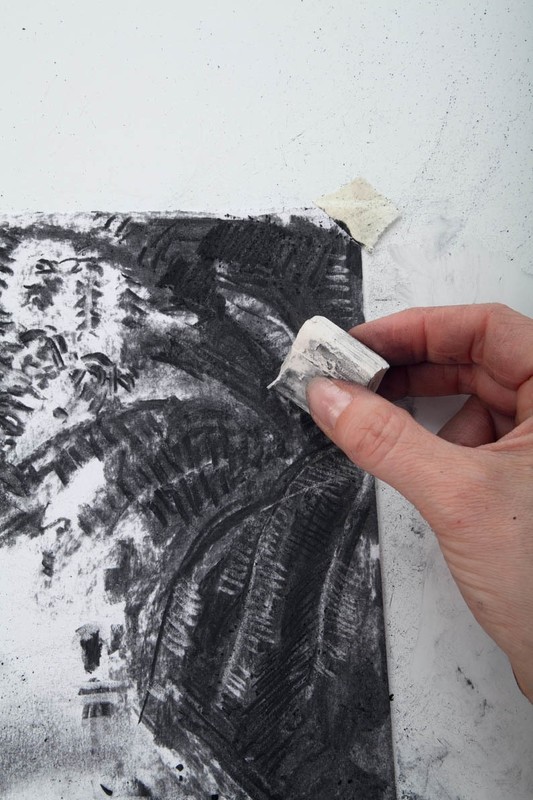
 Step 6
Using the side of the charcoal, apply more tone to the path in the foreground. Using the tip, draw in the dark, wet puddle in the centre of the path and the large flowerpots on either side of it. Blend the mid-toned areas of the path with your fingers. Where necessary, use the eraser to lift off pigment and create highlights on the wet paving.
-
 Step 7
Pull the edge of your kneaded eraser to a fine point and begin wiping out the spaces between the palm fronds, where the sky is visible.
-
 Step 8
Using the tip of the thin charcoal, draw in the lines of the paving, noting carefully how they appear to converge as they recede away from you. Towards the back of the image, where the sunlight hits the wet floor, make your marks less distinct: use the tip of a paint shaper to pull charcoal out into thin lines.
-
 Step 9
The large glass windows at the end of the pathway are very bright. Cover this area with a thin coating of charcoal, then use the kneaded eraser to pull off charcoal and create the shapes of the window panes.
-
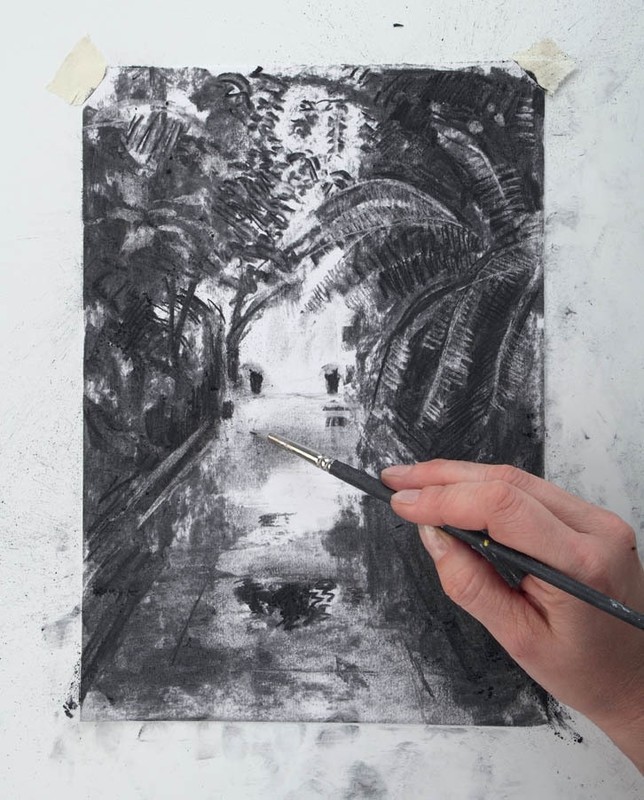
 Step 10
The finished drawing
This is an atmospheric drawing that is full of interesting textures and shapes: the bold, precise lines of the palm fronds; the
sculptural shapes of the large-leaved plants on the left; the softly blended areas of tone on the floor; the bleached-out sky and reflections on the wet path. -
Step 11
Eraser too dirty?
If your kneaded eraser gets completely clogged up with charcoal dust, to the point where you find you’re actually applying dust rather than removing it, simply cut or tear off the dirtiest portion and reshape it.