About
Hand Embroidered Clutch
Sometimes a gal needs a small clutch purse to tote around the bare necessities. This is a great clutch to feature some of your precious hand embroidery work and carry around your keys, cell phone, some money, or any other little things you need to grab in a rush.
-
 marlene.gagne.3 favorited Embroidered Clutch
17 May 20:57
marlene.gagne.3 favorited Embroidered Clutch
17 May 20:57
-
 Angela H. favorited Embroidered Clutch
27 Aug 23:29
Angela H. favorited Embroidered Clutch
27 Aug 23:29
-
 Chudames added Embroidered Clutch to Needlework
07 May 00:07
Chudames added Embroidered Clutch to Needlework
07 May 00:07
-
Chudames favorited Embroidered Clutch
07 May 00:07
-
 Pelagaki E. favorited Embroidered Clutch
21 Apr 13:12
Pelagaki E. favorited Embroidered Clutch
21 Apr 13:12
-
 Christine B. favorited Embroidered Clutch
05 Apr 03:19
Christine B. favorited Embroidered Clutch
05 Apr 03:19
-
 Alannah B. favorited Embroidered Clutch
03 Apr 02:24
Alannah B. favorited Embroidered Clutch
03 Apr 02:24
-
Suzi T. favorited Embroidered Clutch
28 Mar 18:23
-
 MisfitsKid favorited Embroidered Clutch
27 Mar 08:23
MisfitsKid favorited Embroidered Clutch
27 Mar 08:23
-
MisfitsKid added Embroidered Clutch to Sewing Projects
27 Mar 08:23
-
 Step 1
Embroider exterior piece of fabric. I used Follow the White Bunny's "Apple Tree" embroidery pattern. Available here: http://shop.followthewhitebunny.com/product/apple-tree-hand-embroidery-pattern-pdf
-
 Step 2
Cut exterior, interior, and interfacing to 8.5 by 9-inches.
-
 Step 3
Use a jar lid or small plate to create the curved bottom edges of each piece of fabric, interior/lining, and interfacing. I used a jar lid and placed it as close to the bottom and side edge as I could. I traced the bottom curve along the corner of fabric, then clipped the excess fabric off.
-
 Step 4
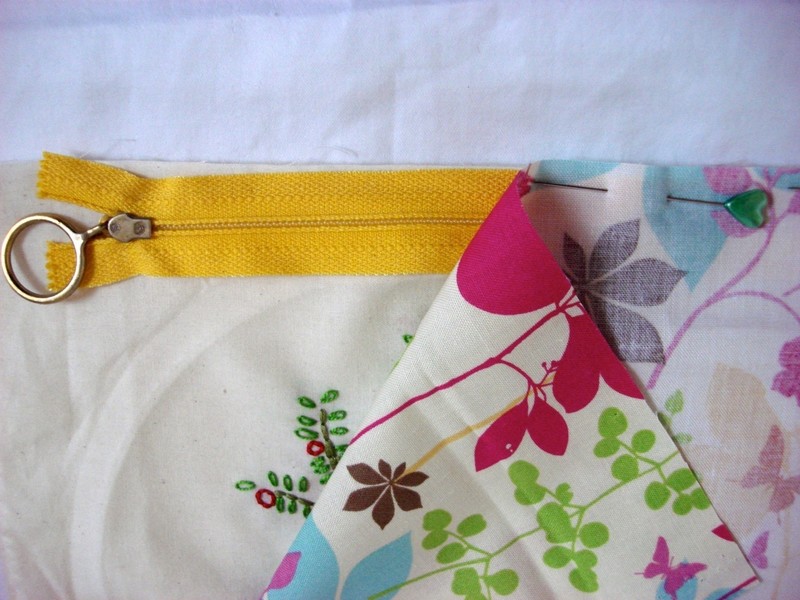
Place the zipper face down over the exterior piece of fabric, with the furthest edge of the zipper tape along the top edge of the fabric. I have the interfacing underneath this exterior piece of fabric. Place one interior or lining piece of fabric face down over that and pin in place. Using a zipper foot on a sewing machine, stitch along this top edge.
-
 Step 5
Repeat the instructions from Step Four on the other side of exterior fabric by placing the zipper face down with the unsewn edge along the top of the exterior piece and the lining face down over that. Again, the interfacing is underneath the exterior piece. You'll have the right sides of the interior/lining facing each other, as shown in the photo below. Pin in place and sew.
-
 Step 6
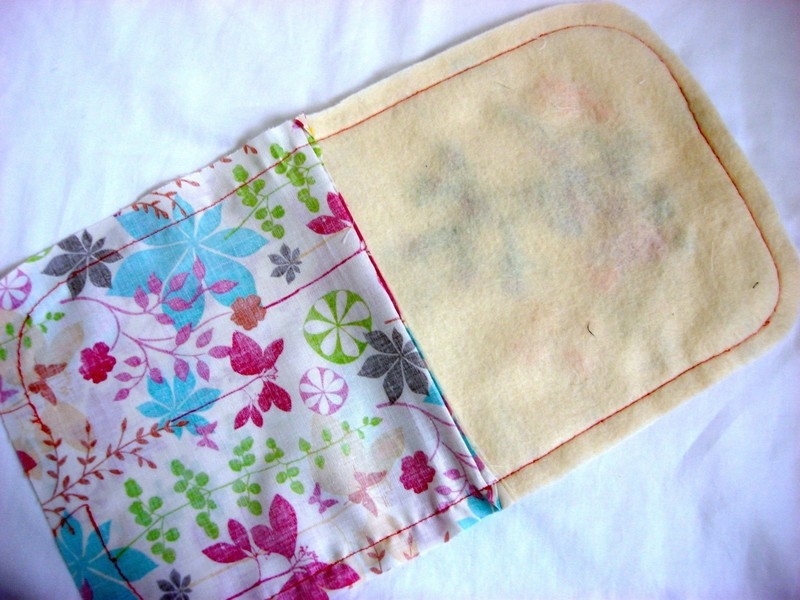
When you turn the fabric out, it should look something like this, with the right sides of the interior/lining and exterior facing out on either side. Top stitch along each side of the zipper, as shown in the photo.
-
 Step 7
Unzip the zipper about halfway. Take the two exterior pieces and bring them right sides together and pin in place. Pin the interior/lining pieces together as well, marking a 2-inch space to leave unsewn on the interior/lining piece. Sew around these pieces using a 1/2-inch seam allowance.
-
 Step 8
Clip the four curves of the exterior and interior/lining, perpendicular to the seam you just created. Clip as closely to the seam as possible, without cutting the thread. This will allow the curve to lay flat once the bag is turned.
-
 Step 9
Turn the bag through the unsewn space in the lining and then top stitch this space shut. Push all the corners out.
-
 Step 10
Add your items and enjoy a fun clutch bag/purse!