


About
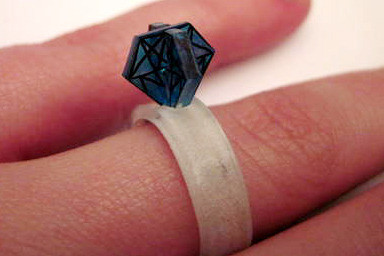
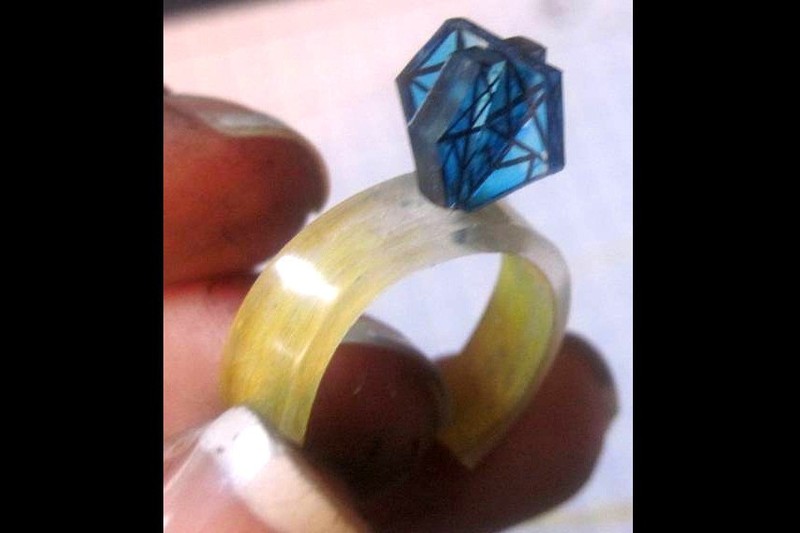
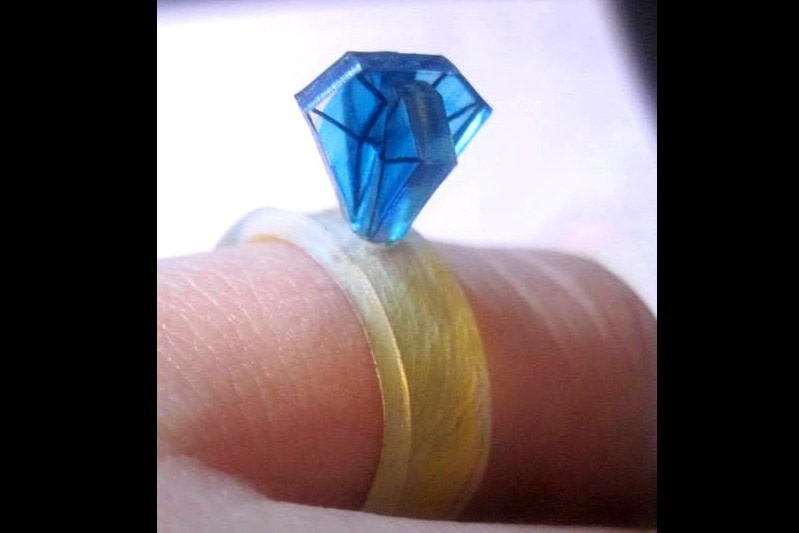
Fancy diamond ring .. .at a fraction of the cost!
I've seen some shrinkydink rings floating around the internet and they inspired me to try one of my own. It was kind of a silly quick project, but I like how it turned out...
-
 Tracy M. favorited (Easy) 3 D Shrinky Dink Diamond Ring
24 Mar 12:41
Tracy M. favorited (Easy) 3 D Shrinky Dink Diamond Ring
24 Mar 12:41
-
 Kendell V. favorited (Easy) 3 D Shrinky Dink Diamond Ring
25 Jul 02:58
Kendell V. favorited (Easy) 3 D Shrinky Dink Diamond Ring
25 Jul 02:58
-
 brandi.williams.atc added (Easy) 3 D Shrinky Dink Diamond Ring to Wire Jewelry tutorials
15 Jun 03:50
brandi.williams.atc added (Easy) 3 D Shrinky Dink Diamond Ring to Wire Jewelry tutorials
15 Jun 03:50
-
 Anja R. favorited (Easy) 3 D Shrinky Dink Diamond Ring
25 May 04:15
Anja R. favorited (Easy) 3 D Shrinky Dink Diamond Ring
25 May 04:15
-
 DocDoolittle added (Easy) 3 D Shrinky Dink Diamond Ring to Rings
23 Feb 14:49
DocDoolittle added (Easy) 3 D Shrinky Dink Diamond Ring to Rings
23 Feb 14:49
-
 Taylor T. favorited (Easy) 3 D Shrinky Dink Diamond Ring
21 Feb 11:02
Taylor T. favorited (Easy) 3 D Shrinky Dink Diamond Ring
21 Feb 11:02
-
 Amena S. favorited (Easy) 3 D Shrinky Dink Diamond Ring
04 Feb 00:34
Amena S. favorited (Easy) 3 D Shrinky Dink Diamond Ring
04 Feb 00:34
-
Leticia M. favorited (Easy) 3 D Shrinky Dink Diamond Ring
17 Nov 15:55
-
Rachel E. favorited (Easy) 3 D Shrinky Dink Diamond Ring
07 Nov 01:31
-
 zoegirl221 added (Easy) 3 D Shrinky Dink Diamond Ring to Jewelry
15 Sep 22:45
zoegirl221 added (Easy) 3 D Shrinky Dink Diamond Ring to Jewelry
15 Sep 22:45
-
 Step 1
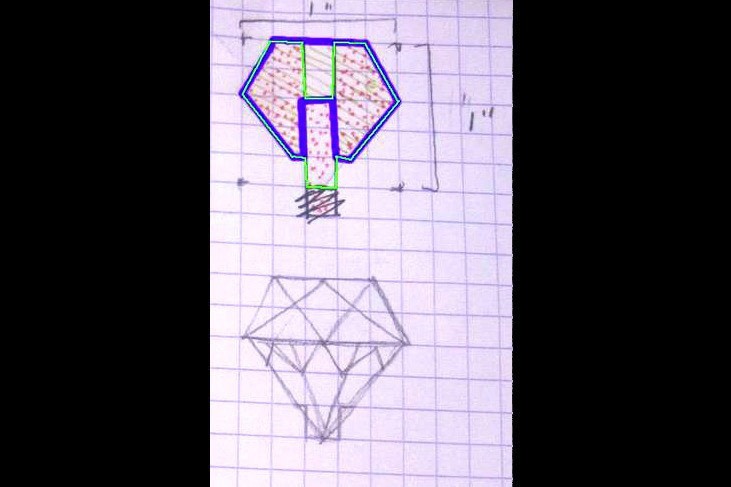
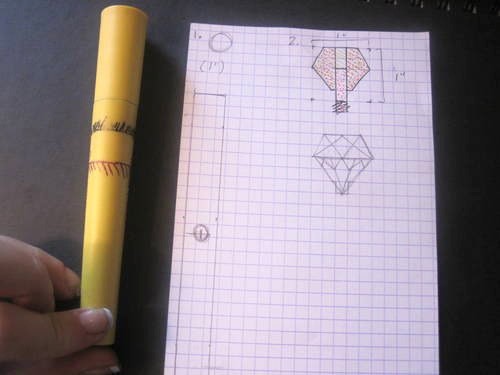
So for the first step, you want to know what the size the finished product should be. ShrinkyDinks (SD) come with a little scale ruler so you can find out what size in inches you need to make the prebaked piece in order for it to end up the right size when shrunk. I usually do a rough little sketch or random shape of the final size that I want the piece to be, and then measure it with the SD ruler (which as you can see I have drawn onto my regular ruler becaus I'm perhaps a little obsessed with SD at the moment). That number then translates into how many 'real' inches you need to make the piece. In this case, it was 1".
-
 Step 2
Using the measurement from the little blob (1") we'll draw the outlline of the diamond as well as a little channel running through the middle. We need to make one piece with a channel cut through the top half and a 'tail' on the end and one piece with the channel cut through the bottom half. This way when they're shrunk, one diamond piece will interlock with the other one, which in turn will stick into the band. I outlined one shape with purple, and the other shape with green so that it is more clear. Below the template piece is another drawing with the lines that we will draw on the pieces once they are cut.
-
 Step 3
We'll also draw the band to the specifics of your ring size. To find out how big I needed my band to be, I slid a ring that already fits down a tapering Covergirl mascara tube (I also used the mascara to shape the final piece once it was baked). In the middle of the band we'll cut a hole so that the diamond will fit in it. I used a hole punch.
-
 Step 4
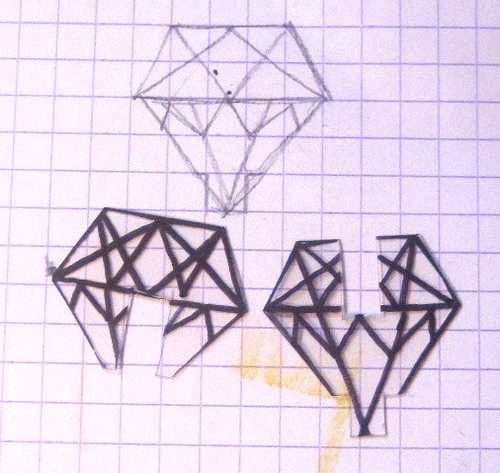
Cut out the two pieces and then trace the lines in Sharpie.
-
 Step 5
To colour my diamond, I used my Prismacolour markers. They don't hold up as well as sharpies (they tend to stain the glaze a little bit, but in this case it doesnt matter as the diamond is all the same colour), but much better than cheap waterbased markers. I coloured the band with coloured pencils.
-
 Step 6
Put the pieces in the oven and bake to the temperatures/times specified in the SD package. Pull them out of the oven and quickly pick up (careful, its hot, but cool enough that I pick them up almost right out of the oven) the band and bend it around whatever object you found that will work for you. If you dont get it right the first time, you can put the cooled SD back in the oven until it softens and try it again.
-
 Step 7
Take the two diamond pieces and fit them together. I put a little bit of E3600 glue to keep them together, but regular white glue would probably work too.
-
 Step 8
Then put a little glue on the hole of the band and fit the diamond into place. I find that the fit is snug enough that you don't even need glue, but wear and tear throughout the day may shake it loose. You could made different coloured gems and switch them up if you don't glue the diamond in.
-
 Step 9
Tips etc..
*to figure out the width of the channel in the middle of the faux-diamond, I measured an already shrunk piece of SD and then converted that number back to 'real' inches. A channel of 1/4(real)" makes the pieces fit perfectly, however if you are unsure at your measuring skills, just cut one channel a little bigger. The glue will fill in the difference.
*To check if your diamond will fit in the band, place the tail inside the hole before baking. Does it fit? Then it will fit when it's shrunk since SD shrinks uniformly. Again though, if you're unsure, cut the tail a little thinner and the glue will make it work.


Comments


