


About
You want a tie, but you don't have any money? OH but you have duck tape? No problem!!!
So, Hi... I can easily get bored, which is ok, but not when I have craft supplies(tape,scissors, and my brain) and a shirt that none of the ties I've "borrowed" from my dad go with. So I made one and it's quite efficient. If your duck tape isn't like mine then forget the scissors(my tape refused to rip right.
If at any point you don't understand what the heck I'm talking about, just ask, I vary rarely make sense, the butterflies are invading!!!!:D
Tags
-
 Sam Goth Winchester commented on her project Duck Tape Tie With Stripes
01 Dec 15:34
Sam Goth Winchester commented on her project Duck Tape Tie With Stripes
01 Dec 15:34
-
 xXSaint.Aida7Xx commented on Duck Tape Tie With Stripes
27 Nov 17:06
xXSaint.Aida7Xx commented on Duck Tape Tie With Stripes
27 Nov 17:06
-
xXSaint.Aida7Xx favorited Duck Tape Tie With Stripes
27 Nov 17:06
You Will Need
-
Step 1
First:take one end of the tape measure( hereby called tape) and put it at the point on or near your neck where the top of the tie will be and note on the paper the distance from the top point to the place where the tip will hang.
-
Step 2
Next: Take your ruler and place it on a flat surface. Then take your pencil and place it so that the tip is pointing to the right measurement on the ruler and take your duck tape and measure it and then rip/cut it.
-
 Step 3
Simply repeat step 2 and then place both pieces EVENLY on top of each other. Put that aside.
(bottom object)
-
Step 4
now measure around your neck, but make it comfortable. If the tape feels like it's choking you, loosen it. now either you can put your finger on the number on the tape or a fried can write it for you.
-
Step 5
This next part may/will get confusing.
Do step 2 again, BUT DON'T REPEAT IT!
Place the duck tape piece so that it is like a "red carpet" in front of you.
Take the two outer edges and fold them INWARD so that they meet in the middle. -
 Step 6
Take your duck tape and make a ton of smallish pieces. Then, make a sort-of tunnel with the 2nd piece and take the tiny pieces and attach them to the seam to fix the tunnel in place.
(top object minus the two end pieces)
-
 Step 7
Now, take a square of duck tape(sorry I don't have info for how big I just eyeballed it) and do step two. Take the two ends and sew them together. Then sew it to one end of the tunnel.
(look at the image to help with the shape)
-
 Step 8
Here's a fun-ish step. Basically, take some duck tape and fold it and squish it till it's a bit bigger than the loop. When big and wide and puffy enough sew the blob just to keep it together. When done sewing don't cut the excess thread, use it to sew the blob the other end of the tunnel.
(the image should help a bit)
-
 Step 9
This is pretty simple.
First, make sure the blob fits in the loop and out.
Then attach it around your neck to make sure all's well if so keep going, if not simply make a cut near one of the ends and add duck tape until its comfortable.(the image shows how it should roughly look)
-
 Step 10
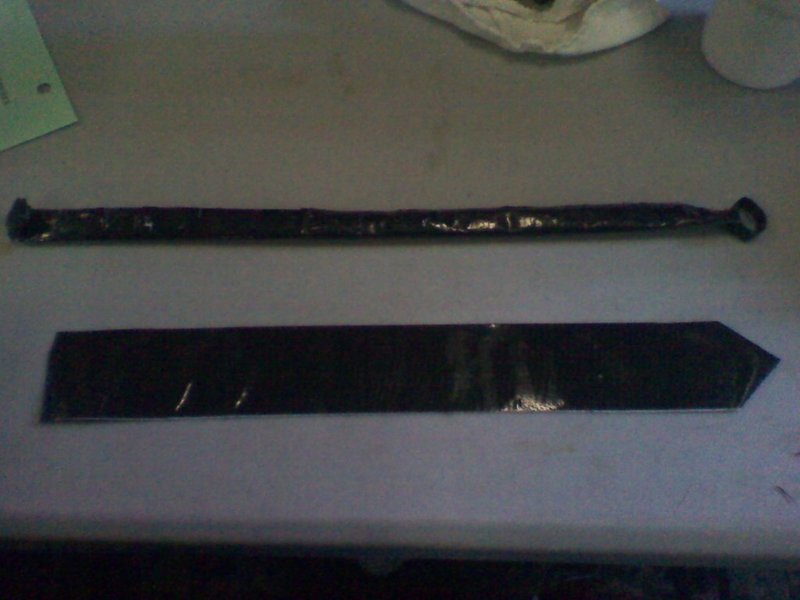
You should have two pieces now,
like in the image. Ignore the point on the bottom piece, that's the next step. -
 Step 11
Take one end of the long piece with square-ish ends and fold the two points in towards each other and attach with duck tape.
-
 Step 12
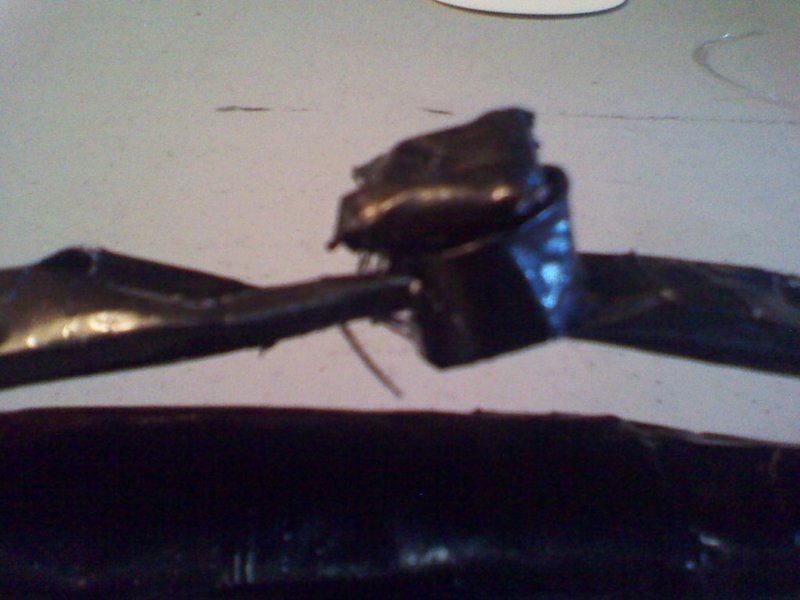
Now this WILL get a bit tricky, so bear with me please.
put the neck piece at the top as shown, and the "body" just a bit on top of it pointing towards you. Take a longish piece of duck tape and attach it at the top to look like a knot in a real tie.
(the image may help you)
-
 Step 13
EMBELLISHMENT TIME!!!! Do whatever you like to it, I chose to add Red stripes to mine.
(Sorry it's crooked, but you get the idea)


Comments


