


About
Make fast wall hooks using wood plaques!
For this DIY, I wanted to choose something that would be useful for almost anyone – something that could fit in any space, have a variety of uses, be reasonable cost-wise, doable for any skill level and most of all totally customizable! Let’s get started!
-
 Alissa B. favorited Diy Wall Hooks
09 May 05:32
Alissa B. favorited Diy Wall Hooks
09 May 05:32
-
 Sahana added Diy Wall Hooks to Living Room
31 Mar 14:02
Sahana added Diy Wall Hooks to Living Room
31 Mar 14:02
-
 Sahana A. added Diy Wall Hooks to Home decor
15 Mar 15:59
Sahana A. added Diy Wall Hooks to Home decor
15 Mar 15:59
-
Katrina P. favorited Diy Wall Hooks
05 Jul 14:29
-
 czari v. added Diy Wall Hooks to Fearies room
20 Jun 15:08
czari v. added Diy Wall Hooks to Fearies room
20 Jun 15:08
-
 Lisa Dawn Perry added Diy Wall Hooks to Shelving, Organization, & Storage
18 Jun 16:14
Lisa Dawn Perry added Diy Wall Hooks to Shelving, Organization, & Storage
18 Jun 16:14
-
Lisa Dawn Perry favorited Diy Wall Hooks
18 Jun 16:14
-
 Steph. favorited Diy Wall Hooks
12 May 16:19
Steph. favorited Diy Wall Hooks
12 May 16:19
-
 Libby W. added Diy Wall Hooks to Homewares
22 Apr 19:33
Libby W. added Diy Wall Hooks to Homewares
22 Apr 19:33
-
Libby W. favorited Diy Wall Hooks
19 Apr 21:26
-
 Step 1
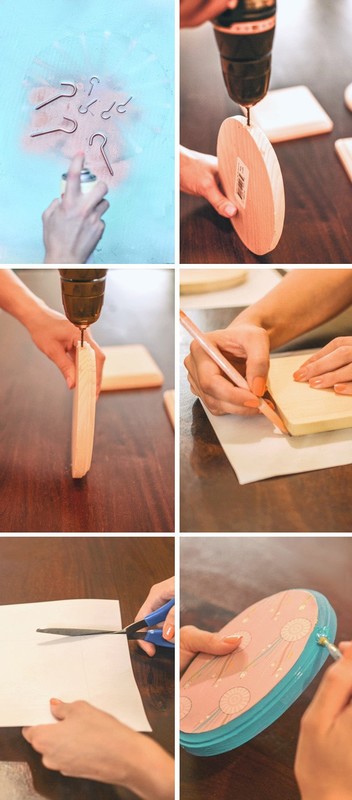
1. Gather your supplies. For the wall plaques, I chose 3 shapes – a 5×5″ square, a 5×7″ rectangle and a 5×7″ oval. You can buy larger or smaller plaques and experiment with shapes for a one-of-a-kind look. You will also need a drill and a 3/16″ drill bit, 3” ceiling/screw hooks, spray paint, craft paint, glue and paper.
-
Step 2
2. Spray paint the ceiling hooks and let them dry. I used two coats on each side to ensure even coverage.
-
Step 3
3. Use the drill and drill bit to drill a hole in the bottom middle of each wood plaque. I didn’t mark the center and just eyeballed it, but measuring precisely is always a great idea. You will need to drill into the wood about an inch or so.
-
Step 4
4. Next, gather your decorative paper. I chose 3 patterns: a feather pattern, a dreamcatcher pattern, and a chevron print.
-
Step 5
5. Place the paper upside down and put each plaque on top and trace around.
-
Step 6
6. Cut out the paper.
-
Step 7
7. Glue the paper on the plaques. I used a glue stick for this step because it is less likely to create bubbles in the paper but any glue will work.
-
Step 8
8. Paint the edges of the plaques. You can do this before you glue on the paper, the order doesn’t necessarily matter! I used turquoise for all of them to make them uniform but you can mix and match colors just as easily.
-
Step 9
9. Wait for the paint to dry.
**Optional: if you want to make the wall hooks extra durable, put a layer of Mod Podge over the paper and paint.
-
Step 10
10. Screw in the hooks to the bottom holes and then hang up your new hooks!
Comments


