About
DIY - VINTAGE LUGGAGE REVAMP TUTORIAL
Learn how to take a shabby old luggage and transform it into a unique & stylish travel accessory!
In this fun and upbeat tutorial, designer Timmery (http://www.timmery.com/), will show you step by step instructions on creating one of her most unique and sought after projects!
You can view the full tutorial here!! http://youtu.be/0w-vXxICUUg
-
 Bonnie P. favorited Diy Vintage Luggage Revamp Tutorial
27 Nov 09:57
Bonnie P. favorited Diy Vintage Luggage Revamp Tutorial
27 Nov 09:57
-
 Key West Witch favorited Diy Vintage Luggage Revamp Tutorial
28 Sep 05:09
Key West Witch favorited Diy Vintage Luggage Revamp Tutorial
28 Sep 05:09
-
 jenny.bowman.77 added Diy Vintage Luggage Revamp Tutorial to DIY the look
21 Mar 19:02
jenny.bowman.77 added Diy Vintage Luggage Revamp Tutorial to DIY the look
21 Mar 19:02
-
 Carla M. favorited Diy Vintage Luggage Revamp Tutorial
17 Sep 01:37
Carla M. favorited Diy Vintage Luggage Revamp Tutorial
17 Sep 01:37
-
 Mochi Mochi favorited Diy Vintage Luggage Revamp Tutorial
29 Aug 22:11
Mochi Mochi favorited Diy Vintage Luggage Revamp Tutorial
29 Aug 22:11
-
 Karen Y. favorited Diy Vintage Luggage Revamp Tutorial
06 Aug 22:09
Karen Y. favorited Diy Vintage Luggage Revamp Tutorial
06 Aug 22:09
-
meg B. favorited Diy Vintage Luggage Revamp Tutorial
24 Jun 23:13
-
 Xirimpi favorited Diy Vintage Luggage Revamp Tutorial
31 May 17:08
Xirimpi favorited Diy Vintage Luggage Revamp Tutorial
31 May 17:08
-
 Quackers, Vino & Cheese favorited Diy Vintage Luggage Revamp Tutorial
26 May 20:38
Quackers, Vino & Cheese favorited Diy Vintage Luggage Revamp Tutorial
26 May 20:38
-
 WerewolfCas favorited Diy Vintage Luggage Revamp Tutorial
29 Mar 10:04
WerewolfCas favorited Diy Vintage Luggage Revamp Tutorial
29 Mar 10:04
You Will Need
-
Step 1
Watch the full Tutorial Here! Step by step written instructions below!
-
 Step 2
Prepare your luggage by cleaning it thoroughly with soap and water or any type of cleaner.
-
 Step 3
Prime your luggage with white primer using paint roller and small or medium paint brush.
Be sure to apply 2 to 4 coats for full coverage. Allow the paint to dry in between coats.
-
 Step 4
Add paint color of your choice!
Add 2 to 3 coats for ultimate coverage!!
-
 Step 5
Now it's time for the fun part! Decoupage your image cut outs!
Once you've decided the placement of your images, dip one of your medium sized acrylic brushes (that you don't mind messing up) into your decoupage glue and water and apply to the entire back surface of the image or your choice.
-
 Step 6
Press the image down onto your luggage, and paint your glue and water mixture of the entire top surface of your image.
Be sure not to use too much water!!! You may get a little bit of bleeding, but that's okay. It can be easily cleaned up with a wet paper towel!
-
 Step 7
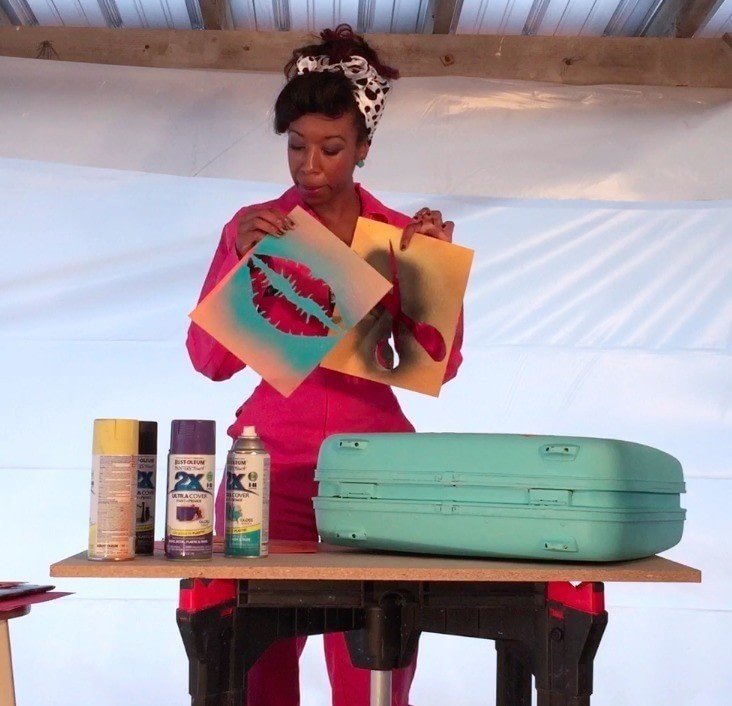
Once you've applied all of your desired images onto the top of your luggage it's time to add the next layer....stenciling and spray paint!
P.S. You can always add more images to fill in gaps and more depth after you stencil!
-
 Step 8
Using the spray paint color of your choice, spray paint your stenciled image onto the desired place on your luggage!
It doesn't always come out perfect, that's okay! You can touch up later!
P.S. Be sure to always spray paint in a well ventilated area and wear your protective mask!
-
 Step 9
Once the front is dried, flip your luggage over and add a stenciled image to the backside or you can always add decoupaging images here. It's truly up to you! This project is supposed to represent YOU and your style!
-
 Step 10
Now, it's time for touchups! Using your small brush or sponge brush go through and touch up all of the areas that were affected by over spray from your stencil.
-
 Step 11
Once your touchups are done, it's time to add details using your acrylic paints and paint brushes!
This can be anything you'd like! Have fun with this!
I also tend to add more decoupaged images, as well, at this point!
-
 Step 12
The front is now complete. Step back and enjoy your work! But we're not done yet!!
-
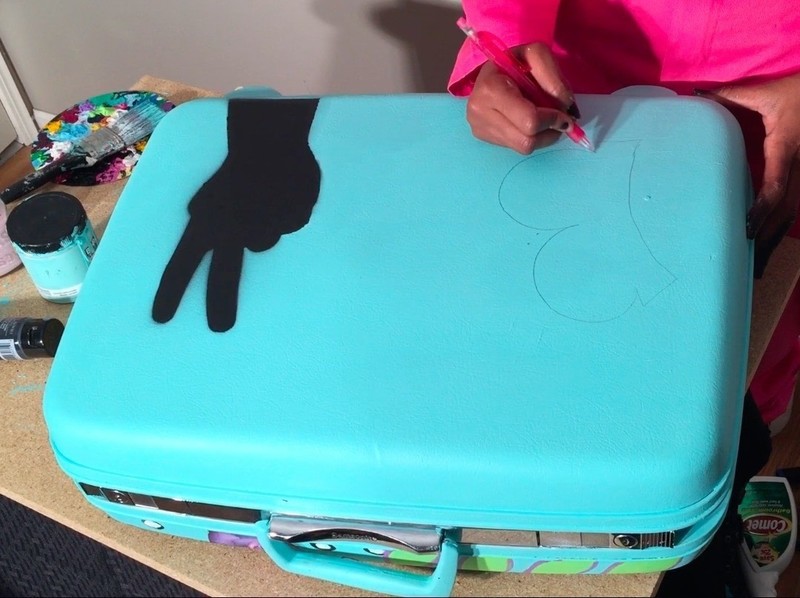
 Step 13
Now it's time to work on the backside of your luggage! Once again, touch up any mistakes using your small brush or sponge brush.
I needed to touch up my peace sign so I used black acrylic paint to sharpen and define my stenciled image!
-
 Step 14
Now that my touchups are complete, I'm going to free hand and paint the word "Bye!" next to my peace sign! That's just my signature thing. YOU can do anything you'd like, of course!
-
 Step 15
Time to fill in with black acrylic paint! Or whatever color you choose to use!
-
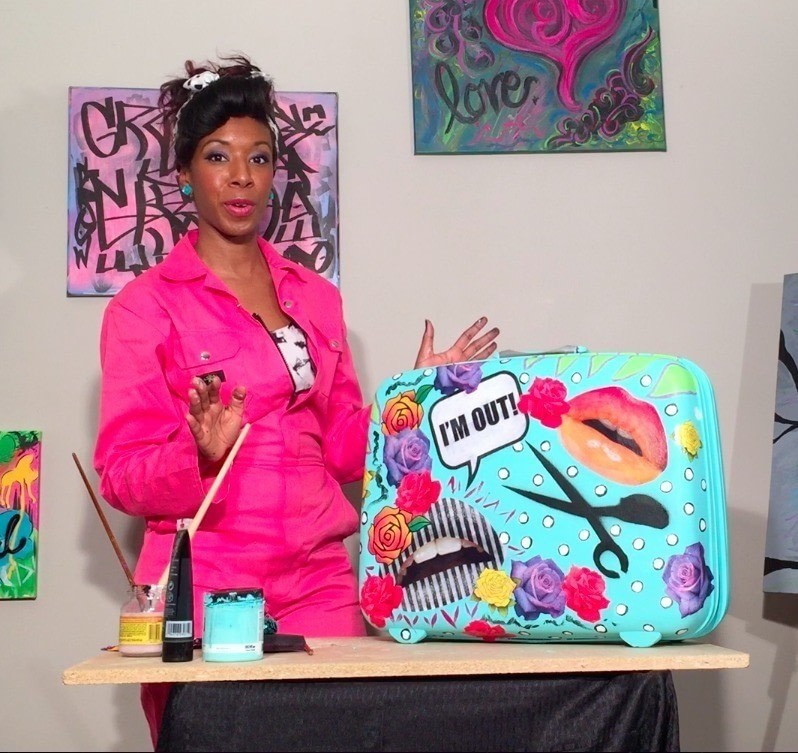
 Step 16
Ta da! Now you have a unique and beautiful piece of luggage!
Be sureto spray your luggage with a clear gloss enamel before using!! You should do 2 to 3 coats of this!
I hope you had fun! If you have any questions at all, please feel free to leave a comment and I will get back with you as soon as I can!
For new projects and ideas please like my Facebook Fan Page: www.facebook.com/allthingstimmery!
And follow me on Twitter & Instagram: @MyNameIsTimmery
Stay Glam!!!