About
A how-to for the perfect 70's inspired design!
It's no doubt that I love all things bright and fun - especially on my nails! This design is perfect for summer and any other time you just feel like having fun nails!
-
 Key West Witch favorited DIY Tie Dye Nail Art
21 Aug 03:52
Key West Witch favorited DIY Tie Dye Nail Art
21 Aug 03:52
-
 kiki w. added DIY Tie Dye Nail Art to Makeup
29 Jan 17:48
kiki w. added DIY Tie Dye Nail Art to Makeup
29 Jan 17:48
-
 asia.pearce added DIY Tie Dye Nail Art to Nails
25 Jul 01:19
asia.pearce added DIY Tie Dye Nail Art to Nails
25 Jul 01:19
-
 autumn rose l. favorited DIY Tie Dye Nail Art
13 Aug 21:52
autumn rose l. favorited DIY Tie Dye Nail Art
13 Aug 21:52
-
Amy k. favorited DIY Tie Dye Nail Art
29 May 20:11
-
 mmotse03 favorited DIY Tie Dye Nail Art
29 May 05:10
mmotse03 favorited DIY Tie Dye Nail Art
29 May 05:10
-
 Maggie favorited DIY Tie Dye Nail Art
13 Feb 16:51
Maggie favorited DIY Tie Dye Nail Art
13 Feb 16:51
-
Dee D. added DIY Tie Dye Nail Art to beauty
04 Feb 05:22
-
 Chachee.rayna added DIY Tie Dye Nail Art to Nails
17 Dec 04:00
Chachee.rayna added DIY Tie Dye Nail Art to Nails
17 Dec 04:00
-
 Jodie P. favorited DIY Tie Dye Nail Art
14 Dec 13:28
Jodie P. favorited DIY Tie Dye Nail Art
14 Dec 13:28
-
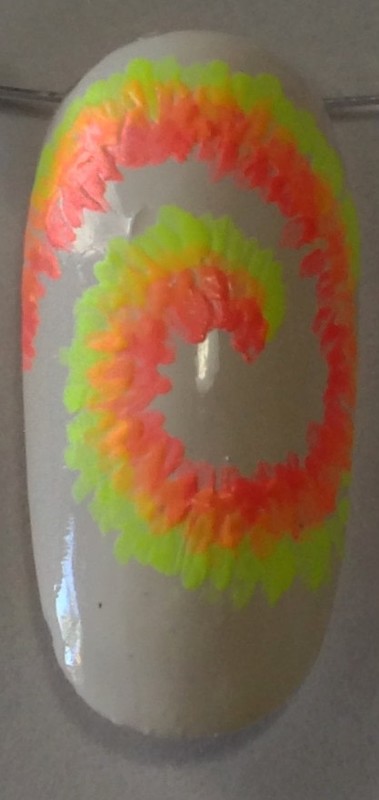
 Step 1
First step is super simple - paint your nails with a white polish. Honestly, I wouldn't even bother painting two coats. You'll be covering it up anyway!
-
 Step 2
Next, this is pretty much what you'll be doing with each color polish. Pick a starting point (near the center) and spiral out. I would recommend starting with your red/pink if you're doing a rainbow themed tie dye.
-
 Step 3
Follow up with orange.
-
 Step 4
and yellow.
-
 Step 5
I actually skipped green because the nails I did put it on, it was barely visible and it was getting cramped on my nails. So turquoise/blue it is!
-
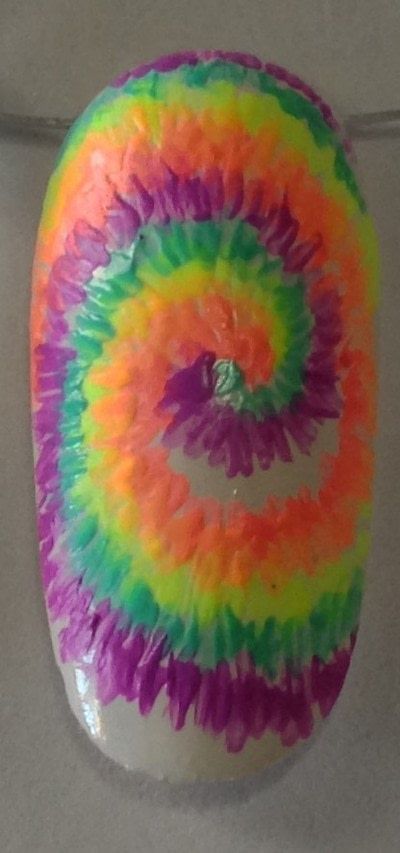 Step 6
and purple. Don't worry if you have extra white space. We will take care of that.
-
 Step 7
Fill your open space (if any) with colors that make sense in that spot . As you can see, I used my pink polish again to fill the space.
-
 Step 8
top coat it and you're done! definitely not as difficult as it seems!