


About
Make a Beautiful Rug you'll Love and Cherish!
anted a 4×6 Pink and Ivory shag rug to go in Riley’s nursery so bad I couldn’t stand it, but after pricing them online I was starting to think that it was out of the question….that is until my DIY light bulb went off….A DIY Shag Rag Rug was the answer! My husband thought it was a bad idea simply because of how long it would take me to make, but of course, that didn’t stop me :-) I was bound and determined to have a shag rug for Riley’s nursery and guess what my DIY Shag Rag Rug turned out GREAT, it looks so much better than I imagined!
For full disclosure I will say that this was one of the easiest projects I’ve ever done, yet it was the absolute MOST time-consuming. I worked on my DIY Shag Rag Rug every single day for 2-4 hours a day and it still took me 4 weeks to complete. I honestly was wondering if I was ever going to get it finished, but I didn’t give up!! Now I have a beautiful rug, so it was well worth the time!!
-
 Key West Witch favorited Diy Shag Rag Rug Tutorial
26 Jun 09:49
Key West Witch favorited Diy Shag Rag Rug Tutorial
26 Jun 09:49
-
 Mistress Nora of Madness favorited Diy Shag Rag Rug Tutorial
05 Oct 22:26
Mistress Nora of Madness favorited Diy Shag Rag Rug Tutorial
05 Oct 22:26
-
 Tracey H. favorited Diy Shag Rag Rug Tutorial
14 Oct 02:44
Tracey H. favorited Diy Shag Rag Rug Tutorial
14 Oct 02:44
-
 Lesa L. favorited Diy Shag Rag Rug Tutorial
16 Aug 05:00
Lesa L. favorited Diy Shag Rag Rug Tutorial
16 Aug 05:00
-
 Ellen P. commented on Diy Shag Rag Rug Tutorial
17 Feb 21:32
Ellen P. commented on Diy Shag Rag Rug Tutorial
17 Feb 21:32
-
Ellen P. favorited Diy Shag Rag Rug Tutorial
17 Feb 21:17
-
 Cindy S. favorited Diy Shag Rag Rug Tutorial
26 Jan 04:08
Cindy S. favorited Diy Shag Rag Rug Tutorial
26 Jan 04:08
-
 patti m. favorited Diy Shag Rag Rug Tutorial
18 Jan 12:09
patti m. favorited Diy Shag Rag Rug Tutorial
18 Jan 12:09
-
 nina.eriksen.90834 added Diy Shag Rag Rug Tutorial to To-make
06 Jan 12:45
nina.eriksen.90834 added Diy Shag Rag Rug Tutorial to To-make
06 Jan 12:45
-
 LollyLabbit favorited Diy Shag Rag Rug Tutorial
06 Jan 01:40
LollyLabbit favorited Diy Shag Rag Rug Tutorial
06 Jan 01:40
-
 Step 1
Cut your fabric into strips. I think it’s easier and less time-consuming if you cut multiple strips at a time. Start by folding your fabric in half vertically then fold in half again horizontally making sure the ends are as even as possible. Then you need to measure 5 inches from the bottom of the fabric and draw a horizontal line all the way across using your fabric chalk.
-
 Step 2
Cut your fabric along the chalk line
-
 Step 3
Now cut your fabric into vertical strips that are about 3/4″ wide
-
 Step 4
Pick up a fabric strip with your jewelry tweezers
-
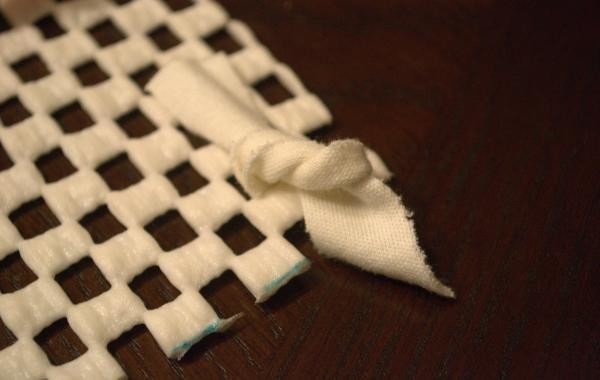
 Step 5
Weave Fabric under one of the holes and back up through another hole (I weaved the fabric in a vertical direction). I left one row of holes empty on all sides.
-
 Step 6
Pull the fabric so that it’s even on both sides and tie it into a knot (this will hold the fabric in place)
-
 Step 7
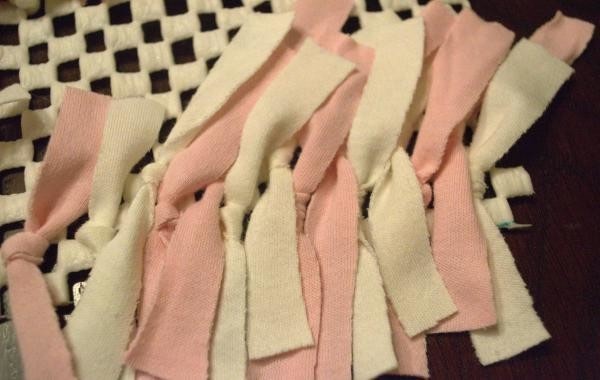
If you are using two colors then you should alternate colors as you go.
-
 Step 8
Continue adding Fabric Strips alternating colors as you go. It will look bare at first but the more rows you add the fuller it will get. Here is what it looks like after adding two rows of fabric
-
 Step 9
My DIY Shag Rag Rug in the works…..I’m finally making some progress
-
 Step 10
And after weeks of repeating the same steps over and over I finally finished the Shag Rag Rug for Riley’s Nursery!
-
 Step 11
Uplcose View of the Shag Rag Rug


Thanks