
About
A simple way of making a beautiful bib necklace your friends will be jealous of!! ;)
This is my first ever DIY tutorial, so please bear with me! :)
I made this necklace and have already made several different versions - I'd love to see your versions!
Tags
-
 Kathy S. favorited Diy Jewelled Bib Necklace
17 Aug 23:06
Kathy S. favorited Diy Jewelled Bib Necklace
17 Aug 23:06
-
 Shemeka S. favorited Diy Jewelled Bib Necklace
09 Apr 10:16
Shemeka S. favorited Diy Jewelled Bib Necklace
09 Apr 10:16
-
Shea Y. favorited Diy Jewelled Bib Necklace
12 Feb 01:37
-
 Step 1
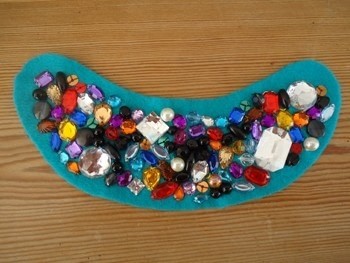
1. Firstly I sketched the shape and size bib necklace I wanted to make and cut out a template. I tried the template on to see if it was right. I then chose the colour felt I was going to use and cut that out using my template.
-
 Step 2
them
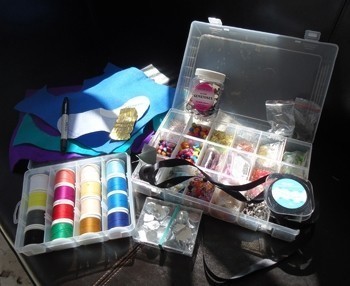
2. I chose what embellishments I wanted to use on my bib and laid them onto the template for a rough idea of how it would look. I used several larger gems, and then filled in the space around them with various other smaller gems, some sequins, a few pearls and other beads and sparkly bits. By laying them on the template, I did not have to remove them from the actual 'bib' whilst sewing other gems on. -
 Step 3
3. Start sewing your gems! This is the most time consuming part of the process. I enjoy sitting and sewing the gems on, but if you want to cheat, you could use a glue gun to secure larger gems. I used coloured threads that matched the gems as closely as possible, which was also time consuming, but I thought it would make for a better end result. I left a border around the edge of the gems.
-
 Step 4
4. I decided to back my felt with fabric. I had an old blazer I'd bought from a thrift store for the buttons, and had kept it handy for scraps. I cut the sleeve off the blazer, washed it by hand (to remove the old thrift store smell!) and let it dry.
-
 Step 5
5. I pinned the beaded bib to the sleeve and cut out around it, leaving approx. 1cm edging. You could do this carefully, but I wanted a bit of a "rough" finish, so my edging was purposely not perfect.
-
 Step 6
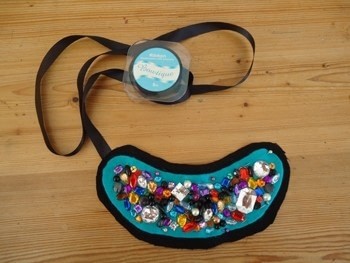
6. Next is the fun bit - using a hot glue gun! I glued the felt to the fabric backing.
Once the glue has dried you can always sew it together for extra security. -
 Step 7
7. Hold your bib up to your neck and work out where you should position the ribbon that will secure it. I marked these spots with pins.
I then measured approximately how much ribbon I would need to tie around my neck. I cut the ribbon longer rather than shorter as it is best to have too much rather than too little!
-
 Step 8
8. Glue the ribbon to the bib using the hot glue gun. I finished securing the ribbon by sewing it as well, just for extra strength.
-
 Step 9
9. And there you go - you've finished!