


About
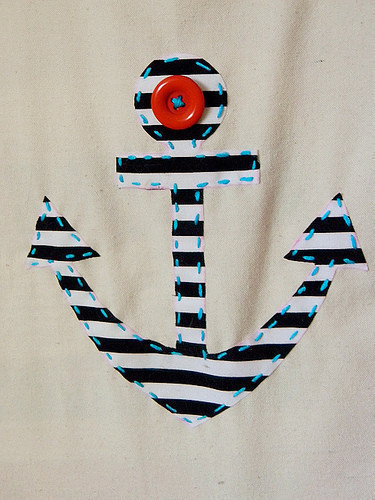
Customize shirts, onsies, tote bags, and more.
One of the coolest and simplest craft supplies I’ve come across is paper-backed, iron-on adhesive. The adhesive often comes on a roll or is sold in sheets. It basically consists of an adhesive that melts when heat is applied (via iron) and a paper backing. I created a similar tutorial a few years ago and it continues to be one of my most popular blog posts. I thought it could use some updating.
-
 Bonnie P. favorited Diy Iron On Patches And Appliques
27 Nov 09:58
Bonnie P. favorited Diy Iron On Patches And Appliques
27 Nov 09:58
-
 Marjorie D. favorited Diy Iron On Patches And Appliques
15 Jun 17:50
Marjorie D. favorited Diy Iron On Patches And Appliques
15 Jun 17:50
-
 Key West Witch favorited Diy Iron On Patches And Appliques
12 Sep 09:17
Key West Witch favorited Diy Iron On Patches And Appliques
12 Sep 09:17
-
 Kimya J. favorited Diy Iron On Patches And Appliques
25 May 23:49
Kimya J. favorited Diy Iron On Patches And Appliques
25 May 23:49
-
 Mick Wasabi favorited Diy Iron On Patches And Appliques
13 Apr 05:41
Mick Wasabi favorited Diy Iron On Patches And Appliques
13 Apr 05:41
-
 Hgosn1 favorited Diy Iron On Patches And Appliques
19 Feb 10:07
Hgosn1 favorited Diy Iron On Patches And Appliques
19 Feb 10:07
-
 Emma H. favorited Diy Iron On Patches And Appliques
20 Aug 12:45
Emma H. favorited Diy Iron On Patches And Appliques
20 Aug 12:45
-
 Tierra T. favorited Diy Iron On Patches And Appliques
07 Nov 21:46
Tierra T. favorited Diy Iron On Patches And Appliques
07 Nov 21:46
-
 Chudames favorited Diy Iron On Patches And Appliques
15 Oct 22:05
Chudames favorited Diy Iron On Patches And Appliques
15 Oct 22:05
-
 mmotse03 favorited Diy Iron On Patches And Appliques
16 Aug 23:37
mmotse03 favorited Diy Iron On Patches And Appliques
16 Aug 23:37
You Will Need
-
Step 1
Start with 1 piece of fabric, large enough to accommodate the size of your patch, and one equal (or lightly smaller) piece of iron-on adhesive. Place the fabric right-side down with the dullish, textured side of the iron-on adhesive facing down on top of it (the shiny side of the adhesive paper will be facing up).
-
Step 2
Pre-heat your iron, usually on the low setting (follow the directions on the iron-on adhesive packaging for optimal temperature). Iron the shiny side of the transfer paper lightly until the textured side bonds securely with the fabric.
-
Step 3
Use a template or freehand a design either (a) directly onto the “good” side of the fabric with a fabric pencil OR (b) draw the design directly onto the shiny backside. If you use method (b), remember that your image will be reversed.
-
Step 4
Cut out your design with fabric scissors.
-
Step 5
Peel the paper backing from the fabric.
-
Step 6
Now you are ready to iron the patch onto a shirt, bag, or whatever your heart desires. Place the material right side up in desired position and iron. Ironing time may depend on thickness of fabric. Iron lightly until you have a secure bond. Sew around the edges (by hand or machine) or embellish as you wish.

