DIY Hand Lettered Typeface
Extract from The Joy of Lettering • By Gabri Joy Kirkendall • Published by Quarto


About
The Joy of Lettering
You love hand lettering—the authenticity, the unique character, and even the little imperfections. Have you ever wondered how to turn your unique lettering style into your very own hand-lettered typeface?
There are several ways to create fonts and a wide variety of font- editing programs to choose from. Professional typographers spend hours meticulously perfecting their typefaces and may use expensive font-editing software that allows them to precisely hone in on
their trade, but don’t let that deter you from trying your hand at creating your own font. I promise you don’t have to be a professional typographer, and you don’t have to spend a lot of money to make your very own beautiful, hand-lettered typeface!
In this tutorial I’ll walk you through some basics of setting up hand- lettering alphabet glyphs, and then I'll demonstrate two possible ways to convert your lettering into a typeface.
-
 mmotse03 favorited DIY Hand Lettered Typeface
16 Jul 08:43
mmotse03 favorited DIY Hand Lettered Typeface
16 Jul 08:43
-
 Johny C. favorited DIY Hand Lettered Typeface
23 Aug 06:19
Johny C. favorited DIY Hand Lettered Typeface
23 Aug 06:19
-
 RavenQuinzel added DIY Hand Lettered Typeface to Stuff of interest
12 Apr 16:32
RavenQuinzel added DIY Hand Lettered Typeface to Stuff of interest
12 Apr 16:32
-
 Alissa B. favorited DIY Hand Lettered Typeface
03 Apr 16:18
Alissa B. favorited DIY Hand Lettered Typeface
03 Apr 16:18
-
 Creative Publishing international published her project DIY Hand Lettered Typeface
10 Mar 09:00
Creative Publishing international published her project DIY Hand Lettered Typeface
10 Mar 09:00
You Will Need
-
 Step 1
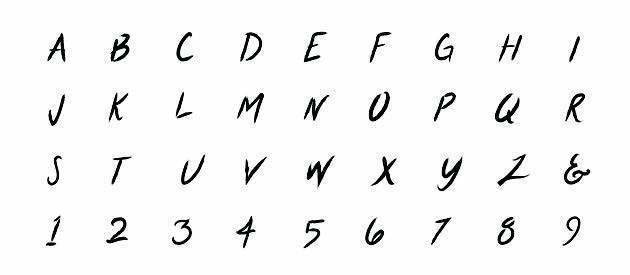
Hand Letter the Typeface
Hand letter your alphabet characters on paper. I wanted my typeface to have a dry-brushed quality, so I used a brush pen on textured paper. If necessary, sketch the lettering on graph paper to keep the letters proportionate.
-
 Step 2
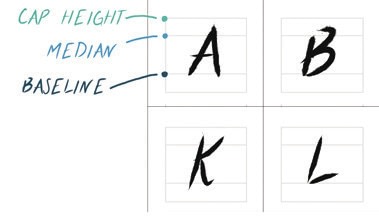
Redraw and perfect any letters you aren’t completely satisfied with. Consider the cap height and baseline, as well as the ascender height, x-height, and descender height. Since my typeface is an all- caps brush script and I want it to feel hand-brushed, I purposefully varied the size of my letters, the baseline, and the cap-height slightly. Once you are happy with all your characters, photograph or scan your work.
-
 Step 3
Convert the Lettering to Vector Art
Place the artwork on a new Illustrator document and, with your work selected, use the “Image Trace” feature to convert the hand lettering.
-
 Step 4
Use the “Expand” button to convert the image-traced object into paths.
-
 Step 5
Use the “Direct Selection Tool” to select an area of your lettering that is filled with white. With the white selected, go to “Select” > “Same" > “Fill & Stroke.” Once all of the white areas are selected on your work, delete them so that only the lettering remains.
-
 Step 6
Look over each letter and symbol. Delete any imperfections, and smooth out any jagged lines.
Artist's Tip
AS AN ALTERNATIVE, IF YOU’D LIKE TO SKIP HAND DRAWING THE LETTERS ON PAPER AND IMPORTING, YOU MAY USE THE "PEN TOOL" IN ILLUSTRATOR TO DRAW YOUR CHARACTERS DIRECTLY IN THE PROGRAM.
-
 Step 7
Organize all of the letters, and scale them appropriately so that they are relatively uniform in size.
-
 Step 8
Create the Typeface: Fast & Free
Research and select a free online font creator. Download the font template. Then copy and paste your vector lettering onto the template and arrange it accordingly.
Make adjustments to size and spacing as needed to match the baseline, cap height,
and median.Artist's Tip
TO INSTALL YOUR NEW FONT ON A MAC, CONTROL-CLICK ON THE FILE AND CHOOSE "OPEN WITH" > "FONT BOOK." -
 Step 9
Save and upload the template to the font creator website. Name your font, and select the TTF output. Press start to generate your font, and download the font file when it is complete. Now you can install your new font just like you would any other downloaded font. Your hand-lettered typeface is ready to use! This option doesn’t offer any extra features for kerning or fine-tuning, but it is a simple, free way to start out.
-
 Step 10
Create the Typeface: The Basics of Font-Editing Software
Do a little research and decide which font-editing software is right for you. Depending on what software you use, these instructions may vary a little, but I will guide you through the basic steps. For this tutorial I’m using Glyphs Mini App. Open the software, and select “File” > “New.” Then select “File” > “Font Info.”
-
 Step 11
Now you can name your font and fill out additional information accordingly. This screenshot shows a sample of how I set mine up.
-
 Step 12
Resize all of your vector letters and symbols in Adobe Illustrator to be 1000 x 1000 px (pixels). In the font software options, choose which letters, numbers, and symbols you want your finished typeface to have.
-
 Step 13
Once you are ready, double-click on each individual glyph in the font software, and copy and paste in the corresponding letter from Illustrator.
-
 Step 14
Size and arrange the letters accordingly.
-
 Step 15
Copy all of the letters and symbols to the appropriate glyphs.
-
 Step 16
You may find that you need to adjust the kerning for your letters. Kerning is the spacing between letters. To adjust kerning in Glyphs Mini App, start by double-clicking to select a specific letter. With the “Type Tool” selected, hold down CMD+OPTION+F. Type some words to see how the kerning looks. To adjust the kerning, select the space between letters, hold down CMD+OPTION, and use the Left/Right arrows on your keyboard to adjust.
-
 Step 17
Generate the nished font by selecting “File”> “Export.” I recommend exporting as an OTF, which stands for OpenType Font.
-
 Step 18
Install your font! After installing the font, experiment with it and note any changes or adjustments you would like to make in your font-editing software.
-
 Step 19
Now you can use your very own font for hand-lettered typography fun! With these basics, you'll be able to perfect your skills and create as many fonts as you like. Happy typing!