


About
Making a hood
-
 Anjeanette Artist favorited Diy Couture Hood
16 May 19:03
Anjeanette Artist favorited Diy Couture Hood
16 May 19:03
-
 Ilana M. favorited Diy Couture Hood
21 Jan 00:33
Ilana M. favorited Diy Couture Hood
21 Jan 00:33
-
Laura P. favorited Diy Couture Hood
11 Nov 01:50
-
 Shawnshawn D. favorited Diy Couture Hood
21 Oct 04:00
Shawnshawn D. favorited Diy Couture Hood
21 Oct 04:00
-
 Rachel B. favorited Diy Couture Hood
29 Nov 06:58
Rachel B. favorited Diy Couture Hood
29 Nov 06:58
-
Barjaa B. added Diy Couture Hood to DIYS
28 Jun 18:11
-
 Morbid M. favorited Diy Couture Hood
19 Jun 18:35
Morbid M. favorited Diy Couture Hood
19 Jun 18:35
-
 Kim T. favorited Diy Couture Hood
02 Feb 21:36
Kim T. favorited Diy Couture Hood
02 Feb 21:36
-
kira t. favorited Diy Couture Hood
14 Dec 23:11
-
Suzi T. favorited Diy Couture Hood
31 Jul 08:19
You Will Need
-
 Step 1
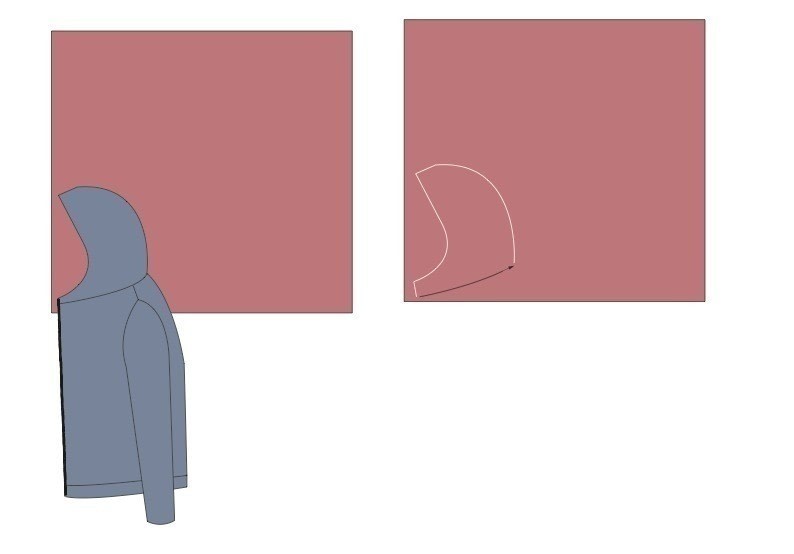
Get a hoody (or coat that has a hood), undo it and fold it in half down the centre, so the hood is folded in half vertically. You need to use this as a template for drawing a similar shape onto your fabric.
-
 Step 2
Lay your hoody out on your fabric and draw around the hood with tailors chalk, adding about 1cm extra all the way round. You will make your hood in two halves. This shape forms half of your hood, and should be about half of the length of the curved neck edge of your garment. The full base of the hood you make needs to be slightly shorter than the full curved edge around the neck of your garment.
-
 Step 3
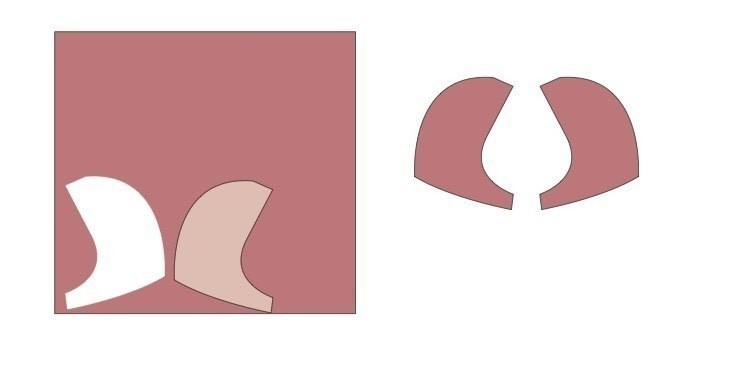
Cut out your first piece then flip it over and use it as a template to cut a mirror image of it from your main fabric.
-
 Step 4
Then use your first piece as a template to cut two pieces from your lining fabric. Make sure you cut two pieces that mirror each other, rather than two identical pieces.
-
 Step 5
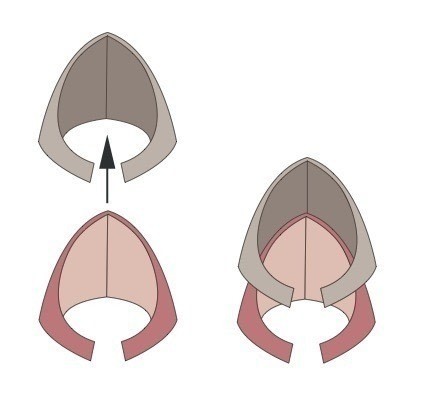
You need to join your hood pieces together in pairs. Join your two outer hood pieces together first. Lay one piece out flat with the right side of the fabric facing upwards towards you, then lay the other piece face down on top of it. Pin all the way along the long curved edge that will form the ‘backbone’ of your hood. Sew along this line with straight stitch. Turn the hood the ‘right’ way round so that you are looking at the neat edge of your seam and, continuing to look at this neat edge, sew a line of straight stitch all the way along this line, very close to the seam (about 1 or 2mm.) Your stitches should catch the flap of fabric on the inside of your hood (the side you can’t see.) This row of stitches flattens the seam and neatens your hood.
-
Step 6
Repeat step five with your pieces of lining fabric.
-
 Step 7
Now you need to join the lining and outer pieces of your hood by creating a large hood-shaped pocket then inverting it. Turn your lining so that you are looking at the wrong side of the fabric. Take your outer piece and insert it inside your lining piece so that the right sides of both pieces are touching each other on the inside of the sandwich. On both sides, you should be looking at the wrong side of your fabrics.
-
 Step 8
You are going to attach the two together by sewing them together along the raw edges. Pin the two together first. You need to leave a small hole so that you can put your hand in and pull the right side of the fabric out into the open air. Leave about 10 cm. Leave the hole along the straightest edge you have. The hole is marked on the diagram with a blue arrow. With the two sewn together, put your hand into the hole and drag the right side of the fabric out so that you can see it.
-
 Step 9
Now you need to sew a line of straight stitch all the way around the seam you have just made, very close to the edge – about 2 or 3mm away. This will flatten and neaten the edge. As you do this, you can sew over the hole you left for your hand. Iron this area before you set off sewing to help you get a nice straight edge. It is best to do this sewing with the lining fabric facing upwards towards you so that you can make sure you are sewing it just slightly inside the outer fabric. This means that your bobbin thread will show on the outside of your hood, so make sure it matches your outer fabric.
-
 Step 10
Now you have a hood, which you need to attach to your garment. This is pretty simple. Just find the centre point of your hood and the centre point of your neck line and pin the hood to the garment at this point. You can attach the hood to the inside or the outside of your neck line, it’s up to you. Pin the hood to your garment all the way along the neckline and try it on to check you are happy with the way it sits. Take it off and sew the hood into place with straight stitch. You have finished!


CO + K User