


About
wallet,skull,black,cute,buttons
Here is the first ever drawn how-to. Sorry I don't have the real picture of the wallet, but after I made it I gave it to my grandmother so I never got the chance to take a picture of it. But this pattern does work, just try it and leave any comments about it if you like. Enjoy...
Peace out...
-
 ShortHairedGirl favorited Cute + Simple Wallet
01 Jan 03:44
ShortHairedGirl favorited Cute + Simple Wallet
01 Jan 03:44
-
 Tierra T. favorited Cute + Simple Wallet
16 Nov 22:28
Tierra T. favorited Cute + Simple Wallet
16 Nov 22:28
-
 Toxic Cupcake Killjoy favorited Cute + Simple Wallet
17 Apr 16:07
Toxic Cupcake Killjoy favorited Cute + Simple Wallet
17 Apr 16:07
-
 Steph. favorited Cute + Simple Wallet
25 Mar 08:58
Steph. favorited Cute + Simple Wallet
25 Mar 08:58
-
 mega.l.waty added Cute + Simple Wallet to try it
27 Feb 11:50
mega.l.waty added Cute + Simple Wallet to try it
27 Feb 11:50
-
 drevanhoussen added Cute + Simple Wallet to Autres
28 Oct 23:38
drevanhoussen added Cute + Simple Wallet to Autres
28 Oct 23:38
-
drevanhoussen favorited Cute + Simple Wallet
28 Oct 23:38
-
 aestheticmachine favorited Cute + Simple Wallet
13 Oct 10:18
aestheticmachine favorited Cute + Simple Wallet
13 Oct 10:18
-
aestheticmachine added Cute + Simple Wallet to Bags, Wallets
13 Oct 10:18
-
 ADRIRI favorited Cute + Simple Wallet
17 Jul 23:02
ADRIRI favorited Cute + Simple Wallet
17 Jul 23:02
You Will Need
-
 Step 1
Ok you will need...
1.Magenta pink felt
2.Black felt
3.Turquoise felt
4.1 medium pink button
5.1 small pink button(the same pink as the medium button)
6.Gray or hot pink sewing thread
7.Sewing needle
8.1 big bucket of loveHopefully you will understand through my drawings...
-
 Step 2
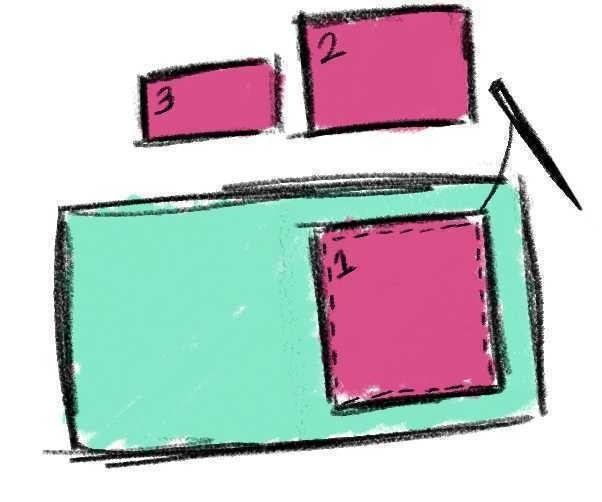
Cut a rectangle out of the turquoise felt, it should be...
7 inches wide...
and 4 inches tall...Then cut a square out of the magenta pink felt to fit in the middle of half of the rectangle(you should leave some room around the square, so that it fits in the center of half of the rectangle)...
The next piece should be the same width as the first pink square just a half inch shorter...
And the last piece should be the same width as the second piece but just another half inch shorter.
-
 Step 3
Sew the piece number one on to the half of the turquoise piece, just like in the picture I've drawn out...
end off and cut string.
-
 Step 4
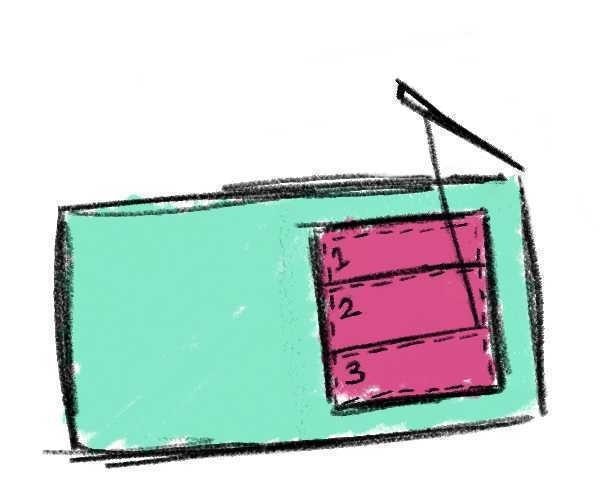
sew the number two piece on top of the number one piece, just like in the picture...
end off and cut string.
-
 Step 5
And last sew the third piece on top of the number two piece, like in the picture...
end off and cut string.
We are now done with the pockets.
-
 Step 6
Now sew the medium button in the right top corner like in the picture. And sew the small button in the bottom right corner...
end off and cut string.
-
 Step 7
Cut a rectangle out of the black felt, it should be...
7 inches wide...
and 4 inches tall... This shape has to be the the exact size as the turquoise one. -
 Step 8
Using the felt, you can make any thing to go on the front of the wallet, like it could be a skull,flower,buttons,or peace sign, Anything you like...
When you are done sew the skull or whatever you made on the right side of the black rectangle, just like in the picture...
-
 Step 9
flip the black rectangle over to the side thats blank...
-
 Step 10
Place the turquoise piece with the pockets facing up on top of the black rectangle and use a blanket stitch to sew them together like in the picture...
-
 Step 11
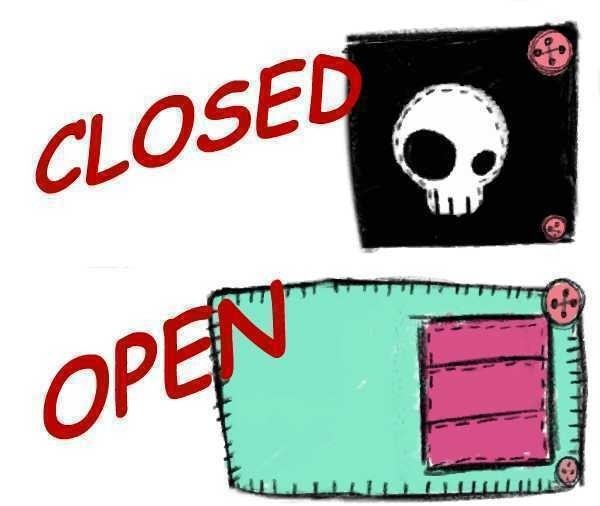
Finally you are done! Yay!
This is what it should look like closed and open... Oh don't forget to splatter some love on it! lolz!
Enjoy what you made and don't forget to leave me some comments letting me know if I explained everything well...
Peace...


Thanks for your effective post.It's really nice post.It's a effective post everybody real life and real person. I really love your writing, unlike most blogs I actually learn things, find the content useful and it’s well
<a href="http://mywalletdepot.com/magic-wallet/genuine-leather-magic-flip-wallet/">Flip Wallet</a>Written. 11/10 every time in the post, we need work out more techniques in this regard, thanks for sharing.
OMGEEE I LOVE YOU THIS IS SOOOOOO CUTE THANK YOU!!!!!
i love the skull