About
The Purple Pencil Eater!
<center>
This bag is VERY simple, and the perfect size to tote around all of the things I need to survive High School!
I must say, I'm pretty proud of myself on this one.
-
 sherlynlavenia favorited Customized Pencil Bag
14 Jul 02:48
sherlynlavenia favorited Customized Pencil Bag
14 Jul 02:48
-
 almosthope favorited Customized Pencil Bag
30 Jun 05:47
almosthope favorited Customized Pencil Bag
30 Jun 05:47
-
 Michelle entered their project Customized Pencil Bag to Cath Kidston's Sew! Contest
07 Nov 18:39
Michelle entered their project Customized Pencil Bag to Cath Kidston's Sew! Contest
07 Nov 18:39
-
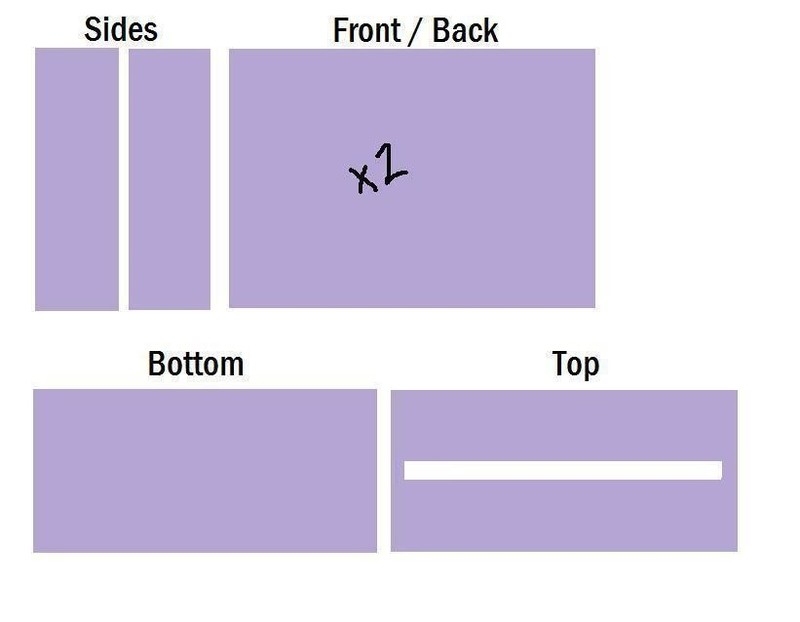
 Step 1
<center>
Cut out these shapes to the size you want your bag. In total you should have <b>six</b> shapes. The sides should be the same length as the length of the front and back pieces, and the bottom should be as tall as the width of the sides.
Also, please note in the "Top" panel of fabric, there is a hole. Cut out this hole. This is where the zipper goes, unless you have a better way to put on a zipper. :)
-
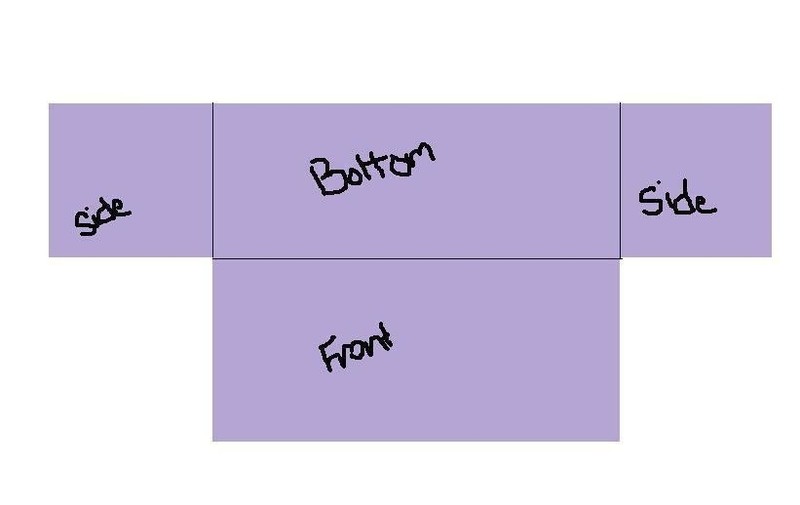
 Step 2
<center>
Sew a side and a bottom together, right sides together.
So, the seam where the two pieces join should be on the inside, with the wrong side of the fabric facing up.
-
 Step 3
<center>
Repeat with the other side of the bottom panel, using the other side panel of fabric.
Now, take the front panel of fabric and sew it to the bottom, wrong side facing up. Sew as shown.
-
 Step 4
<center>
Repeat with the back panel on the opposite side of the bottom. You should have something that looks like the picture.
Now, check. Make sure you can see all of the seams at the same time right now, with the wrong side of the fabric facing up.
-
 Step 5
<center>
Now flip the whole piece. You should see the right side of the fabric now (the side with the brightest color and pattern).
Bring up the sides and attach to each other, creating a box without a top. Pin the box together with the sides. Now, sew.
-
 Step 6
<center>
Now, Put the zipper into the hole in the top panel of fabric and sew. Unzip the zipper so the top is "open".
Put the zipper panel on top of the fabric box you have made, with the right side of the zipper facing inside, so when you turn it inside out the seams and threads, etc. are on the inside. Sew the top to the box.
-
 Step 7
<center>
Turn inside out andd....
Wallah! Your own special made pencil case. :)
If the tutorial is not clear on something, please leave a comment on what you didn't understand and I will explain to you and change the instructions.
Thank you! :)
P.S.: I made a matching iPod case by putting two pieces of fabric (with one piece of fabric longer to be a flap) together, sewing, and turning inside out. I then cut a hole in the longer piece (flap), big enough for a button. Sew on a button, and that's it! :)