About
A organizer for the more experienced sewers.
A similar idea to Cat Morley's organizer
(link: http://www.cutoutandkeep.net/projects/drawer_organizer_box_2_2_2)
A bit more tricky but this is a cover so you can remove it and wash it if you need to. Enjoy.
-
 Sarah S. added Cupboard Organizer to Things to spruce up a room
19 Jan 07:31
Sarah S. added Cupboard Organizer to Things to spruce up a room
19 Jan 07:31
-
 Birgit added Cupboard Organizer to Organising
06 Apr 16:07
Birgit added Cupboard Organizer to Organising
06 Apr 16:07
-
 Doodlebert favorited Cupboard Organizer
01 Oct 20:31
Doodlebert favorited Cupboard Organizer
01 Oct 20:31
You Will Need
-
 Step 1
Measure your cupboard or drawer where you want to keep this box(es).
I'm making two. So first you take your measurements and subtract 2 inc from the length and width. If your making 2 divede this new measurement with two only in the length. I'm using 4 of these lids of boxes where you buy paper in. You can use any box which fits your needs. -
 Step 2
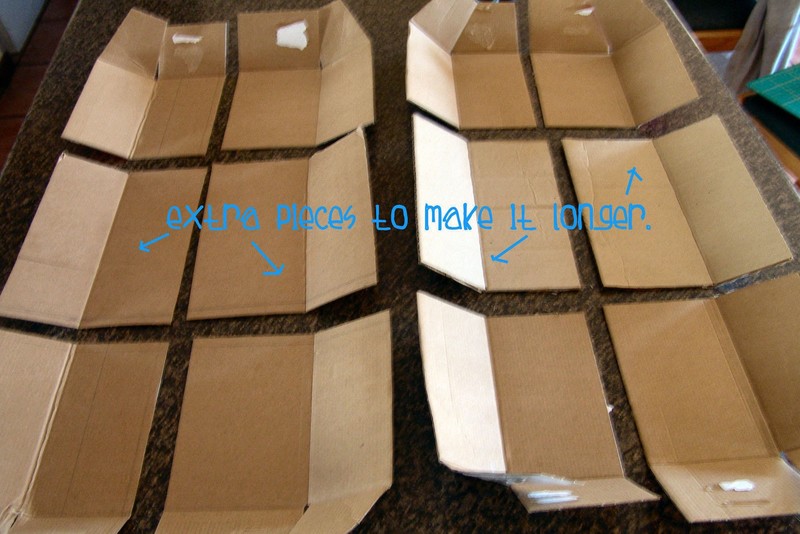
I couldn't find the perfect box so I'm making mine fit.
I would suggest that if you are going to change the size cut your box in 4 and then diminish and increase the size in the middle. I'm going to increase the length by using my third & forth box (keeping the sides), this is the pieces with the blue font on it. I'm also diminushing the width by cutting pieces of in the middle. REMEMBER to keep a "seam" allowance at each side where you have cut. -
 Step 3
Staple the side together just to make it easier to keep it together.
Take the sticky tape and tape all the place where you have cut to make the box stronger.
Make sure your boxes fit in the cupboard. -
 Step 4
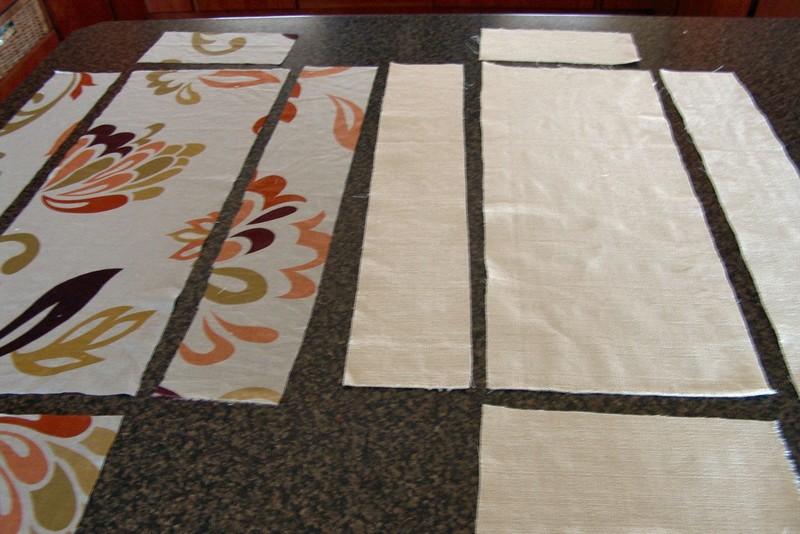
Measure the sides of the box. You only have to measure the bottom and 2 different of the 4 sides. YOu don't have to measure the inside, I promise the inside is the same size.
Add 0.5 inc at each side for a seam allowence. It's so simple that you can only draw it directly on your material. I'm using different material for the inside (with pattern on). Remeber to cut a set out of each tipe of material. -
 Step 5
Place the pieces out and check that you have all of them, 10 pieces, 5 respective to each tipe for one box cover.
-
Step 6
SEWING!!! (Always seam allowence of 0.5 inc)
Start by sewing the smaller sides to the smaller sides of the bottom piece (biggest piece). Iron your seams open.
Next stitch the longer sides to the longer sides of the bottom and iron the seams open.
Stitch the remaining sies together, the small piece's side to the larger piece's side and iron open the seams.
DO this with both sets, one inside and one for the outside. -
Step 7
Tricky part!
Turn the piece that forms the inside of the cover open so that the seams is seen outside. Keep the piece that forms the outside the right way around (seams inside).
NOW, place the outside part inside the inside part (keep over turned) and stitch around the edge. Keep one side open so that you can get the box inside. If the box can't get trough the opening, unravel some of your stitching on the sides next to the open side.
Cut an extra piece of the inside material thats the same size as the side where the cover is open. Turn the sides of the piece over and stitch around the edge. Place this piece with the right side on top of the right side of the peice that forms the inside and stitch arounnd the edge.
The material that forms the outside will now be under neath this extra pice but you must still give it a seam. SO flip over and stitch around the edge. -
 Step 8
If you want to you can add a button or bow to the extra piece which covers the opening. Slip the cover over your box and there you go!
If anything is unclear please comment and I'll help with love.