


About
Cookie Box Tutorial
Okay, so I know this tutorial is WAY too late for Christmas, but I figure there's always next year! Plus, this would make a really awesome Valentine's gift.
-
 Rainbow Wyvern favorited Cookie Box
26 Jan 20:50
Rainbow Wyvern favorited Cookie Box
26 Jan 20:50
-
 Spookachtige favorited Cookie Box
30 Aug 22:05
Spookachtige favorited Cookie Box
30 Aug 22:05
-
 Kitsuné favorited Cookie Box
31 Dec 14:14
Kitsuné favorited Cookie Box
31 Dec 14:14
-
 Charlotte G. commented on Cookie Box
26 Sep 02:06
Charlotte G. commented on Cookie Box
26 Sep 02:06
You Will Need
-
Step 1
I started out with some cardboard photo boxes. I've seen them at craft stores for as little as 3 boxes for $5 so you are spending under $2 per box.
-
Step 2
Fill the box with home-baked treats. You can line the box with tissue paper to keep the box clean (so that the recipient can use it as a photo or memory box once the treats are gone). You can fancy it up with pretty cupcake liners, individual boxes, or anythig else your heart desires. Once the baked goods are inside, put the lid on the box.
-
Step 3
Next, take a peice of scrapbooking paper (preferably a color or print that goes well with the color of the box) and cut 3 stips of paper, making sure each is the same height. This is easiest done with a paper cutter but an old fashioned ruler, pencil, and scissors or exacto knife will also work.
-
Step 4
Once you have 3 stips of paper, you'll need to attach them together to fit around the box. Start by overlapping strip 1 over strip 2 about 2 inches. Use your favorite paper adhesive. I personally like those double-sided tape pens. Then you don't have to worry about glue soaking through the paper and the tape adheres better than a glue stick.
-
Step 5
After you have strips 1 & 2 attached, place them pretty side down on the table. Center the box over the strips, then fold the two sides of the strip up so that the stips go up the sides of the box. Place the 3rd strip of paper centered across the top of the box and fold the sides down so that they overlap the other stips. Adhere into place. Make sure the strips fit snugly but can still be pulled off the box without tearing.
-
Step 6
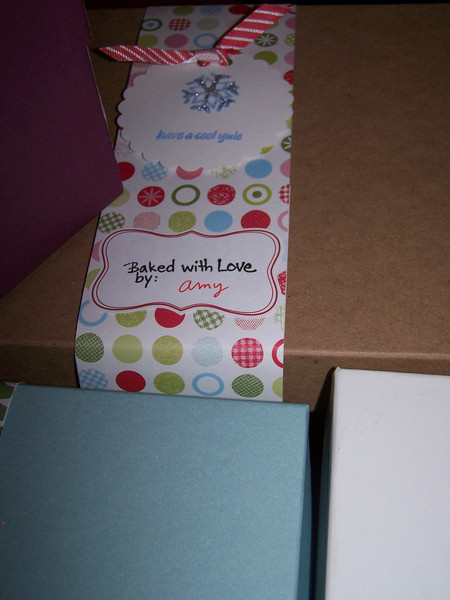
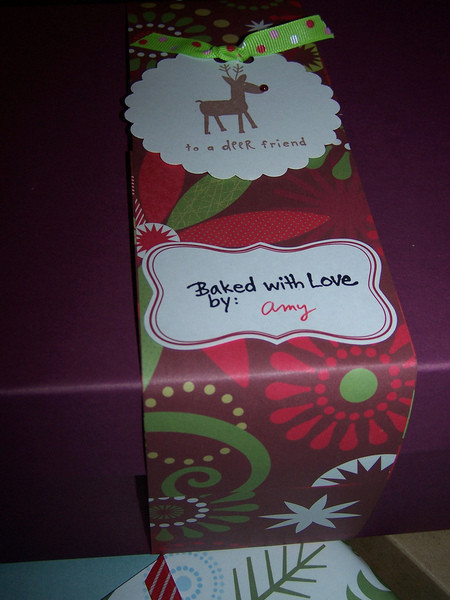
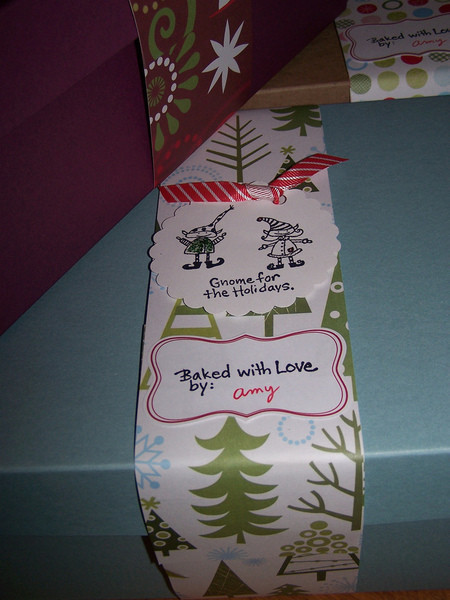
Next I took some pre-printed pre-cut labels and rubber-stamped on them. You could print out labels with borders on your computer or cut out a nice shape with scissors or a paper-punch if you don't have pretty labels at hand. You could also print out the text, (I used a rubber-stamp) that says "Baked with love by." Then I signed my name neatly with a gel pen. Finally, stick the label onto the scrabooking paper that surrounds the box.
-
Step 7
For the final touch, cut out a circle or scalloped shape with fancy edged scissors or a paper punch ( I LOVE paper punches). Use rubber stamps or clipart from your computer to decorate. I added some glitter glue for some extra sparkle.
-
Step 8
Punch two holes at the top of the shape with a regular size hole punch. The holes should be relatively close to one another - maybe only 1/4 inch apart.
-
Step 9
Cut a peice of decorative ribbon to string through the holes and tie in a knot or bow. Trim off excess ribbon.
-
Step 10
Attach the whole thing to the scrapbooking paper using double-sided sticky foam. You can find this is craft and scrapbooking stores - or save some money by purchasing at a discount store (99Cent Clearance Centers, Dollar Tree, and Walmart all carry it. Check the home improvement isles).
Now give to your friends, family, or significant other. They will be impressed!
Comments

