


About
Christmas Mini Album Tutorial
I hope you enjoy this Christmas mini album class!
The designs are timeless, and very easy to adapt no matter what kind of papers you are using. Just try to replace stripes with stripes, patterns with patterns, solids with solids and you will likely be very pleased with how it comes out!
Tags
-
 Kerry A. favorited Christmas Mini Album
06 Sep 08:27
Kerry A. favorited Christmas Mini Album
06 Sep 08:27
-
 Christa D. favorited Christmas Mini Album
13 Apr 07:35
Christa D. favorited Christmas Mini Album
13 Apr 07:35
-
 dSolitude favorited Christmas Mini Album
14 Mar 02:18
dSolitude favorited Christmas Mini Album
14 Mar 02:18
-
 Rachael H. added Christmas Mini Album to Books/Journals
16 Dec 10:00
Rachael H. added Christmas Mini Album to Books/Journals
16 Dec 10:00
-
 Tra-My T. favorited Christmas Mini Album
16 Nov 19:21
Tra-My T. favorited Christmas Mini Album
16 Nov 19:21
-
 robin.atilano added Christmas Mini Album to My Craft Favorites
16 Jun 02:54
robin.atilano added Christmas Mini Album to My Craft Favorites
16 Jun 02:54
-
robin.atilano favorited Christmas Mini Album
16 Jun 01:09
-
Mignon D. favorited Christmas Mini Album
21 May 19:55
-
 Lorraine E. added Christmas Mini Album to Vintage xmas
18 Dec 22:11
Lorraine E. added Christmas Mini Album to Vintage xmas
18 Dec 22:11
-
Alexis P. added Christmas Mini Album to Stuff To Try
08 Dec 05:21
You Will Need
-
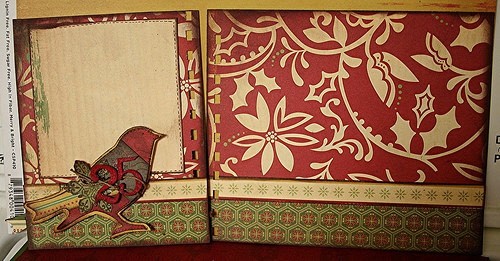
 Step 1
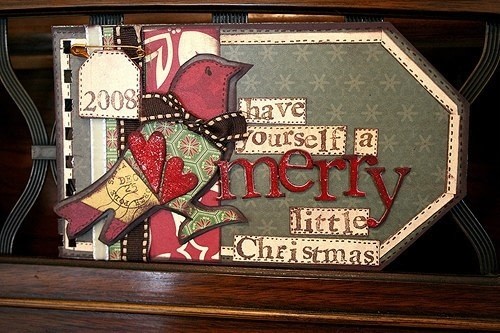
This is your cover.
First rule of the entire project, so I don’t have to keep typing it: Ink Every Edge. All of them. Any teensy paper scrap used should have the edges inked. Continuing. . .
It measures 4×7 inches, from the tip of the tag to the edge. The cover paper is the backside of the Reindeer Games paper. I plan to bind my book with a Bind-it-all, and I punch the holes as I go. This keeps me on track, and makes sure that I don’t put any major embellishments where I’m going to be putting a binding later. If you do not have access to a Bind-it-all, you could use binder rings or even take the entire completed project to Kinko’s and get them to bind it for you.
If you will look closely at my holes you will see that I have already messed up this project. I had an unthinking moment while punching my holes, and they are slightly wonky. This is ok. By the time I put the binding in and tie some pretty ribbons around it, no one will be able to see my mistake. So take heart, make mistakes, it’s ok.
To get the tag shape, trim one corner off of a 4×7 rectangle. Then flip it around and use it as a guide for cutting off another corner. This will get you a nice matching tag shape.
Along the left side, you want to put 4 strips of papers or ribbon. The total space covered should measure 2.5 inches, and you will want the Yuletide paper to be your largest piece. You will need to work out the rest based off of what ribbons you are using, and if you are off a bit, it won’t hurt.
-
 Step 2
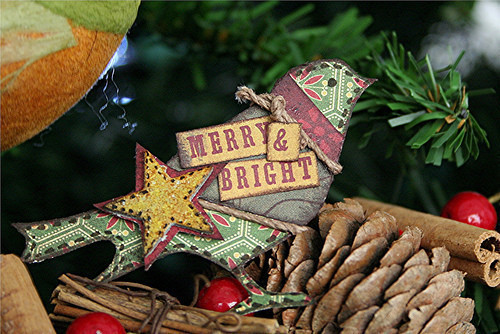
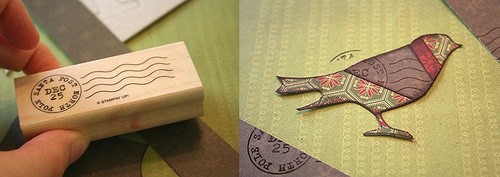
Now for the bird. I cut my bird out of the reverse side of the Wrapping Paper paper to get that pretty red base. Then I used him as a template and cut a piece of a bird out from the front of the same paper. I then stamped the reverse side of the Merry and Bright paper, and trimmed it to fit the bird. (You are inking these bits, right?) After I adhered them to the bird, I drew faux stitching or tick marks around what remained of the red edges. I also gave him an eye, and a jaunty ribbon necktie that draws in the ribbon I used behind him. I added two grunge board hearts and cut out a shadow to go around him. This helps him to pop off the page a bit.
For the title I stamped “have yourself a little Christmas” with my alphabet stamps, cut around the words, and added faux stitching. For the word Merry (and all bits of grunge board) I covered them with a red ink, and then dragged them through my chocolate chip ink to dust them up a bit. This is a pretty rustic looking album, so it is ok to be dirty.
-
 Step 3
Around the edge of the tag, I trimmed trips to just under a quarter inch and created a mitered frame look. Now, my edges are not mitered prettily, they are just pieced together. Rustic, like I said, leaves room for quick, easy and a little bit of imperfection. As long as there are no gaps in the edges or no grossly mis-sized connecting pieces, you’re good. Add a little faux stitching on the inside of the frame and also the outside edge of your tag. It is amazing how much that tiny detail adds.
I made another short, little tag up in the comer and stamped the year on it. I recommend stamping before you cut out the tag. My tag is just about 1 1/8 inches both ways. I would trim yours to whatever measurement looked best with your number stamps. I hung my little tag sign with a gold safety pin, just for kicks.
Your cover is done!
To work ahead:
1: All pages in this album will be two sheets of paper stuck together, this doesn’t let you use the back of the patterns, but it does make the pages stronger so it will last longer. The backside of this front cover will be the reverse of Wrapping Paper. You will want this adhered before you punch your holes.
2: Feel free to make a few little birds! I will be using 5 or 6 in the project, some bigger, some smaller. They are really just patchworked together. I try to use 2 papers, a trim, a stamp and a small embellishment on each bird, so I suppose you could call that “The Bird Formula”.
-
 Step 4
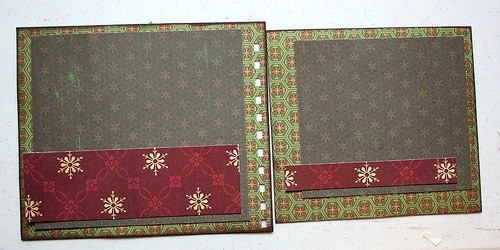
Pages 1 & 2
Hopefully your cover is ready and you can move on to the inside pages of the album!
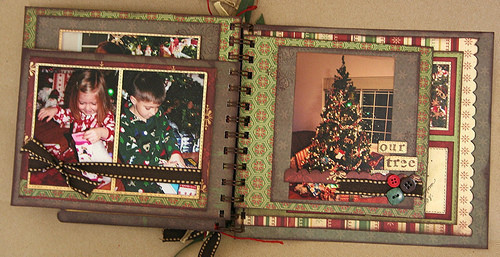
The pretty red that is serving as the base of the page is the reverse pattern on the “Wrapping Paper” sheet in your “Oh Joy” collection. Your 1st should be cut to fit the back of your cover, and the second page measures in at 5.5 x 4. You will want to cut yourself two mats, the one that will hold two photos should be 5.5 x 3 3/4ths. The opposite page will be slightly smaller at 5 x 3.5.
Add two smaller mats cut from the front of “Wrapping Paper” 2.5 x 3 3/8ths.
You will want to draw in some faux stitching around the edges like so:
-
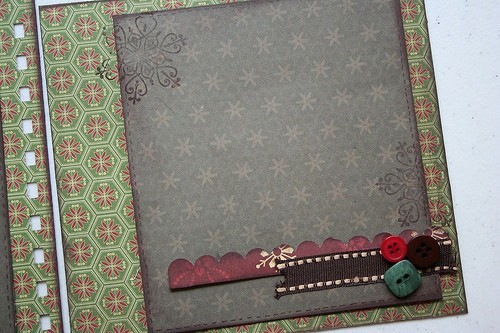
 Step 5
For the decorative deer bit in the center I stamped the deer and then punched him out using my Stampin’ Up curly label punch. If you don’t have this punch or stamp, you can substitute it with a circle, or anything else that looks appropriate and doesn’t take over your photo mats. Any Christmas stamp works just fine here; I chose the reindeer because we bought new reindeer ornaments this year, so it goes well with my tree photos. And it’s cute! Be flexible- make it work for you.
Whatever you choose, double mat it with the red underneath, and add some stitch marks to tie it all together and make it pop. I looped my brown ribbon to show a bit of a loop coming from the top and bottom. This little embellishment you just made should be adhered with an adhesive that adds depth.
-
 Step 6
Adding your pictures is pretty simple- just crop them to fit your mats, and adhere them with a pop dot. You can crop them larger or smaller, depending on how much of the patterned paper you want to have showing, and how large your photos are. You will want to leave a large edge around your bigger photo so that you can journal around the edges. Or, perhaps you have a lot to say, and you would like to use that space for just journaling! It is your book, make it work for you.
-
 Step 7
My journaling for this section is about how we just moved into a new house and don’t even have curtains hung yet- but we got the tree out and even bought a few new ornaments to add to it. My photos detail that information. You may put any Christmas photos you like here- I just started where we started, with the tree going up.
This is how your cover and the second page will fit together.
-
 Step 8
Pages 3 & 4 are cute and simple.
Start with a 4 x 5.5 piece of the Wrapping Paper paper, and adhere it to the back of the previous page. Trim any unsightly edges, and give it a good coat of ink around the edges. This will hide any minor flaws or white edges. Punch your holes.
Trim your yellow paper to 3 1/4 x 3 1/2. Trim your Yuletide paper to 3 1/4 x 1 1/4th. Cut out the green snowflake strip from the Merry & Bright paper. These green snowflakes are one of my favorite bits of the Oh Joy collection. I will be using them a lot. If the green isn’t doing it for you, you can always use one of the red on white strips or the white on red. When you trim this strip out, leave a little red on the one side and a little yellow on the other to create a small border.
-
 Step 9
Ink all of the edges and layer them on the page, slightly left so you don’t cover your holes. Adhere them with a dimensional adhesive. Add faux stitching around the edge of the yellow with your brown pen. Trim two strips of twine to fit across your photo mat. Tie two knotted pieces around these strips and glue them down using a liquid adhesive. When you add a photo here, crop it to fit just inside the yellow box. I will have photos added to all of the pages by the last day of the class; we haven’t been doing anything terribly festive the past few days unless you count croupy kids and trips to the doctor. ‘Tis the season, no doubt!
-
 Step 10
For the larger page, trim two pieces of Reindeer Games brown snowflake paper to 6 x 7. Stick them together, brown sides out, and use a scallop edge punch on the opposite side. My scallop trimmer is by Stampin’ Up, I am pretty sure Fiskars also makes a similar punch. (Actually, I know they have this really cool one with a scalloped edge with little holes in the scallops called ‘threading water’ – if anyone wants to put that in my stocking for Christmas. . .hey. . .that’d be cool). Ink the edges.
Trim the green Wrapping Paper paper to 6.5 x 4 3/4. Adhere it to the left, and punch your holes. Trim a piece of Yuletide to 5 x 1, adhere that so the edges come close to, but do not overlap your holes. Add a shorter strip of my favorite green snowflakes at 4 1/4 inches, and adhere that with a dimensional adhesive.
-
 Step 11
Add a small bird accent. I used twine, grunge board and two stamps on this little guy here. If you are having trouble coming up with your own birds, do not worry- tomorrow there will be a quick tutorial on how to piece the birds with lots of pictures. Just get your pages prepped and ready for them for now.
-
 Step 12
To begin with, let me just say that I know the colors on these pics are kinda whacked. Apparently my dining room is more fluorescent than I bargained for, so apologies. Really, the papers at my house are all the right colors.
-
 Step 13
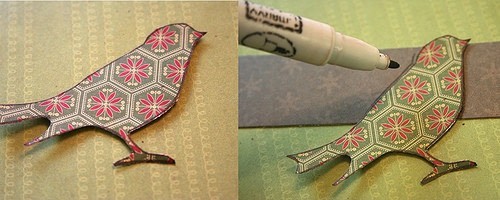
Use your template to trace a bird shape.
-
 Step 14
Cut him out, and then find a piece of scrap paper that partially covers him. Trace the part it covers and cut it out.
-
 Step 15
Aww, look, he has a turtleneck! Hmm, he doesn’t like it, so why don’t we trim that into a v-neck sweater. Very preppy of him.
-
 Step 16
We’ll give him a jaunty little ascot as well. I like him in red. Just trim it to fit. Ink your edges and glue it down.
-
 Step 17
Now, I think that sweater needs a little something, so we’ll use some scraps to create a mask that covers up the bird’s bum and the ascot. If you think of this ahead of time, you can skip this step and add accents before you glue it down.
-
 Step 18
Ahh, I like this stamp. It makes me happy. So we add that to his sweater, move the mask pieces and voila- very cute.
-
 Step 19
Now he needs some accessories. I’d like to bring out the yellow in the paper, especially on this bit of star grungeboard. I am only half unpacked, and I have no idea where most of my ink pads and paint daubers are boxed up, so we improvise! I have an ugly mustard color that is too dark, and my daughter happens to be coloring at the table with me, and has graciously lent me her bright yellow crayon. I mix the two- and perfect! Weathered and cute. I did experiment a bit on some scrap grunge to see if it would work out first.
-
 Step 20
Now I cut out a star just bigger than the grunge board in red to help our star pop.
-
 Step 21
We need to add some details before we glue it on. Add a little faux stitching.
Now check out the edges of your papers- don’t they have cute names? Don’t they have cute lettering? Lettering you could totally steal and put on your bird? Awesome! You could also stamp out what you wanted to say. At any rate- let’s give him a message.
-
 Step 22
Before you adhere those bits, glue on some twine. To make a simple knot without adding a bunch of bulk, lay one piece under another, glue them down and tie a little knot. Trim the knot’s edges.
Now just layer on your words and star accent, and he’s dressed and ready to go! Handsome little guy, isn’t he? He looks good on my Christmas tree, which brings me to my next point.
If you don’t have time to do the entire album, but you are enjoying the look and feel of things- why not do up a few quick ornaments? Pop a ribbon through the bird and he’d happily nestle into your tree and look festive.
-
 Step 23
Pages 5 & 6
Beginning with the cute scalloped edged page you made last time out of the back pattern on Reindeer Games, make sure you have inked your edges. I find that when inking around scallops you can go for messy or you can slightly bend the crease at each scallop to get the ink in the cracks. I was a little messy this time around, as the tone on tone and size of the scallops lets me get away with it. On pages where this is more obvious, I take the time to be all picky.
-
 Step 24
Cut yourself some Yuletide (the green side) measuring 5 x 6. Center it between the scallops and the holes, and adhere it with a dimensional adhesive. Now cut a piece of Merry & Bright to 4 1/4 x 4 1/2. Layer this piece onto your Yuletide.
-
 Step 25
Now you are going to add in some yellow from the back of the Merry & Bright with a 5 x 1 inch strip across the bottom. Add a strip of pretty ribbon overlapping that so only about 3/4th of an inch shows. Just a bit of faux stitching will help give it the weight it needs to be the base.
Then you will need to grab some Yuletide paper and punch yourself a scalloped border. If you look closely at mine, you will see that the inking is more obvious here, and I took the time to make it look good. Adhere this strip with a dimensional adhesive.
-
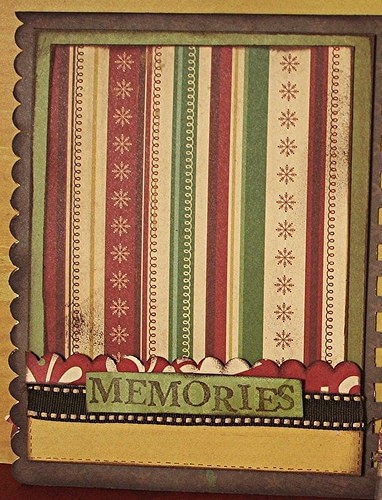
 Step 26
Use your letter stamps to write a title (I used memories just because that is pretty straightforward and generic. If you are doing cookies or jammies or Santa or Baby Jesus on this page, then, by all means, title it appropriately. I may go back and fiddle with mine when I get my pictures developed and know exactly what I’m putting here.) Cut out the title and layer it so it overlaps both the ribbon and scalloped edge. If you can’t stamp a straight line, don’t worry about it. Look closely- neither can I, but it’s working for me.
To create the next page you will need another piece of Yuletide measuring 5 x 6. Layer a 1 inch strip of Reindeer games across the bottom, add a quarter inch strip of Merry & Bright.
-
 Step 27
Now cut yourself a photo mat from the yellow of Merry & Bright. Mine is about 4 x 4 1/2. Center it on your page, and give it some cute faux stitching to match the other side.
-
 Step 28
Layer a scalloped Yuletide strip over the base of the photo mat with a dimensional adhesive, and fill in the gaps with a few strands of twine. Add a cute little tie in there somewhere just to add a little detail.
-
 Step 29
Welcome to pages 7 & 8! These are a little bigger and fun- they leave you tons of room for a nice 4×6 or 5×7 of your favorite horizontal photo, as well as space for journaling or a smaller accent photo!
To begin. . .
-
 Step 30
Trim your Yuletide paper to 5 x 6 inches. Add a strip of Wrapping Paper 1 1/2 inches accross the bottom, and then a strip of my favorite bit of Merry & Bright- the green snowflakes! Make sure to leave a little color from the top and bottom of this strip for contrast.
-
 Step 31
Cut out some Mitten Mitten at 3 3/4th x 4 inches and use it as a photo mat or journaling space. Add some faux stitching around the edges for an extra little frame.
-
 Step 32
Adhere your bird with a dimensional adhesive. To add to this bird, I cut out a shadow to go behind him, added a stamped shape, grunge board letters and some twine. He is festive and ready to party Christmas style!
Onto the adjoining page!
-
 Step 33
Trim your Yuletide paper to 6 x 7 inches, and repeat the bottom layers as you did on the smaller page. Ink all of your edges.
-
 Step 34
Wow. That was an easy page! On this page, I would recommend showcasing one large, horizontal favorite photo. Depending on the size and crop of your favorite picture you could keep it all on the Yuletide, or overlap onto the Wrapping Paper. You could also show off two smaller vertical photos if that suits your purposes better. This is where your own creativity comes into play.
-
 Step 35
Pages 9,10, 11 &12
Trim two pages of Wrapping Paper to 6 x 7 and 6 x 6.
-
 Step 36
Using the back of Reindeer Games, trim two photo mats to 6 x 5 1/2 and 4 1/2 x 5. Adhere with a dimensional adhesive.
Scallop the edges of two pieces of Mitten Mitten. One should be approximately 5 1/2 x 2 and the other should be 1/2 inch. I say approximately because trimming will shorten them a slightly, but it really doesn’t matter if it is off by a bit. These should also be slightly popped off your page. -
 Step 37
Run some coordinating trim along the bottom of your Mitten Mitten. Drop a few cute buttons on the page as well. Stamp some random images going off the sides of the pages. Notice how I flubbed up the first page? I had an idea that didn’t get off the runway, (alright, it kind of exploded in the hanger and mucked up my page)- BUT- it is O. K. because I’m going to put my photo smack over that weird gluey-ripped spot. Shhh, don’t tell. Many of my photos hide ugly mistakes on some of my favorite layouts. It’s ok. It’s just paper.
-
 Step 38
I intend to put a 4 x 5 photo from the very edge of the smudge over, and the ribbon will overlap the photo. I didn’t give it it’s own mat, because I thought it would be too much.
-
 Step 39
Similar concept going on over here on the clean side with no mistakes.
Now. Everybody always has too many horizontal 4 x 6 pictures they need to find homes for, right? So, we are going to put a little bonus page smack in between these two pages! It is identical on both sides.
-
 Step 40
Side one.
-
 Step 41
Side deux. They are twins.
Trim your middle page (Reindeer Games) to 5 x 7. Now trim your Mitten Mitten mats to 4 1/4 x 6. Adhere them with a dimensional adhesive. You will be able to put a 4 x 6 pic in that spot with only a teensy bit of trimming first. Run a half an inch strip of Wrapping Paper just above the bottom of your mat. You can choose to put this over or under your photo- whatever works for you.
-
 Step 42
Now, flip your middle page over and repeat. Super simple.
-
 Step 43
Pages 13 & 14
To begin trim yourself a piece of Wrapping Paper to 6 x 5 1/2. This will be your base.
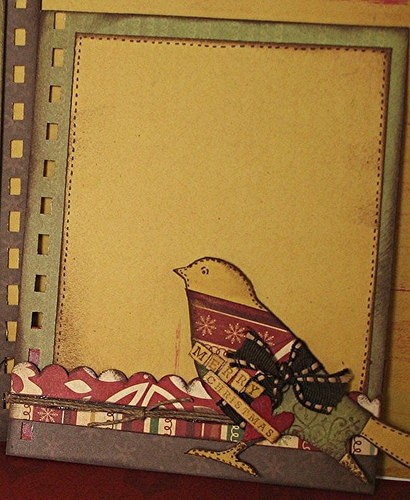
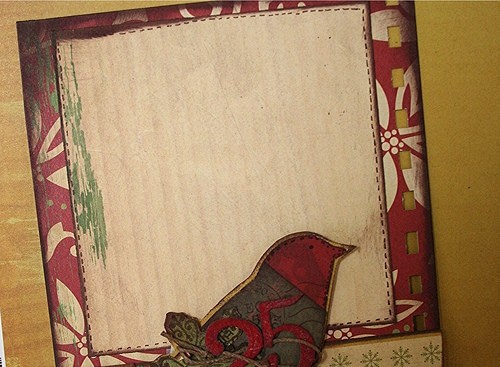
Add a 5 x 6 pice of Merry & Bright over it, running the full length. You should only see the back of Wrapping Paper about a quarter inch on each side. Now cut a piece of Yuletide 4 1/2 by 5 inches, and adhere it with pop dots. You will want to add some faux stitching around the edges of this mat. The bird is our Merry & Bright bird from the bird tutorial. You can put him anywhere that works with you and your photos or journaling.
-
 Step 44
Next page! This is your biggest page as it is the base of the entire book. It is 7 x 8 inches out the reverse of Reindeer Games.
You will want to trim yourself a piece of Merry & Bright to 6 1/4th by 7 1/2. I admit I fussy cut this paper to ensure that I had pretty red snowflakes on my edge where I planned to do my scallops. The easiest way to do this is to take the entire sheet of paper, scallop up the side making the snowflakes extra pretty, and then trim the rest to fit the page. I’m persnickety like that.
-
 Step 45
After your scallops are perfect, trim up a sheet of Yuletide to 5 1/2 x 7 inches. Adhere this to your page with a dimensional adhesive. At this point, you will want to punch your holes. Once you have punched those holes, you will need to add some faux stitching around the Yuletide, only do the stitching on the outside of the holes, not the inside.
-
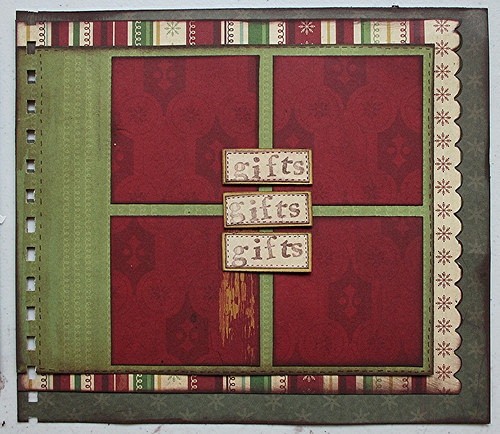
 Step 46
Now trim up 4 red Wrapping Paper squares at 2 1/2 x 2 1/2 inches. Make a 4 square pattern to the right side of your Yuletide paper.
Now, when I added my photos, I trimmed them to 2 x 2 and then added a very small cream mat around the edges to make them pop. My photos are a bit dark, and really needed a little extra lightening. Yours may not need this. I also turned one square into a journaling space, rather than adding a fourth photo. We’ll discuss adding pictures more in the last class.
-
 Step 47
I used my letter stamps to add the word “gift” three times down the center. I adhered them in the center with a dimensional adhesive so my photos slip right underneath. Make sure that you add the faux stitching! I don’t have an exact measurement for these- I stamped, then trimmed around the stamping, so each word square is a millimeter or two different, depending on how straight I stamped the word that time. I matted each word with a little gold paper.
-
 Step 48
Here it is all together! I bound mine with a Bind-it-All and a 3/4th inch brown o-wire. Then I tied a few yards of ribbon, twine and embroidery floss around the rings to give it some flair. When I put my pages onto the wire I layered them as I thought they would look good. Some pages that clearly ran together because of certain design elements I kept on the same level. I staggered things where I thought it would look good and tried to keep a balance between up and down. Just play with it and see what works with your pictures best.
-
 Step 49
I just tied them on at random, trying to mix and match colors and textures.
Here is how it all turned out.
-
 Step 50
When completing the album I added three things: photos, journaling/titles & photo mats.
Adding in photos is pretty simple. Find the shot you like that fits and go with it. If you are having trouble with colors being off, you can always convert to black and white or sepia. You will noticed that when I chose my photos I sometimes put two vertical wallet sized photos where you would expect one horizontal 4×6- it turns out I took a lot of vertical shots this year, and I could include more this way.
-
 Step 51
Other pages I off set the photo and opted not to fill the entire mat, this just happened to work with my photos and how they were cropped. You can mix and match and make the space work with your photos.
Journaling was important to me, as I enjoy that part of the process and like to tell the story. I used several photo mats as journaling spaces, writing in the little memories and adding details of who did what. You could use different photo mats, or you could put photos where I put writing. No biggie. Whatever works best with your memories.


Comments


