Cath Kidston Brighton Cushion
Extract from Cath Kidston Sewing Book • By Cath Kidston • Published by Quadrille


About
Cath Kidston Sewing Book
Level: Easy
Embroidery can be rather a painstaking process, so this cushion is ideal for anybody with limited stitching time. All you have to do is to choose your favourite design areas within the background fabric, then sew over the outlines with matching stranded threads, giving you maximum visual impact for minimal preparation! Every version will be individual, so you can really put your own personal stamp on this project.
SIZE
35cm square
CUTTING OUT
From the BACKING fabric
Two 25 x 37cm back panels
FABRIC CHOICE
We used our own Brighton-inspired Brighten Up Your Day print here, but any print with a strong outline to embroider will work.
Tags
© 2024 Cath Kidston / Quadrille · Reproduced with permission. · Cath Kidston Sewing Book by Cath Kidston (Quadrille £20) Photography: Rita Platts
-
 Luna D. favorited Cath Kidston Brighton Cushion
25 Apr 05:44
Luna D. favorited Cath Kidston Brighton Cushion
25 Apr 05:44
-
Alecia B. favorited Cath Kidston Brighton Cushion
24 May 08:04
-
 Sofia favorited Cath Kidston Brighton Cushion
12 Mar 14:22
Sofia favorited Cath Kidston Brighton Cushion
12 Mar 14:22
-
 Quadrille published her project Cath Kidston Brighton Cushion
17 Feb 09:00
Quadrille published her project Cath Kidston Brighton Cushion
17 Feb 09:00
You Will Need
-
Step 1
TO MAKE THE CUSHION
MARK UP THE CUSHION FRONT
Rule a 37cm square on the patterned fabric, picking an area that contains an interesting part of the design. Don’t cut this out yet, as you will need some spare fabric around the outside edge when you are stitching close to the outline. Mount the area to be stitched in an embroidery hoop, if you wish. -
 Step 2
EMBROIDER THE OUTLINES
Backstitch is good for flexible lines, so use this to embroider over some of the handwritten text. For a very curvy and looped outline like this, the stitches will need to be around 4mm long.
-
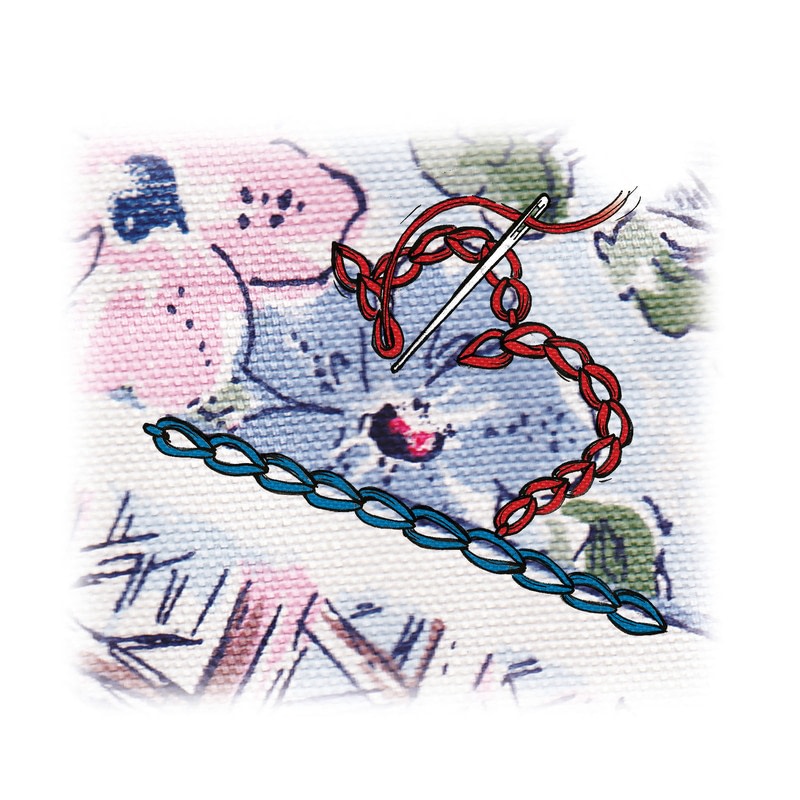
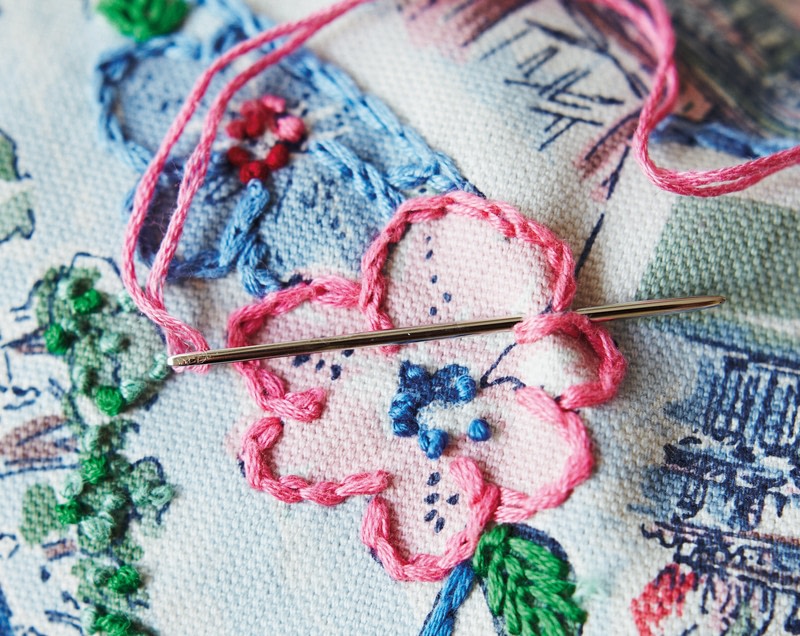
 Step 3
Work chain stitch around the flowers, as this produces a thicker outline. Working each petal individually, rather than going all the way round in a continuous line, will give you a more accurate shape. You can also use chain stitch for straight lines, such as the edges of the postcards.
-
 Step 4
FILL IN THE LEAVES
Fly stitch, with its pattern of chevrons, is good for leaves. Use green thread and vary the width of each individual stitch so that it fits within the outline. Start and finish each stitch at the centre of the leaf to make a ‘vein’. Work straight stitches over the stalks.
-
 Step 5
ADD HIGHLIGHTS
French knots are perfect for small dots of colour. Use these to fill in the centres of the flowers.
-
 Step 6
MAKE UP THE CUSHION
When you have finished, trim the cushion down to 37cm, along the pencil outline. Lay it out with the right side facing upwards. Starting close to one corner, tack the piping cord all the way around the outside, matching the edge of the tape to the edge of the fabric. Make a small snip into the tape at each corner. Overlap the ends and then trim them in line with the edge.
-
 Step 7
Neaten one side edge of each back panel with a 1cm double hem. With the right sides facing inwards, pin one panel to the left-hand side of the cushion front, matching the raw edges. Pin the other panel to the right-hand side.
Fit a zipper foot to your sewing machine so that you can stitch close to the piping cord, then machine stitch around the outside edge. Your seam allowance should be the same width as the tape.
Clip the corners to reduce the bulk and turn the cover right side out. Ease out the seams and corners, then press lightly. Insert the cushion pad. -
 Step 8
TIP... if you want bold stitches, sew with all six strands of the embroidery thread and a large-eyed needle. For finer stitches, separate out the stands and use just three at a time.
TIP... you may need to wash your cushion cover one day, so remember that cotton duck has a shrinkage rate of 5%. Wash and press the fabric and piping before you cut them out and double check that your embroidery threads are colourfast.