

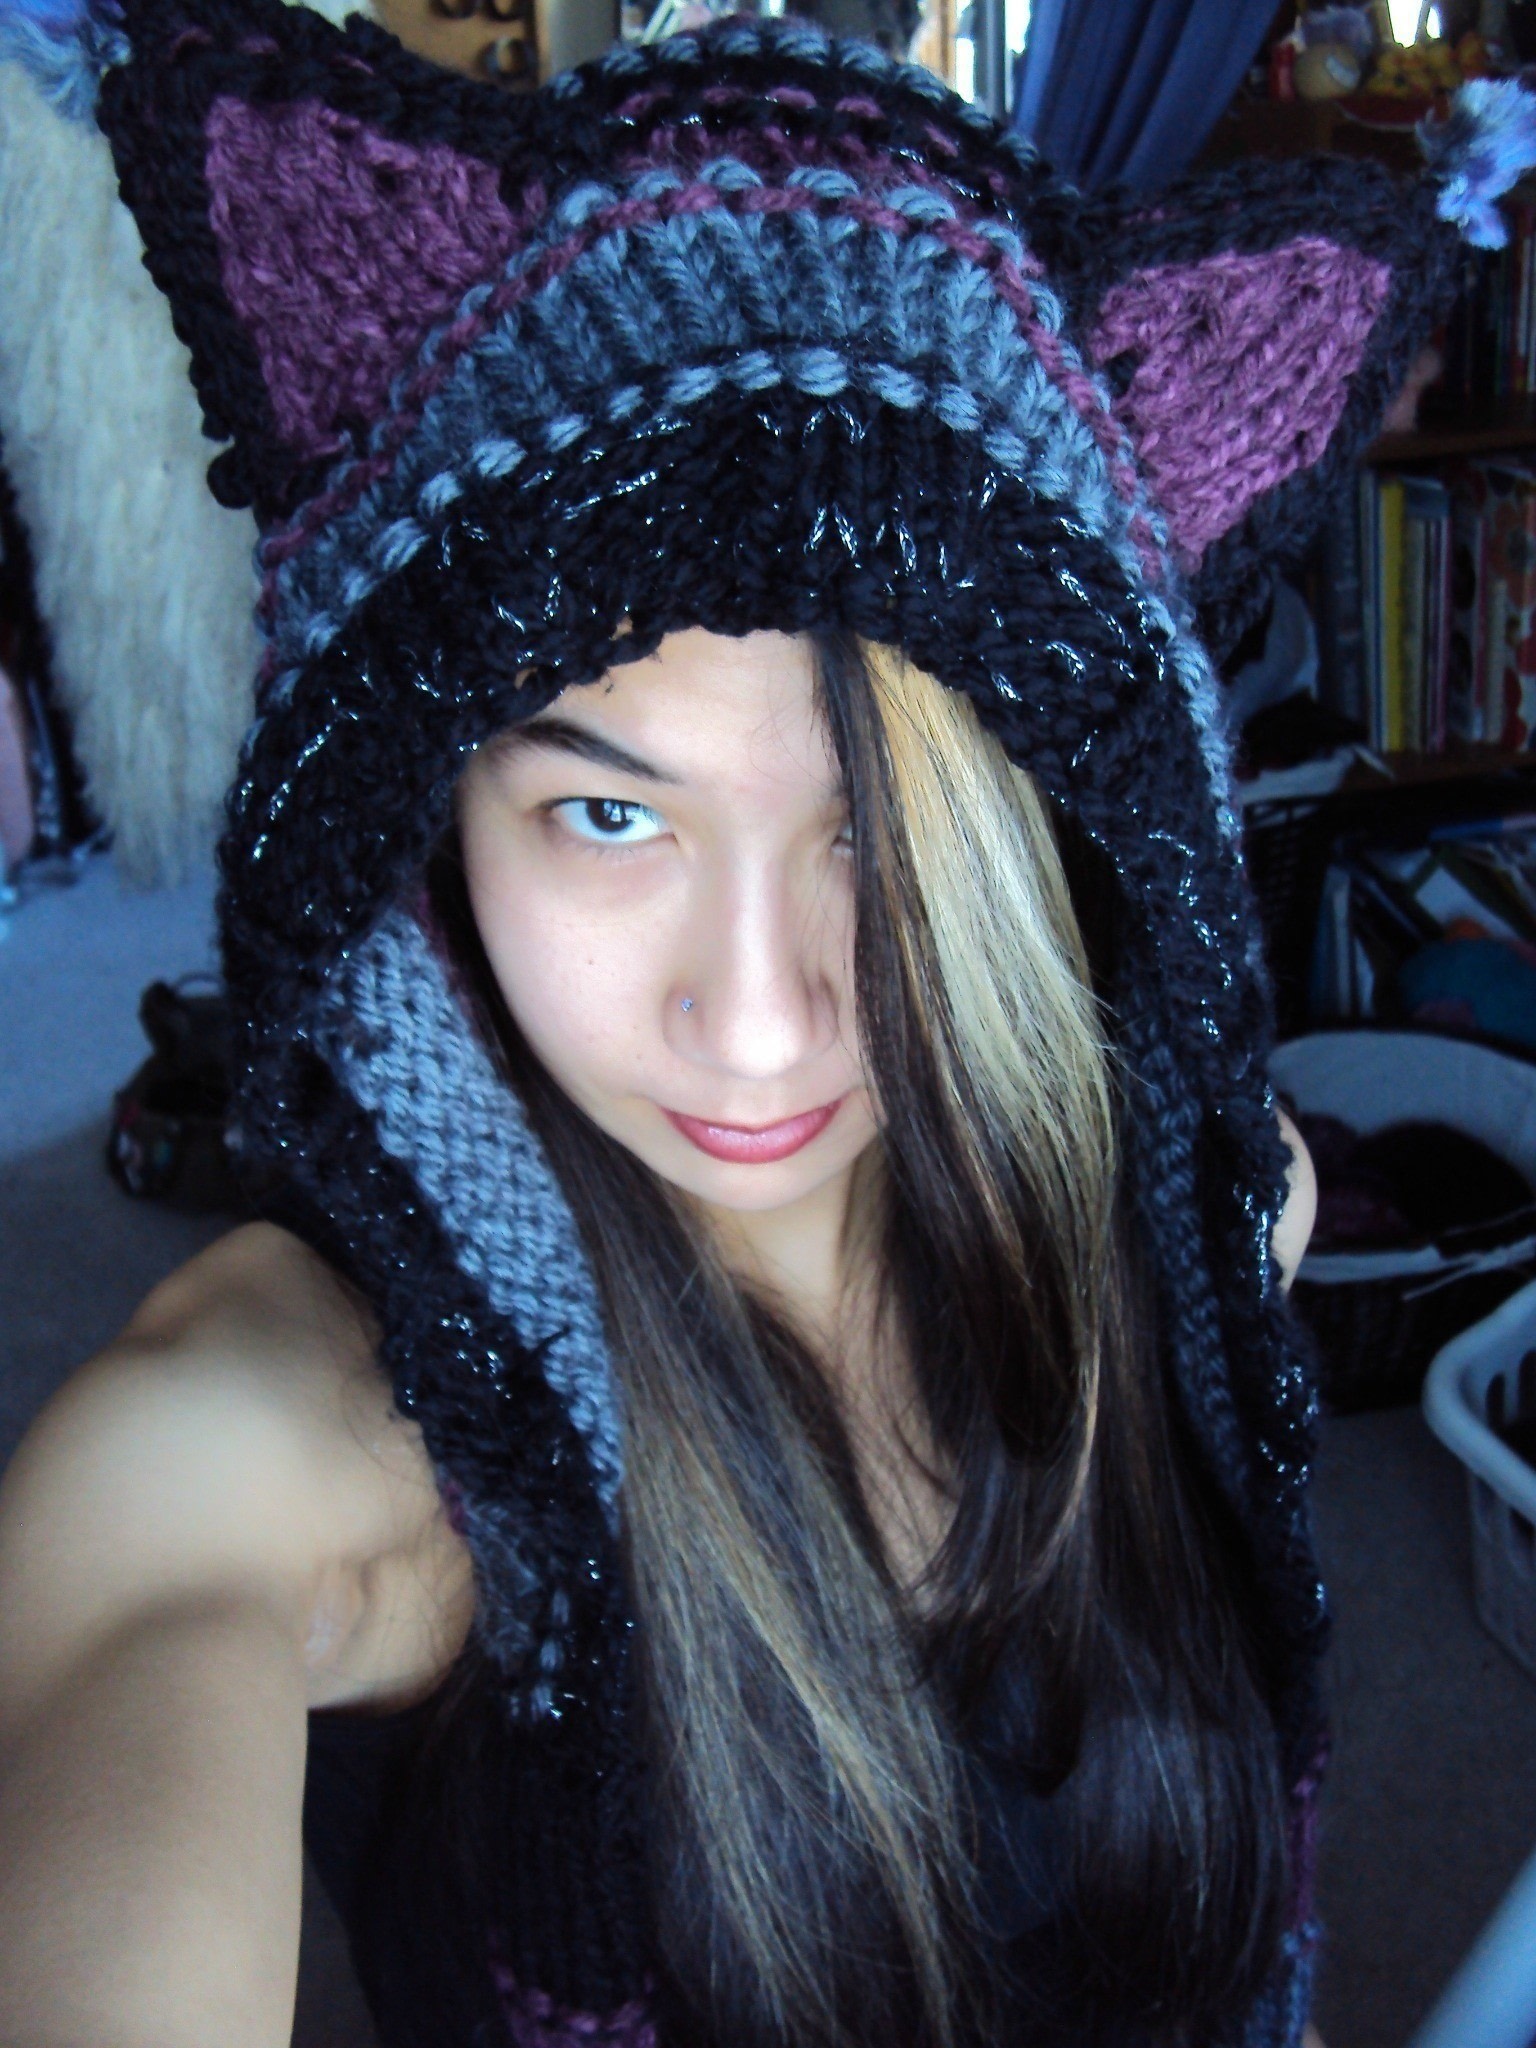

About
From the Cheshire Cat Hood found on Pinterest
Found the hood on Pinterest but I couldn't find the instructions on how to knit it anywhere! There are several crochet tutorials, but I wanted a knitted version. My friend found the instructions for the hood from the knitter on Deviant Art (will link once I find it again), but I did a variation of the instructions as the original didn't work too well for me.
Tags
-
 Loviiletter favorited Cat Hood
05 Oct 05:02
Loviiletter favorited Cat Hood
05 Oct 05:02
-
 Brenda L. favorited Cat Hood
26 Jun 17:27
Brenda L. favorited Cat Hood
26 Jun 17:27
-
 Wendy O. added Cat Hood to Knitting
29 Oct 06:13
Wendy O. added Cat Hood to Knitting
29 Oct 06:13
-
Wendy O. favorited Cat Hood
29 Oct 06:13
-
Rachel K. favorited Cat Hood
15 Nov 00:05
-
 Key West Witch favorited Cat Hood
07 May 01:07
Key West Witch favorited Cat Hood
07 May 01:07
-
 liza.minelli.564 favorited Cat Hood
16 Apr 20:57
liza.minelli.564 favorited Cat Hood
16 Apr 20:57
-
Lele H. added Cat Hood to to do
11 May 00:15
-
 Stephanie H. favorited Cat Hood
09 Apr 12:12
Stephanie H. favorited Cat Hood
09 Apr 12:12
-
 moonofsilver favorited Cat Hood
08 Jan 14:21
moonofsilver favorited Cat Hood
08 Jan 14:21
-
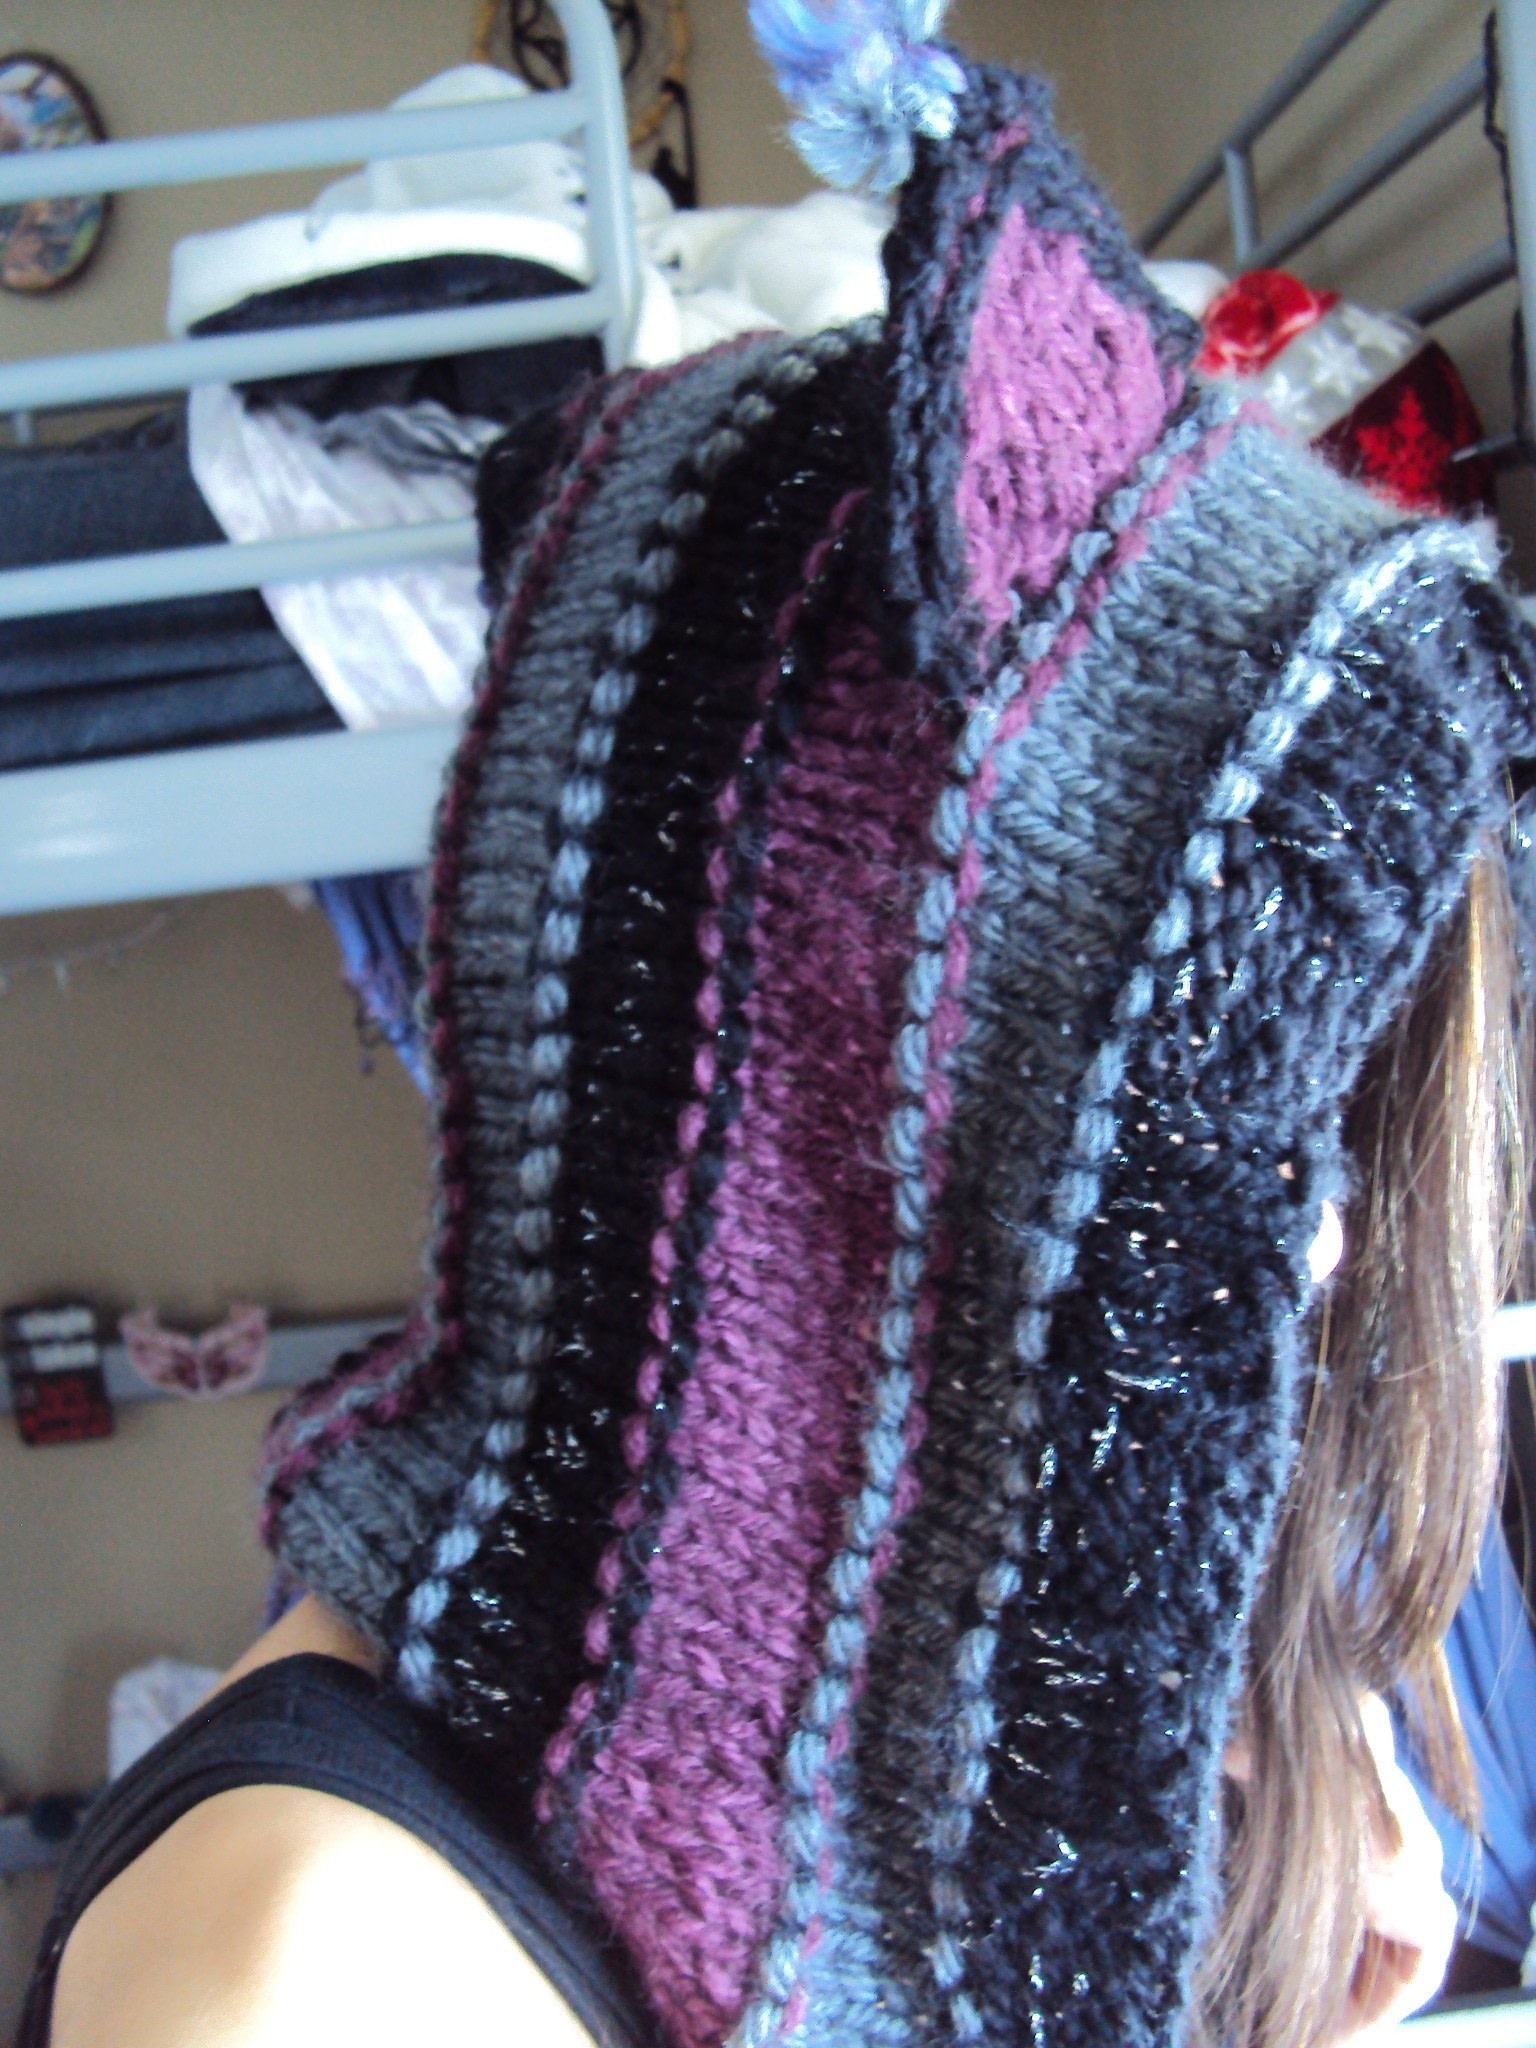
Step 1
Take your first color of yarn. This will be the ribbing that is the brim of the hood. I used 4X4 ribbing so however many you decided to cast on, make sure it's in multiples of 4. For this tutorial, I will give you the numbers I used.
Cast on 68 stitches.
-
Step 2
After casting on, knit 4, then purl 4. Repeat until end of row.
I counted this as row one, so whenever I say "odd row" I mean to knit 4, then purl 4. Last section of 4 should end on knitting.
-
Step 3
Second row (even row) Purl 4, knit 4. Last section of 4 should end on purling.
-
Step 4
Continue on with knitting and purling for odd rows, then purling and knitting for even rows until you have 5 rows.
-
Step 5
Take your second color of yarn. The step goes for each time you change colors as this is how you get the bumps between color changes.
Knit one row. Don't count this row on your stitch counter. I thought of it as row 0.
-
Step 6
Knit and purl rows alternating until you have 5 rows. The knit row from step 5 does not count as one row.
Ex: after the ribbing your knit two rows, but only the second knit row counts, then purl, knit, purl, and knit to have 5 rows.
-
Step 7
Repeat steps 5 and 6 until you reach your desired depth for your hood. This was after 36 total rows for me including the ribbing(not counting knitted rows for color changes).
Bind off.
-
Step 8
This step is how to make the side scarves to the hood.
Cast on 9 stitches.
-
Step 9
Knit and Purl on alternate rows until you have made nine rows.
Change color.
Continue until first scarf reaches your desired length, BUT only make 8 rows for the last section. Row nine is where you bind off.
This was after I had 7 sections.
-
Step 10
Repeat steps 8 and 9 for second scarf.
-
Step 11
Attach to hood at bottom of brim.
-
Step 12
Following steps will be for the ears/
Take the color you want for the inside of the ear.
Cast on 7 -
Step 13
Knit and purl so you have the little Vs in the material. When you reach row 5, k2 together then keep knitting until you have two loops left on the left needle (right needle if you are left handed). Knit the last two loops together.
-
Step 14
Do this for row 9 as well.
-
Step 15
When it's time to work on row 10, you should have three loops; k3 to make the point of the ear.
Repeat again for the second ear.
-
Step 16
Pick your color or colors for the outside of your ears.
Cast on 9 -
Step 17
Do the same as you did for the inside of the ears.
k2 on row 5 beginning and end
do this for rows 9 and 13 as well.
then to make the point of the ear, k3 on ro -
Step 18
Repeat 16 and 17 for second outer ear.
-
Step 19
Take the crochet hook and yarn matching the color of the larger triangles (outer ear).
Lay the small triangles on top of each other and slip stitch the edges of the small triangle to the big triangle.
Make sure the wavy stitches or the purls are together before you slip stitch.
Do this again with the remaining two triangles. -
Step 20
This next step is optional.
If you would like tufts on the top of your ears, take a thread or two of yarn and a needle. Pull it through the tip of the ear and double knot it. Then use a fine tooth come to make it fluffy. -
Step 21
Attach the ears to the hood, wherever you would like.
Use pins to mark the spot where you'd like them to keep it symmetrical.


