


About
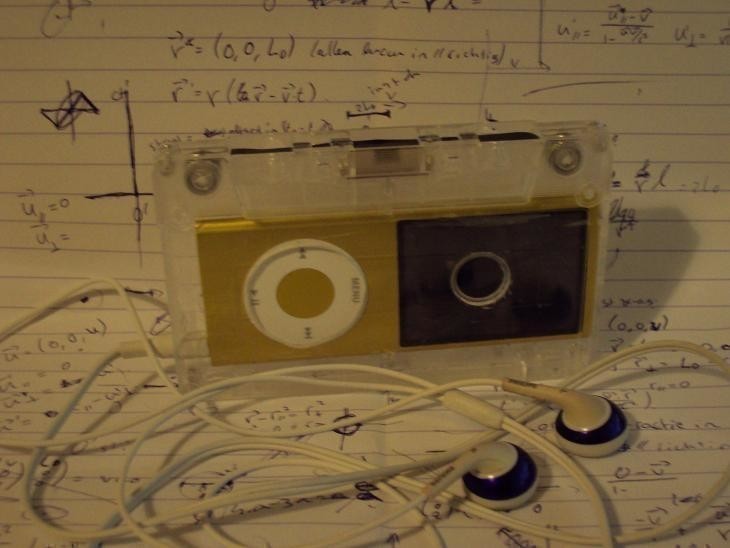
Now you can fit 8GB of music on one casette disk ;D!
I swear, these two are chosen by faith to go together, they just fit so snugly into eachother.
Well, after 2 hours of filing that is, but still.
-
 Conner W. added Cassette Ipod to Things to try and make/ideas
13 Feb 20:36
Conner W. added Cassette Ipod to Things to try and make/ideas
13 Feb 20:36
-
Conner W. added Cassette Ipod to gadgets stuff
07 Sep 00:55
-
 Claire M. favorited Cassette Ipod
21 Sep 21:59
Claire M. favorited Cassette Ipod
21 Sep 21:59
-
 Minimax favorited Cassette Ipod
01 Jun 06:45
Minimax favorited Cassette Ipod
01 Jun 06:45
-
 Andrea B. favorited Cassette Ipod
12 Jul 12:24
Andrea B. favorited Cassette Ipod
12 Jul 12:24
-
Step 1
Sorry, I didn't make any pictures of the progress when I was making it, but it's not that hard to understand without them, so here we go.
Screw open your old cassette, You'll need one with screws, not one that clicks, because then you won't be able to close it again.
SAVE the screws in a secure place, you don't want to lose them ;).
-
Step 2
Now take out everything that is inside the cassette and save it, maybe you want to use it later.
Basically all you want to do is put your Ipod in and close the cassette again, but, it's not that simple...
-
Step 3
You'll have to make the inside of the cassette smooth to make it big enough, i.e. the little circular hole stick out on the inside and the two little pins in the middle are in the way. The pins in the corners aren't so let 'em be. You can smooth everything by using sandpaper, but be sure to tape the inside of the cassette first with painters tape to avoid scratching it.
-
Step 4
When you're done with both sides, your hands will be hurting, so take a break. Oh BTW you don't have to smooth down one hole, it'll be dealt with later.
-
Step 5
On to the controlpanel holes. Take your file and get to work on the hole you didn't sandpaper. It has to be big enough for you to use the buttons of your Ipod. The hole might not have to be completly in the middle, so put in your ipod every now and then to check if it's still in the right place.
Also make slots in the top and bottom edges so you can plug in your headphones/charger and use the lock switch, be sure to make them big enough and maybe use tape again so you don't scratch anything.
-
Step 6
You're now done with filing and sandpapering!! yeah!
You can now put in your Ipod and screw it closed and be done with it.
Or you can put some of the magnetic tape back on the edge. -
Step 7
To do that, take the two small cylinders/rolls that came from the corners of the cassette (about 5mm in diameter... found them?). Cut a piece of magnetic tape (aprox. 20 cm should be enough). Glue one end carefully around one cylinder. Place it in one half of the cassette disk. Glue the other end to the other cylinder, you might want to cut it first so you don't have a long strip of tape, that'd be very inconvenient.
Place the other cylinder in the disk too and try to pull the tape tight, then glue the cylinders in place, so that the tape stays tight in between them, otherwise it'll unravel while it's in your pocket or something.You can also put the little metal bits back in behind the tape.
-
Step 8
Now place your Ipod in, exactly where you want it, because it's not going to move after you closed it.
Put the top half of the casette on and screw it closed again.
And now you're done. You'll never even have to take your Ipod out again if you made the hole for the charger big enough. :)
Comments


