About
by Sophie Strong
Cutting portraits, generally in profile, from black card became popular in the mid- eighteenth century. This project makes an ideal keepsake for a special occasion. As with a modern-day locket, you could create a lasting image of a special person or even a whole set to represent your nearest and dearest. Choose pastel tones of leather and muted tones for the linen. For threads, try neon colours for more impact. Select a dark colour for the portrait outline.
General Knowledge
Use the appropriate machine needle for the type of fabric you choose.
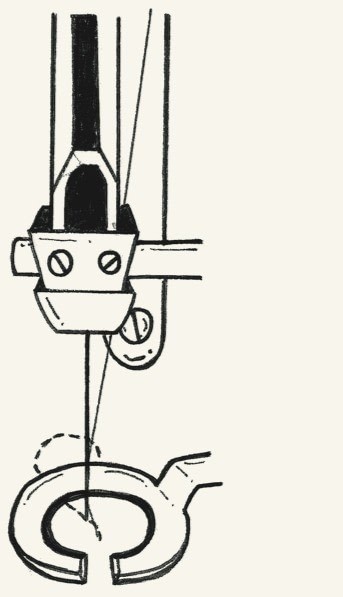
The switch to lower the feed dogs on a sewing machine is found at the back of machines with top-loading bobbins, or revealed by moving the free arm on machines with front-loading bobbins.
You will find the material easier to manoeuvre if you use
a larger piece than you need. Cut it to size later.
-
 Ms Dorito added Cameo Brooch to sew craft
12 Jun 18:13
Ms Dorito added Cameo Brooch to sew craft
12 Jun 18:13
-
 Alissa B. favorited Cameo Brooch
05 Sep 16:30
Alissa B. favorited Cameo Brooch
05 Sep 16:30
-
 erin f. favorited Cameo Brooch
02 Sep 05:35
erin f. favorited Cameo Brooch
02 Sep 05:35
-
 Laurence King published his project Cameo Brooch
23 Aug 10:30
Laurence King published his project Cameo Brooch
23 Aug 10:30
You Will Need
-
Step 1
Capture a Portrait:
The Traditional Method
Tape the paper to a wall and shine the light at it. Sit sideways between the light and the wall so that your profile appears on the paper, and ask a willing volunteer to trace your silhouette. Remove the paper from the wall and tidy up any uneven lines. Scan the image into the computer, resize it to 5 x 6cm (2 x 23/8in) and print. Attach the tracing paper to the image with tape and trace a single neat line around it. To allow a practice run, create two identical traced images from the drawing.
You could, of course, trace from an existing photograph instead. -
 Step 2
Embroider the Cameo
Attach the tracing-paper drawing to the linen with masking tape, making sure no tape touches the area to be sewn. If you wish, for extra stability, put the fabric into an embroidery hoop with the larger ring underneath.
Place the fabric in the sewing machine. Lower
the embroidery foot so the needle is on the line of your drawing. Moving the linen slowly, trace the line of your silhouette carefully with short, straight stitches.
Remember to reverse on to the line when you have completed the embroidery, to secure your stitches. If your silhouette includes
a neckline, you could create a necklace effect by embroidering a line across the neck using thread in
a complementary colour. When you have completed your sewing, remove the fabric from the sewing machine and cut any
loose threads.
Remove the embroidery hoop and masking tape, and carefully peel off the tracing paper to reveal
the image. -
 Step 3
Attach the Linen to the Leather
Place the embroidery on top of the leather, but do not pin at this stage as you may mark the fabrics. Put both layers into the embroidery hoop.Use thread in a different colour to machine stitch a rough outline around the portrait, 2mm (3/32in) away from the original line. Do not sew over the silhouette outline. Remember to change the bobbin thread as well as the top thread.
-
 Step 4
Frame the Cameo
Trim away the linen 2mm (3/32in) from the stitched line, without cutting through the leather.
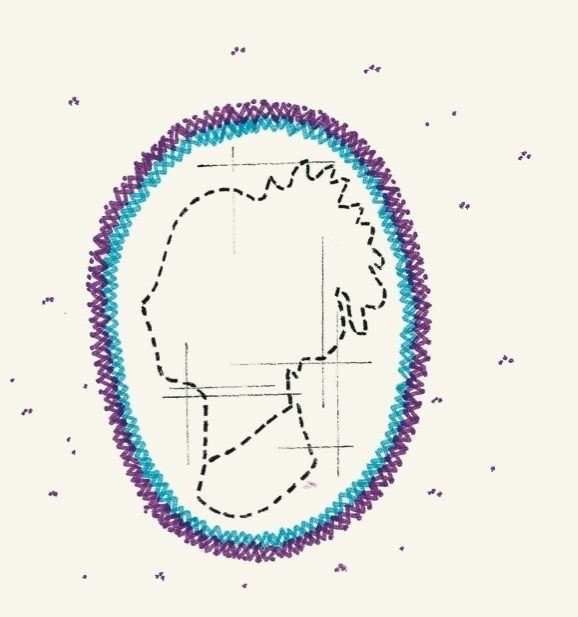
Embroider over the outer line using short horizontal stitches, until the linen edge is no longer visible. Remember to move the fabric slowly to control the stitching.
To add further detail, repeat the process with thread in another colour, this time making the lines less dense.
Cut an oval around your line of embroidery, leaving a 5mm (3/16in) gap around the edge.
Repeat the sewing process one last time, sewing over the edge of the leather to give the cameo a bold border. -
 Step 5
Add the Inscription
Using a ballpoint pen, write an inscription on the backing leather, leaving a space to attach a brooch pin. Slowly sew over the pen marks using short, straight stitches.
Cut the backing piece of leather to the same size and shape as the front. Sew the brooch pin to the back, covering your stitches with a small scrap of leather or fabric of your choice. -
 Step 6
Assemble the Brooch
Apply a thin layer of fabric glue to the wrong side of each piece of leather, press together and leave to dry.
When the glue has dried, hand or machine sew over the raw edges using the same thread as the border.