


About
How to Crochet a Button-Bedecked Headband
I live in Montana, where the winters are beautiful but also L-O-N-G. I've been feeling sick of all of my winter clothes after wearing them for months on end, and started eyeing my yarn scraps to see what I could do about it. I came up with this colorful headband, which was just the accessory to kick me back into colorful dressing. I wanted to put it on my head as soon as I finished it, and it was a hit at my yarn shop, where lots of customers started telling me about their own button collections.
Using buttons to highlight several crocheted circles sewn together, you too can make a brilliant headpiece. Feel free to experiment with the number of circles (and their sizes) in your headband, and remember that if this is too much color for you, you can also make it in neutral shades or tone down the buttons.
-
 Loviiletter favorited Button Bedecked Headband
31 May 19:34
Loviiletter favorited Button Bedecked Headband
31 May 19:34
-
 Kimya J. favorited Button Bedecked Headband
29 Oct 22:30
Kimya J. favorited Button Bedecked Headband
29 Oct 22:30
-
 TwinkleTime favorited Button Bedecked Headband
22 Oct 23:07
TwinkleTime favorited Button Bedecked Headband
22 Oct 23:07
-
 Michelle S. added Button Bedecked Headband to Shoes, Clothes, Accessories
11 May 03:11
Michelle S. added Button Bedecked Headband to Shoes, Clothes, Accessories
11 May 03:11
-
 androinerd added Button Bedecked Headband to Craft Bucket List
03 May 17:43
androinerd added Button Bedecked Headband to Craft Bucket List
03 May 17:43
-
 Casablanca favorited Button Bedecked Headband
16 Apr 08:58
Casablanca favorited Button Bedecked Headband
16 Apr 08:58
-
 Victorian Dreamer favorited Button Bedecked Headband
27 Jan 04:27
Victorian Dreamer favorited Button Bedecked Headband
27 Jan 04:27
-
 Jesi.Lynn favorited Button Bedecked Headband
03 Nov 15:48
Jesi.Lynn favorited Button Bedecked Headband
03 Nov 15:48
-
 Stephanie M. favorited Button Bedecked Headband
01 Aug 17:04
Stephanie M. favorited Button Bedecked Headband
01 Aug 17:04
-
TemperanceRiver favorited Button Bedecked Headband
26 Jul 15:45
You Will Need
-
 Step 1
The materials I started with were a few colors of similarly sized cotton yarn, some buttons, a 3.75mm crochet hook, and a yarn needle. Pick a few skeins from your stash that inspire you—you only need a little of each color.
I didn't end up using all of these materials, but having them out helped me choose which ones I liked best.
Note: I used dk-weight cotton yarns and a size 3.75mm (F) hook. The main color is Vickie Howell's yarn, Craft in color #769 Jennifer. The accents are made with Tahki Stacy cotton classic yarns. You can pretty much work the circle in any size yarn you want—creating delicate circles with fingering-weight yarn or funky ones with bulky yarn—just remember to change your hook size to suit the yarn.
To start, make a few circles from your main color (see the circle pattern below).
Vary the sizes of the circles by working a different number of rounds for each one. For instance, I worked one 4-round, one 3-round, and one 3-round circle where I substituted half-double crochets for the double crochets in the last round. -
 Step 2
Basic Circle Pattern
Make a magic ring, or start with a slip knot.
Round 1: Ch 3 (counts as dc), 9 dc in ring—10 dc.
Round 2: Ch 3, dc in same st, 2 dc in each dc around—20 dc.
Round 3: Ch 3, *2dc in next dc, dc in next dc; repeat from * around, ending with 2dc in last dc—30 dc.
Round 4: Ch 3, dc in next dc, *2dc in next dc, dc in next 2 dc; repeat from * around, ending with 2dc in last dc—40 dc.
Round 5: Ch 3, dc in next 2 dc, *2dc in next dc, dc in next 3 dc; repeat from * around, ending with 2dc in last dc—50 dc.Note: You can substitute any stitch for the dc stitch if you are consistent (make the whole round in that stitch).
-
 Step 3
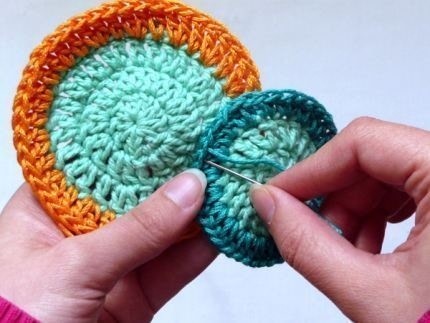
Using a contrasting color for each circle, add a double crochet or half-double crochet edging to each circle.
To get the right stitch count, follow the directions for the next round of stitches in the new color (for instance, if your circle is 3 rounds large, add the edging following the round 4 instructions).
-
 Step 4
Arrange the circles as you wish and sew them together. For the top overlapping edge, sew under the V of the stitch of the circle on top and back through to the back side of the bottom circle. Turn the work over and sew the back sides together as well, making sure the yarn doesn't show through to the front.
Remember, you can arrange the circles however you want. I actually started with four circles, but it seemed like too much. My design is asymmetrical, but you might prefer a symmetrical design, or one where the circles cover the majority of the top of your head. You can do it however you want—go for it!
-
 Step 5
Sew the buttons in place. If the yarn you are using is too thick to fit through the button hole, try separating one ply (strand) and using that as thread. Alternately, you can use a coordinating color of embroidery floss.
Determine a "top" side to your formation (the side that will sit near the top of your head). -
 Step 6
ttach the main color (or any color) yarn 2 stitches to the left of the center top of the piece and half-double crochet around the entire edge of the sewn-together circles. Make 2 half-double crochet stitches in every 4th or 5th stitch as necessary to keep the edge even.
Note: If your edge starts to ruffle, you're adding too many stitches into the edge. If it starts to curl, you aren't adding enough stitches. Pull out a few stitches and try again.
-
 Step 7
At the start of your half-double crochet border, join the last stitch to the first with a slip stitch, and slip stitch in the next 2 sts. Ch 3 (counts as double crochet), turn, and double crochet in the next 4 sts. *Ch 3, turn, dc across. Repeat from * for as many rows as necessary until the headband's length (including circles) matches your head's circumference.
Remember that the headband will stretch, so you might want to make it 1 to 2 inches shorter than your actual head circumference. Alternately, you could crochet the band in single crochet stitches to make it slightly less stretchy.
-
 Step 8
Fasten off the band, leaving a long tail for sewing. With wrong sides facing, center the band over the bottom circular part of the headband and sew the short edge of the band to the circular piece.
Once the headband is sewn together, slip stitch around the entire outside edge of the headband. This will keep the band from stretching too much. -
 Step 9
Now you're set to go in colorful style. Depending on your yarn, button, and placement choices, you can make this headband just right for you.


thanks a lot for posting this up...
i now need to learn how to crochet a circle as alli can do is squares!
but maybe..... *runs of to find a crochet hook and yarn!*