About
Arne & Carlos: Greatest Knit
LEVEL OF DIFFICULTY
Advanced
MATERIALS
Yarn: CYCA #3 (DK weight) Schachenmayr Merino Extrafine 120 DK, 100% wool (131 yd/120 m / 50 g)
Yarn Colors and Amounts: Choose your own selection of colors
Crochet Hook: U.S. size E-4 / 3.5 mm
When we reorganize our yarn supply after a long winter, we usually end up crocheting a new throw with the leftover yarns. We often work with butterflies as a theme, and this version of a granny square blanket features butterfly shaping.
SPECIAL STITCHES
1st dc / UK tr = ch 3.
dc cluster (dc cl) / UK tr cluster (UK tr cl) = 2 (3) dc / UK tr joined as follows:
2 (3) dc cluster / UK tr cluster = *work 1 dc / UK tr, but do not bring yarn through last 2 loops on hook. Repeat from * 1 (2) more times until there are 3 (4) loops on hook; yarn around hook and through all remaining loops.
dc group (dc gr) / UK tr group (UK tr gr) = 3 dc / UK tr into 1 stitch
NOTE: U.S. stitch names will be followed by British stitch names throughout.
Tags
Downloads
- 2018-09-19-124317-A_C+Favorites+Crochet+Chart+Symbols.pdf 763 KB [ Download ]
-
 Key West Witch favorited Butterfly Throw
24 Aug 03:42
Key West Witch favorited Butterfly Throw
24 Aug 03:42
-
 Welandra favorited Butterfly Throw
28 Jul 19:54
Welandra favorited Butterfly Throw
28 Jul 19:54
-
 Helen S. favorited Butterfly Throw
11 Jul 18:05
Helen S. favorited Butterfly Throw
11 Jul 18:05
-
 Susan G. favorited Butterfly Throw
01 Nov 17:35
Susan G. favorited Butterfly Throw
01 Nov 17:35
-
 satilanna added Butterfly Throw to Crochet
31 Oct 06:02
satilanna added Butterfly Throw to Crochet
31 Oct 06:02
-
 Dawn S. favorited Butterfly Throw
30 Oct 18:26
Dawn S. favorited Butterfly Throw
30 Oct 18:26
-
 Crafterella featured Butterfly Throw
25 Oct 23:00
Crafterella featured Butterfly Throw
25 Oct 23:00
-
 RareJewel favorited Butterfly Throw
23 Oct 10:07
RareJewel favorited Butterfly Throw
23 Oct 10:07
-
 Search Press published her project Butterfly Throw
12 Oct 09:00
Search Press published her project Butterfly Throw
12 Oct 09:00
-
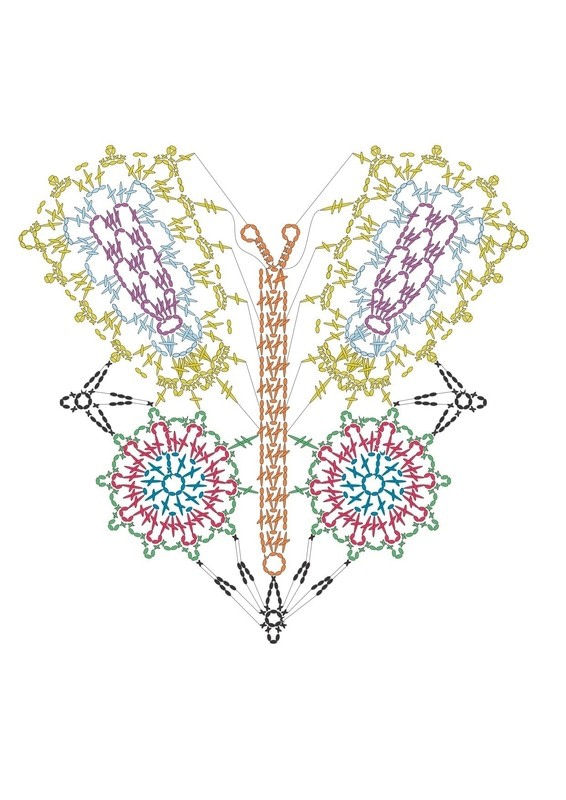
 Step 1
ANTENNAE
Ch 10, 1 sc / UK dc in 6th ch from hook, and then work 1 sc / UK dc in each of the next 3 ch, 1 sl st between the 2 dc / UK tr in the center of the previous segment of the body, ch 10, 1 sc / UK dc in 6th ch from hook; 1 sc / UK dc in each of next 3 ch, 1 sl st between the 2 dc / UK tr in center of the last segment on body; cut yarn and fasten off. -
 Step 2
BACK WINGS
Make both wings alike on Rounds 1-2.First Color
Ch 8 and join into a ring with 1 sl st into 1st ch.
Rnd 1: Ch 4 (= 1 dc / UK tr + ch 1), (1 dc / UK tr, ch 1) around ring 9 times and end with 1 sl st into 3rd ch at beginning of rnd.
Cut yarn and fasten off = 10 dc / UK tr around circle.Second Color
Rnd 2: Work around the ch st between each dc / UK tr of Rnd 1. Begin with (ch 3 and 2-dc cl / UK 2-tr cl) around ch loop, ch 4, (3-dc cl / UK 3-tr cl around next ch loop, ch 4) around; end with ch 4 and 1 sl st into top of 1st dc cl / UK tr cl.Third Color
Rnd 3: Join the right back wing to the body. Work (2 sc / UK dc, ch 3 = picot, 2 sc / UK dc) in 1st ch loop between dc clusters / UK tr clusters on Rnd 2, ch 2.
The wing is joined to the body in two places as follows:
2 sc / UK dc around the next ch loop between dc clusters / UK tr clusters on Rnd 2. 1 tr / UK dtr around dc / UK tr on side of body in 5th segment from bottom, on right side from back, 2 sc / UK dc around ch loop of wing, ch 2, 2 sc / UK dc in next ch loop between dc cl / UK tr cl on Rnd 2, 1 dc / UK tr around dc / UK tr on right side of body in 3rd segment as counted from bottom up on back, 2 sc / UK dc back around ch loop on wing, ch 2. *(2 sc / UK dc, ch 3, 2 sc / UK dc, ch 2) in next ch loop between dc cl / UK tr cl on Rnd 2*; rep from * to * in all ch loops. End with 1 sl st in 1st sc / UK dc. -
Step 3
Join Left Back Wing to Body
Work (2 sc / UK dc, ch 3, 2 sc / UK dc) in 1st ch loop between dc clusters / UK tr clusters on Rnd 2, ch 2. The wing is joined to the body in two places as follows:
Work 2 sc / UK dc in next ch loop between dc cl / UK tr cl on Rnd 2, 1 dc / UK tr around left side of body in 3rd segment as counted from the bottom of back, 2 sc / UK dc back around ch loop of wing, ch 2.
2 sc / UK dc around next ch loop between dc clusters / UK tr clusters on Rnd 2. 1 tr / UK dtr around dc / UK tr on left side of body at 5th segment from bottom of body, 2 sc / UK dc back around ch loop on wing, ch 2, *(2 sc / UK dc, ch 3, 2 sc / UK dc, ch 2) in next ch loop between dc cl / UK tr cl on Rnd 2*; repeat from * to * in every ch loop.
End with 1 sl st into 1st ch.
Cut yarn and fasten off. -
 Step 4
FRONT WINGS
Make both wings alike up to round joining wing to body.First Color
Ch 8 and join into a ring with 1 sl st into 1st ch.
Row 1: Ch 5, 3 dc / UK tr, ch 2, 1 dc / UK tr around ring.
Row 2: Turn and ch 3, 2 dc / UK tr around ch loop, ch 2, 3 dc / UK tr around last ch loop; turn.
Row 3: Ch 5, 3 dc / UK tr around ch loop, ch 2, 1 dc / UK tr in last dc / UK tr of previous row.
Row 4: Turn with ch 3, 2 dc / UK tr around 1st ch loop, ch 2, 3 dc / UK tr around last ch loop; turn.
Row 5: Ch 5, 3 dc / UK tr around ch loop, ch 2, 1 dc / UK tr in last dc / UK tr of previous row. Cut yarn and fasten off.Second Color
Attach yarn around ring beginning First Color section above. Ch 3 and work 2-dc cl / UK 2-tr cl around bottom of ring.
Ch 4, 3-dc cl / UK 3-tr cl around ring, ch 3 and then (3 dc / UK tr, ch 3) in each of the next 2 ch loops along side of wing.
Corner: *(3 dc / UK tr, ch 4, 3 dc / UK tr) around ch loop in corner, ch 3* and, in next corner, work * to * once more, work (3 dc / UK tr, ch 3) in each of next 2 ch loops along other side of wing.
End with 1 sl st into top of 1st dc cl / UK tr cl.Third Color
Begin at lower edge of wing between 2 dc clusters / UK tr clusters; work around the 4-ch loop.
Work (ch 3, 2-dc cl / UK 2-tr cl, ch 3, 3-dc cl / UK 3-tr cl) in same ch loop, ch 3, *3 dc / UK tr, ch 3*; rep from * to * around the next 3 ch loops. In the corner work (3 dc / UK tr, ch 4, 3 dc / UK tr, ch 3), 3 dc / UK tr in center ch loop, ch 3, and, in next corner, work (3 dc / UK tr, ch 4, 3 dc / UK tr, ch 3), *3 dc / UK tr, ch 3*; rep from * to * in the next 3 ch loops. End with 3-dc cl / UK 3-tr cl in 1st ch loop (where you have already worked a 2-dc cl / UK 2-tr cl), ch 3, and 1 sl st into top of 1st dc cl / UK tr cl.Join body and back wings in the same color as follows:
-
Step 5
RIGHT WING
Begin with 2 sc / UK dc in 1st ch loop, 1 dc / UK tr in 1st picot from body on back wing, 2 sc / UK dc back in ch loop on wing, ch 2.In the 2nd ch loop (between 2 dc groups / UK tr groups), work 2 sc / UK dc, 1 dc / UK tr in 2nd picot from body on back wing, 2 sc / UK dc back around ch loop on wing, ch 2.
Work *(2 sc / UK dc, ch 3, 2 sc / UK dc, ch 2) around next ch loop*; rep from * to * around the 3rd, 4th, and 5th ch loops. Around ch loop in corner work: (2
sc / UK dc, ch 4, 2 sc / UK dc, ch 2) and then continue *(2 sc / UK dc, ch 3, 2 sc / UK dc, ch 2) around next ch loop*; rep from * to * around the 7th and 8th ch loops.Work 2 sc / UK dc in ch loop in corner, ch 3, 1 sc / UK dc, 1 dc / UK tr in ch circle at end of 1st antenna, 2 sc / UK dc back in same ch loop on wing, ch 2.
10th ch loop: 2 sc / UK dc, 1 tr / UK dtr in top of segment where antenna is crocheted from, 2 sc / UK dc back in same ch loop on wing, ch 2.
11th ch loop: 2 sc / UK dc, 1 dc / UK tr around dc / UK tr at side of 3rd segment from top, 2 sc / UK dc back, ch 2.
12th ch loop: 2 sc / UK dc, 1 dc / UK tr around dc / UK tr at side of 5th segment from top, 2 sc / UK dc back, ch 2.
13th ch loop: 2 sc / UK dc, 1 dc / UK tr around dc / UK tr at side of 7th segment from top, 2 sc / UK dc back, ch 2.
14th ch loop: 2 sc / UK dc, 1 tr / UK dtr around same dc / UK tr at side where tr / UK dtr from back wing is worked, 2 sc / UK dc back, ch 2.End with 1 sl st into 1st sc / UK dc; cut yarn and fasten off.
-
Step 6
LEFT WING
1st ch loop: 2 sc / UK dc, 1 tr / UK dtr around same dc / UK tr on left side where tr / UK dtr from back wing was worked, 2 sc / UK dc back in same ch loop on wing, ch 2.
2nd ch loop: (between 2-dc cl / UK 2-tr cl) 2 sc / UK dc, 1 dc / UK tr around dc / UK tr at side of 7th segment from top, 2 sc / UK dc back, ch 2.
3rd ch loop: 2 sc / UK dc, 1 dc / UK tr around dc / UK tr at side of 5th segment from top, 2 sc / UK dc back, ch 2.
4th ch loop: 2 sc / UK dc, 1 dc / UK tr around dc / UK tr at side of 7th segment from top, 2 sc / UK dc back, ch 2.
5th ch loop: 2 sc / UK dc, 1 tr / UK dtr in top of segment where antenna is crocheted from, 2 sc / UK dc back, ch 2.2 sc / UK dc around ch loop in corner, 1 dc / UK tr in ch-ring at end of second antenna, 1 sc / UK dc back in same ch loop on wing, ch 2.
6th ch loop: (2 sc / UK dc, ch 3, 2 sc / UK dc, ch 2) in corner, *2 sc / UK dc, ch 3, 2 sc / UK dc, ch 2*; rep * to * around 7th and 8th ch loops.
Around the ch loop in corner, work: (2 sc / UK dc, ch 3, 2 sc / UK dc, ch 2), work *2 sc / UK dc, ch 3, 2 sc / UK dc, ch 2* around 10th, 11th, and 12th ch loops.
13th ch loop: Work 2 sc / UK dc, 1 dc / UK tr in 2nd picot of body, on back wing, 2 sc / UK dc back in ch loop, ch 2.
14th ch loop: Work 2 sc / UK dc, 1 dc / UK tr in 1st picot of body, on back wing, 2 sc / UK dc back in ch loop, ch 2.End with 1 sl st in 1st sc / UK dc; cut yarn and fasten off. Weave in all ends neatly on WS.
-
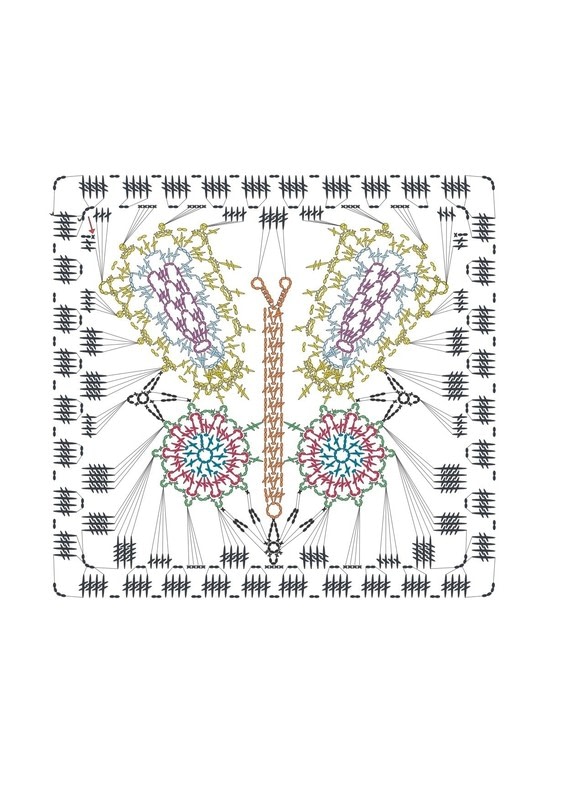
 Step 7
Background Color for Joining Butterflies
We decided to crochet with Black all around the butterflies. Begin by working around each butterfly as follows.WORK BETWEEN THE WINGS AND BODY BACK:
Ch 6 and join into a ring with 1 sl st into 1st ch.
Rnd 1: Ch 3, 1 sc / UK dc in 2nd picot from body on right wing, ch 3, 1 sc / UK dc back around ring.
Ch 3, 1 sc / UK dc in 1st picot from body on right wing.
Ch 3, 1 sc / UK dc back around ring.
Ch 3, 1 sc / UK dc in ring at end of body, ch 3, 1 sc / UK dc back around ring.
Ch 3, 1 sc / UK dc in 1st picot from body on left wing.
Ch 3, 1 sc / UK dc back around ring.
Ch 3, 1 sc / UK dc in 2nd picot from body on left wing.
Ch 3, 1 sc / UK dc back around ring.
End with 1 sc / UK dc around ring, ch 3, and 1 sc / UK dc around ring.
Cut yarn and fasten off.WORK BETWEEN THE FRONT AND BACK WINGS:
Ch 6 and join into a ring with 1 sl st into 1st ch.
Ch 3, 1 sc / UK dc in 1st picot on front wing from join between front and back wings.
Ch 3, 1 sc / UK dc back around ring.
Ch 3, 1 sc / UK dc around join between front and back wings, ch 3, 1 sc / UK dc back around ring.
Ch 3, 1 sc / UK dc in 1st picot on back wing from join between front and back wings.
Ch 3, 1 sc / UK dc back around ring.
End with 1 sc / UK dc around ring, ch 3, 1 sc / UK dc around ring.
Cut yarn and fasten off.
Work the same way on the other side of the butterfly’s body, but begin with the back wing.Crochet around the butterfly with the same color, beginning in the left corner at top of front wing and then continue towards the left in all picots.
Rnd 1:
1st picot: Ch 3, 2 dc / UK tr, ch 2.
2nd picot: 4 dc / UK tr, ch 2.
3rd picot: 4 tr / UK dtr, ch 2.
4th picot: 4 dtr / UK tr tr (= 3 yarnovers over hook to begin stitch), ch 2.
5th picot: Work around the 3 ch from join between wings, 4 dc / UK tr, ch 2.
6th picot: 4 tr tr / UK quadtr (= 4 yarnovers over hook to begin stitch), ch 2.
7th picot: Corner, 3 tr tr / UK quadtr, ch 4, 3 tr tr / UK quadtr, ch 2.
8th picot: 4 dc / UK tr, ch 2.
9th picot: 4 sc / UK dc, ch 2.
10th picot: 4 tr / UK dtr, ch 2.
11th picot: Around the ch 3 of join between wings, work 4 sc / UK dc, ch 2.
12th picot: 4 tr / UK dtr, ch 2.
13th picot: 4 sc / UK dc, ch 2.
14th picot: 4 dc / UK tr, ch 2.
15th picot: Corner, 3 tr tr / UK quadtr, ch 4, 3 tr tr / UK quadtr, ch 2.
16th picot: 4 tr tr / UK quadtr, ch 2.
17th picot: Around the ch 3 of join between wings, work 4 dc / UK tr, ch 1.
18th picot: 4 dtr / UK tr tr, ch 2.
19th picot: 4 tr / UK dtr, ch 2.
20th picot: 4 dc / UK tr, ch 2.
21st picot: Corner, 3 dc / UK tr, ch 4, 3 dc / UK tr, ch 2.
22nd picot: 4 sc / UK dc, ch 2.
23rd picot: 4 sc / UK dc, ch 2.
24th picot: 4 dc / UK tr, ch 2.
In the ring on the antennae, work 2 tr / UK dtr in 1st antenna and 2 tr / UK dtr in the other one, ch 2.
25th picot: 4 dc / UK tr, ch 2.
26th picot: 4 sc / UK dc, ch 2.
27th picot: 4 sc / UK dc, ch 2.
End with 3 dc / UK tr in 1st corner, ch 4, and 1 sl st into top of 1st dc / UK tr.Turn work and crochet back:
Rnd 2: Ch 4, 3 tr / UK dtr around ch loop, ch 4, 4 tr / UK dtr around same ch loop, ch 2.On the long side, work 4 tr / UK dtr around ch loop, and ch 2 between dc groups / UK tr groups. In each corner, work (4 tr / UK dtr, ch 4, 4 tr / UK dtr, ch 2). End with 1 sl st into 4th ch at beginning of rnd. Cut yarn and fasten off. Weave in all ends neatly on WS.
-
 Step 8
BUTTERFLY BODY
Ch 8 and join into a ring with 1 sl st into 1st ch.
Row 1: Ch 3, 1 dc / UK tr, ch 1, 2 dc / UK tr around ring = 1st body segment.
Row 2: Work back: Ch 3, (1 dc / UK tr, ch 1, 1 dc / UK tr) around ch between the 2 center dc / UK tr of previous round and 1 dc / UK tr in top of ch 3 at beginning of row.Repeat Row 2 10 times—12 body segments. End with ch 3, (1 dc / UK tr, ch 1, 1 dc / UK tr) around ch between the 2 center dc / UK tr of previous row, 1 dc / UK tr in top of ch 3 at beginning of row. The last 2 dc / UK tr are crocheted together.
-
 Step 9
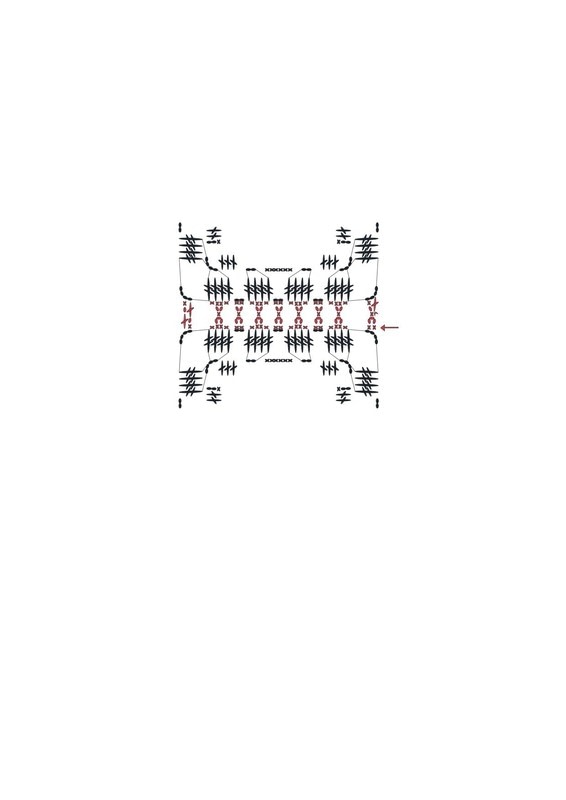
JOINING ALL THE BUTTERFLY BLOCKS
Begin with the 1st butterfly block and work from corner to corner on one side.
Begin in the 1st corner with (1 sc / UK dc, ch 3, and 1 sc / UK dc) around the same ch loop.
Continue with 1 sc / UK dc between the 1st and 2nd tr / UK dtr, (1 sc / UK dc, ch 3, 1 sc / UK dc) between the 2nd and 3rd tr / UK dtr, 1 sc / UK dc between the 3rd and 4th tr / UK dtr, (1 sc / UK dc, ch 3, 1 sc / UK dc) around ch loop; end with (1 sc / UK dc, ch 1, 1 dc / UK tr) in corner in second end of side you are working on.
Continue with ch 1 and 1 sc / UK dc in corner on block you are joining the 1st one to.
From the corner on the next block, work 1 dc / UK tr in corner of 1st block. Work along the side of the 2nd block the same way as for the 1st, but the ch 3 is now ch 1, 1 sc / UK dc around ch loop on 1st block, and ch 1.
Join all the blocks for the first strip (tier) the same way. Work each strip separately and then join the strips.