


About
How To: Butterfly Brooches
Time for another free tutorial... this time, how to make simple but super-cute butterfly brooches decorated with buttons.Lovely for springtime, or as a sweet gift all year round!
Tags
Downloads
- butterfly001.jpg 30 KB [ Download ]
-
 katmacb favorited Butterfly Brooches
29 Feb 03:23
katmacb favorited Butterfly Brooches
29 Feb 03:23
-
 satilanna added Butterfly Brooches to Jewelry
12 May 18:05
satilanna added Butterfly Brooches to Jewelry
12 May 18:05
-
 linootz z. added Butterfly Brooches to ideas
14 Dec 13:02
linootz z. added Butterfly Brooches to ideas
14 Dec 13:02
-
 pittysoares commented on Butterfly Brooches
21 Jul 17:04
pittysoares commented on Butterfly Brooches
21 Jul 17:04
-
pittysoares favorited Butterfly Brooches
21 Jul 17:04
-
 Bayou Jenn added Butterfly Brooches to Jewelry
16 Jun 00:58
Bayou Jenn added Butterfly Brooches to Jewelry
16 Jun 00:58
-
 gareth m. favorited Butterfly Brooches
02 May 19:39
gareth m. favorited Butterfly Brooches
02 May 19:39
-
 Miss_Fit added Butterfly Brooches to Fun Little Bits
29 Mar 04:26
Miss_Fit added Butterfly Brooches to Fun Little Bits
29 Mar 04:26
-
 Naomi D. favorited Butterfly Brooches
27 Nov 17:32
Naomi D. favorited Butterfly Brooches
27 Nov 17:32
-
 Kelly B. favorited Butterfly Brooches
02 Nov 00:01
Kelly B. favorited Butterfly Brooches
02 Nov 00:01
You Will Need
-
 Step 1
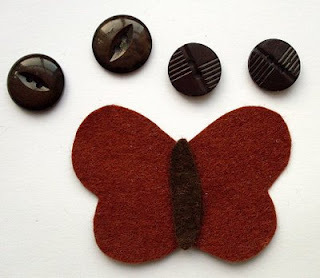
First cut out your pattern pieces - if you print the pattern sheet (see end of this post) at 100% your brooches will be the same as mine, approx 6cms across, just print it larger to get larger butterflies and to be able to use bigger buttons. You need one body piece in black or brown, and two colourful wing shapes. All the pieces I've cut out for my "in progress" shots are brown as I decided to use the pattern to make some moths.
-
 Step 2
Next choose your buttons to match - again, mine are brown to suit my moth but you can have lots of fun playing around with colours.
-
 Step 3
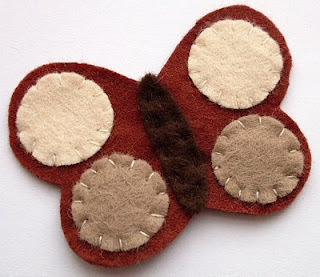
Use your buttons as a template to cut small circles of contrasting felt. Hold the button against the felt and cut round it leaving a narrow border which will "frame" your button. Once you've cut one circle this way you can use it as the template to cut a matching one for the other button. Repeat for the second pair of buttons. Lay all your pieces onto the wing shape to check you're happy with your design.
-
 Step 4
Using matching thread, sew on the narrow body shape and the felt circles (using contrasting thread for the circles can work quite nicely in adding an extra bit of decorative detail).
-
 Step 5
One by one, position each button as close to the centre of its felt circle as possible and sew it on securely (this is much quicker if you use a double thickness of thread).
-
 Step 6
Now take your second wing shape, and sew on your brooch back or safety pin. To attach a safety pin neatly just cut a small rectangle of felt to match your brooch, place it over the pin (make sure the part which you use for pinning remains free!) and sew it securely in place. I used to do this all the time when I first started making brooches, the one pictured is one of my early felt flower brooches.
-
 Step 7
Finally, put the front and back pieces together and sew them together with matching thread - either with plain stitches or whip stitching around the edges. This is easiest if you start at the side of one wing instead of near the middle. And that's it! Easy, huh? Why not make lots and have a whole group of butterflies fluttering across your sweater...
-
 Step 8
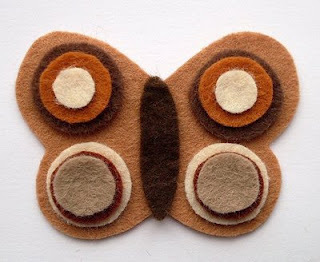
Of course, I do love a good design variation ... so here's a way to use this pattern even if you don't have any buttons. Instead of a button with a framing circle of felt, cut lots of little circles of felt and layer them - cut the smallest circle first and use this as a template as described above for cutting "framing" circles.
-
 Step 9
Sew on the narrow body piece and then use contrasting thread to attach the circles. I held each trio of circles in place and stitched through all three at once starting in the middle and moving outwards like a spiral.
-
 Step 10
You can play around with the stitches a little if you like to add some more detail, as I did with the second set of circles.
-
 Step 11
For extra variations on this design you could try sewing sequins or small beads in the centre of the circles for a bit of sparkle. Then just attach a brooch back or safety pin as before and sew the front and back together and wear your creation with pride!


Comments

