


About
For all you barganista, d.i.y. Star Wars gals...
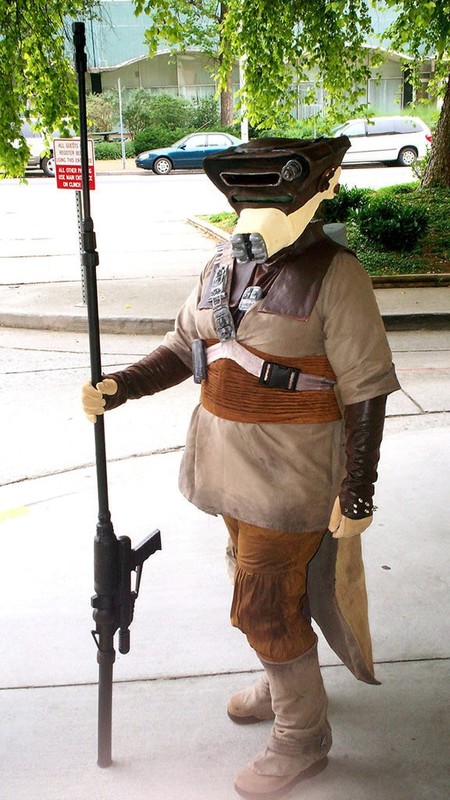
For you Star Wars nerds out there: I couldn't shell out the $600+ to buy the kit or pre-made helmet, so I thought I'd make my own.
It worked! This can take a while, especially if you're not used to working with heat guns or wonderflex, but it pays off. My helmet is very sturdy, comfortable, and has gotten a ton of use at the trooping events I attend.
* A note about Wonderflex: it's made by Dazian, and the most reliable supplier I have found is here - http://www.cosplaysupplies.com/store.php?s=M4UZ
In theory, you can make this using ABS plastic and a clay model of the helmet, but I avoid hazardous fumes and, thusly, ABS. I also can't sculpt for squat.
Good luck!
Tags
-
 fritzcracker favorited Boushh Leia Helmet
24 Aug 17:28
fritzcracker favorited Boushh Leia Helmet
24 Aug 17:28
-
 Amanda S. favorited Boushh Leia Helmet
16 May 21:54
Amanda S. favorited Boushh Leia Helmet
16 May 21:54
-
 Kim favorited Boushh Leia Helmet
27 Jan 22:16
Kim favorited Boushh Leia Helmet
27 Jan 22:16
-
 DarthAmethystos favorited Boushh Leia Helmet
31 May 15:30
DarthAmethystos favorited Boushh Leia Helmet
31 May 15:30
-
 Emmy S. favorited Boushh Leia Helmet
31 Mar 14:03
Emmy S. favorited Boushh Leia Helmet
31 Mar 14:03
-
 KelliDroze added Boushh Leia Helmet to KK
16 Dec 05:44
KelliDroze added Boushh Leia Helmet to KK
16 Dec 05:44
-
KelliDroze added Boushh Leia Helmet to KK
16 Dec 05:30
-
KelliDroze added Boushh Leia Helmet to KK
16 Dec 05:30
You Will Need
-
Step 1
Using your ruler, measure your head's circumference, height, neck length.
Look at your reference images. Based on your actual measurements, you need to gauge how much distance you want to the external edges of the helmet, especially on the brow/crown area in the front and the mouth area in the front.
I found it useful to try a football helmet on, then a full-cover cycle helmet to get an idea of what may be too large or too small for my head.
-
 Step 2
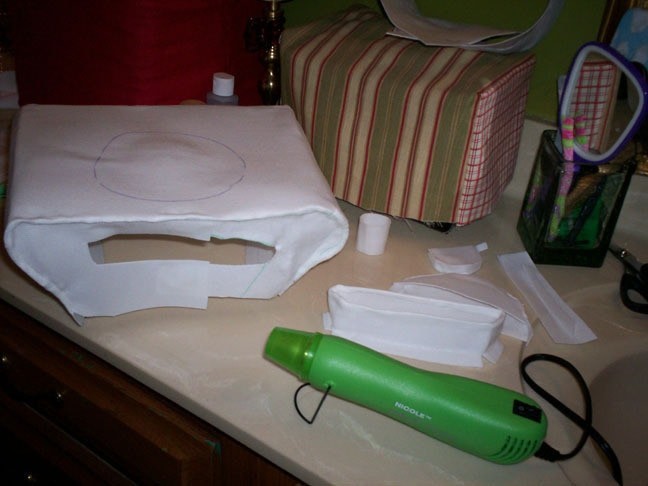
Now that you've got an idea of the measurements you want, you have to do a little math.
I recommend cutting the pattern out in posterboard or cardstock first, taping them together, and then cutting the Wonderflex.
The image to the left is a scaled-down, rough cutting pattern for the Wonderflex. It's intended to give you a general idea of the basic shapes you need to begin building the helmet.
If you have trouble viewing this image, the pdf is online here http://padawansguide.com/gifs4/BoushhWonderflexPattern.pdf
-
 Step 3
Now that you've cut out our pieces, it's time to start assembling them.
Using your heat gun, begin with the muzzle/mouth area, then move onward.You may have to create the domed crown last.
The nice thing about wonderflex is that it's self-bonding, and even scraps can be re-used.
It can get very hot, however, so be careful. -
Step 4
With your helmet constructed, it's time to do something about the duct-tape texture of the wonderflex.
Using your fingers and your Hearty (air-dry) clay, smooth it over the entire helmet surface, except for the muzzle.
Once it has dried, sand it smooth. If areas flake off or become too thin, you can reapply the clay.
Make sure you sand outside and wear a mask. The particles of the clay can be irritating to those with respiratory issues.
-
Step 5
Now that your helmet is sanded, it's ready to create the detail pieces.
1. cut a strip of chamois the length from one side of helmet rear to the other. Hot glue each raw end to the center of the back strip so no raw edges are showing.
2. create two identical, circular details (I used unfinshed wood checker pieces, painted brown and aged) and attach them to the ends of the chamois strip.
3. Create two different-sized detail pieces (I used old clock and computer keyboard parts glued, painted, and aged) to add to both sides of the helmet.
-
Step 6
Now it's time to deal with the muzzle.
Using the pattern and sculpting skills as inspiration, you use Hearty clay to create the two muzzle frontispieces. Remember that these need to fit snugly inside of the muzzle rim, and allow for about 20% shrinkage of the clay when dried.
When these have dried completely, paint them silver, age them, then seal them with non-glossy water-based varnish.
Paint a gently angled trapezoidal piece of wire mesh black. Make sure it's about 2 inches longer on each side than the internal muzzle measure.
Glue this mesh in, and then glue the frontispieces onto the mesh. -
Step 7
Paint your helmet. It will take several layers, then use deeper and lighter tones to add depth and age.
You may want to use the non-gloss varnish to seal it.
-
Step 8
Almost Last step -- and possibly the most tricky: attaching the chamois.
Since the leather has to be smooth on the muzzle, I recommend doing this part seperately and on the bias. The nice thing about the chammy is that it is so stretchy! Place your seam on the underside of the muzzle, and get the raw edges as close to each other as possible.
Make sure the edge of the chammy facing your eyes is rolled under to create a finished edge. Glue this as close as possible to the edge of the painted/clay-covered helmet.*I had to use hot glue to do this, and actually had to rip it off and redo a couple of times.
Attaching the rest of the chamois is fairly easy. Cut a long rectangle with wider, angled ends based on how deep/tall your helmet is and how far down your neck you want the chammy to droop.
Finish both the top, bottom and sides by gluing then folding under, and then attach the sides and top only to the helmet, allowing the bottom to hang lose downward.
-
Step 9
Glue on the chamois strap and other details.
-
Step 10
Inside the helmet, glue in foam for comfort and a secure fit.
This is also the time to cut and glue in the green PVC sheet in the visor area. I did two layers so my eyes weren't visible in photos.
-
 Step 11
Enjoy!
Just don't leave it in a overly humid/moist environment, or in a hot car.

Comments

