https://www.cutoutandkeep.net/projects/black-and-white-snowflake-egg • Posted by Search Press
Black and white fabrics, lace trims and textiles are always popular in interiors. In fact, a black-and-white design is suitable for both a rustic farmhouse and an elegant city home. A collection of these eggs looks fantastic on display in a rustic ceramic bowl on a crocheted doily. You could also turn these eggs into hanging ornaments – they would look great hanging from a tree with crocheted snowflakes.
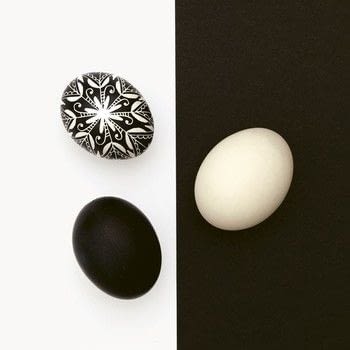

Black and white fabrics, lace trims and textiles are always popular in interiors. In fact, a black-and-white design is suitable for both a rustic farmhouse and an elegant city home. A collection of these eggs looks fantastic on display in a rustic ceramic bowl on a crocheted doily. You could also turn these eggs into hanging ornaments – they would look great hanging from a tree with crocheted snowflakes.

Close up the hole in the bottom of the egg. Using a pencil, divide the egg into eight equal sections by drawing a horizontal and vertical line to create a cross, then adding four diagonal lines. Repeat on the other side of the egg, making sure the lines on both sides join up. On both sides, draw a dot where all the lines cross in the centre, then add a circle of eight petals to create a daisy shape. Go over your linework with beeswax, drawing the lines boldly so they stand out, and let dry.

Continue to embellish the two daisy shapes, adding swirls and straight lines that fan out in the same direction like a windmill. To create the snowflake motif, draw the outline of a star around the ‘windmills’ on both sides of the egg.

To make the snowflakes more ornate, use the stylus pen and beeswax to fill the inside of the two stars with leaf-like shapes, then draw another star outline around the first and edge it with a series of tiny loops – think of these as a lace trim.

Turn the egg slightly and fill in the empty spaces between the points of the stars with more details to make the design look like a fancy doily. Here, each space has been filled with a simple cross and small daisy. Let the beeswax dry.

Once both snowflakes are drawn and all the sections filled in, submerge the egg in the black dye for 10 minutes or so, then remove and blot dry with a paper towel.

Hold the egg close to the candle flame and start removing the melting wax with a tissue. Keep turning the egg, holding it near the flame and gently cleaning off the wax.