


About
A creepy ass doll for my cousin, a replica of the little sister's one in the game
My cousin Jordan mentioned that he'd love a replica of this doll that appears in a game he loves, and me always up for the challenge and looking for oppertunity realised his birthday was just around the corner.
Gathering the materials was a bit of a nightmare (hard to find baseballs in scotland!) and there were some problem solves along the way but I'm really chuffed with my efforts.
This is the original doll from the game -
http://bioshock.wikia.com/wiki/File:Big_daddy_doll.png
-
 WerewolfCas favorited Bioshock Infinite Big Daddy Doll
06 Apr 14:27
WerewolfCas favorited Bioshock Infinite Big Daddy Doll
06 Apr 14:27
-
 Vanessa M. favorited Bioshock Infinite Big Daddy Doll
17 Apr 00:59
Vanessa M. favorited Bioshock Infinite Big Daddy Doll
17 Apr 00:59
-
 Neko-San K. favorited Bioshock Infinite Big Daddy Doll
31 May 21:09
Neko-San K. favorited Bioshock Infinite Big Daddy Doll
31 May 21:09
-
 Nitrous_Party favorited Bioshock Infinite Big Daddy Doll
08 Oct 23:07
Nitrous_Party favorited Bioshock Infinite Big Daddy Doll
08 Oct 23:07
-
 Sarah B. favorited Bioshock Infinite Big Daddy Doll
23 Aug 12:49
Sarah B. favorited Bioshock Infinite Big Daddy Doll
23 Aug 12:49
-
 Deven S. favorited Bioshock Infinite Big Daddy Doll
03 Aug 04:17
Deven S. favorited Bioshock Infinite Big Daddy Doll
03 Aug 04:17
-
 Kyerial added Bioshock Infinite Big Daddy Doll to Gotta try someday
28 Aug 01:26
Kyerial added Bioshock Infinite Big Daddy Doll to Gotta try someday
28 Aug 01:26
-
Kyerial favorited Bioshock Infinite Big Daddy Doll
28 Aug 01:26
-
 susie entered her project Bioshock Infinite Big Daddy Doll to Petits Pixels
26 Jun 15:40
susie entered her project Bioshock Infinite Big Daddy Doll to Petits Pixels
26 Jun 15:40
-
 Chaos favorited Bioshock Infinite Big Daddy Doll
03 Jun 23:43
Chaos favorited Bioshock Infinite Big Daddy Doll
03 Jun 23:43
-
Step 1
Firstly, I don't know why, I made his legs. basic tubes of red and white striped fabric, little black booties and stuffed them.
-
Step 2
I sized, shaped and stitched by eye. I didn't take into account how much a small piece of Hessian can fall to bits so take heed!
Stuff and stitch the legs on.
Leave holes to thread your rope arm through. -
Step 3
Thread the arm through, I was lucky that my rope had this little nub on the end, otherwise I was going to make a Hessian hand.
I stitch my arms in place a little, just so they wouldn't become uneven. -
Step 4
Now the baseball torture :)
It's actually a soft ball I used for size and after some negotiating I managed to push the nails in and the wire lengths too, the toughest part was making a hole in the skin.
I used a staple gun to attach his head to his body, not a great hold but he's a figure, not a toy so it'll be plenty strong enough.
I've seen other versions online that have used push pins instead of nails but I like the look of the nails :) -
Step 5
The drill hand was a nightmare!
In the original image it looks like a thimble with a corkscrew but I found it really hard to find these in a size that suited me. Luckily I found this little salt shaker in a pound shop and this drill bit was procured from Harry's Hardware, proud sponsers of many a mad crafting notion and always happy to listen to my crazy requests :)
I had to hammer, plier, stretch and twist to little hole in the salt shaker but he finally relented. enough to get the drill bit through. I stuffed and superglued it to hell and it holds pretty well. -
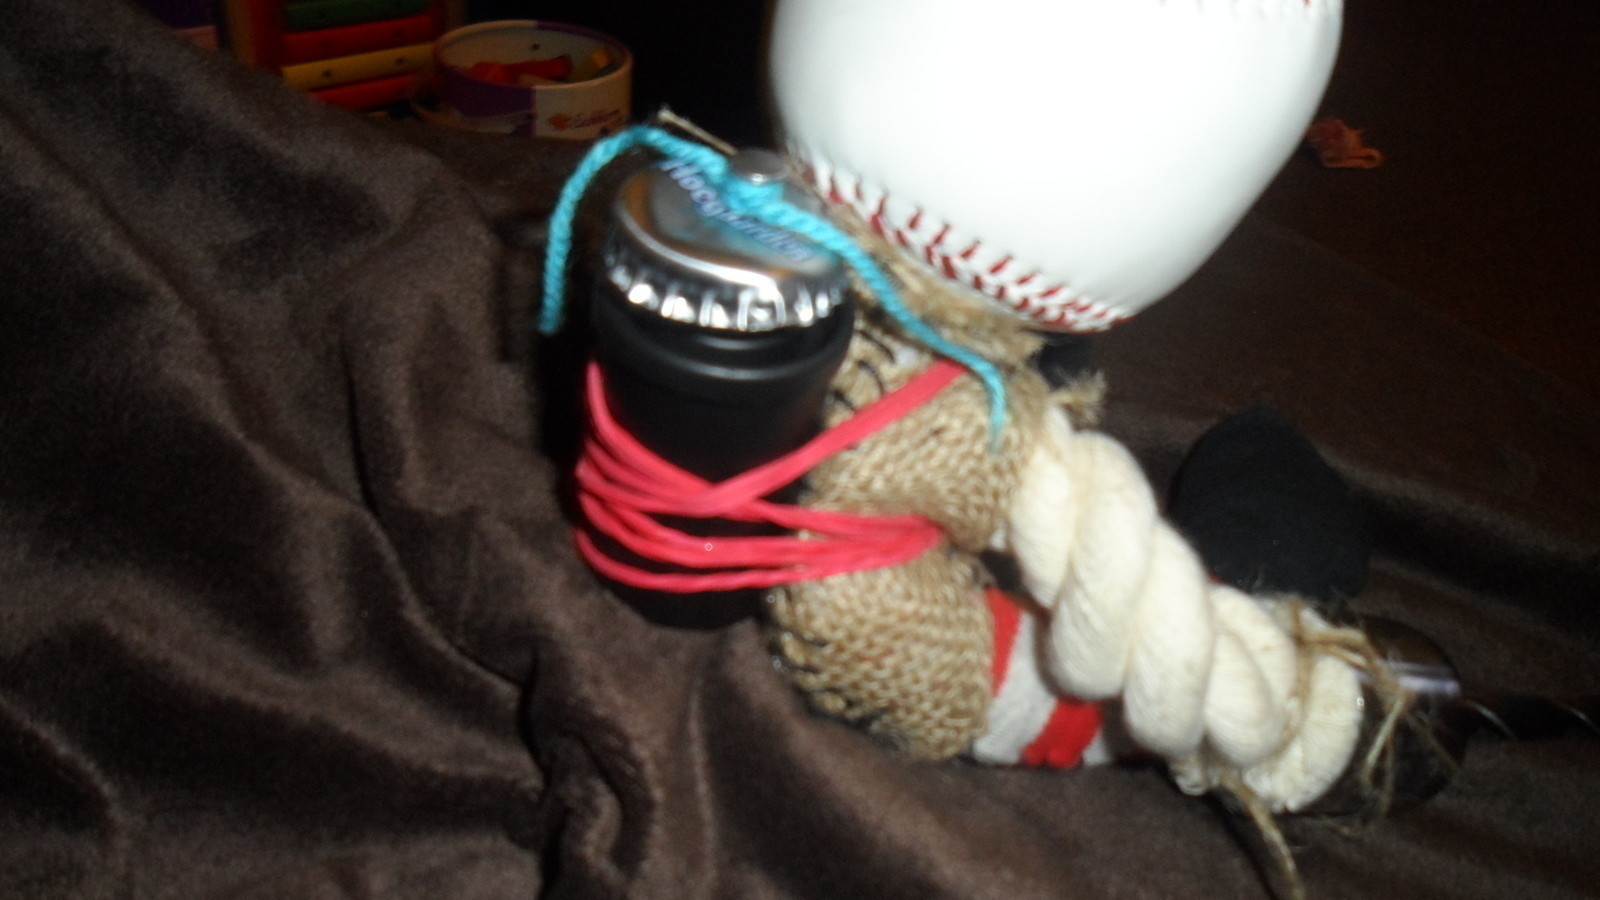
Step 6
The backpack is a film canister with a bottle cap nailed to it (I used an elastic band to stop it from slipping down)
Attatch to your figure with red rubber bands and you're done.
I'd urge you to try and get old stuff for this make, love the touch of the rusty wire round his face, wish I could have used more found items.


I've wanted to make one of these too, been telling myself I'll get around to it for something like 3 years though.
A+ though, very well done!.