https://www.cutoutandkeep.net/projects/binder-cover • Posted by Lola...again!!!
Seam allowances are 1/2" unless otherwise noted. Measurements of your binder may vary.....adjust measurements of pattern accordingly! The binder I used was a 1 inch Economy Binder that measured 11.5 inches tall x 22.5 inches (open ) Interface every piece, except lining and accent pieces, with a Fusible Craft Interfacing. Mark the pieces, with thier name, as you cut them. I use masking tape on the wrong side of the fabric. This helps to make it less confusing. You need 4 different fabrics Fabric 1 (berry looking)-main fabric for body of cover Fabric 2(flowers)-contrast piece used for pencil pocket, and on outside Fabric 3(dark brown)- accent used in small quantity Random lining fabric Cut everything out and fuse interfacing before you start. Fabric 1 - Outside of Cover cut 1 @ 13 x 24, Inside Flaps cut 2 @ 10 x 13, Right Flap pocket cut 1 @ 5 x 13, inside of Snap Flap cut 1 @ 5 x 5. Fabric 2- Pencil Pocket cut 1 @ 5x10, Contrast on Right Flap pocket cut 1 @ 3 x 13, Outside of Snap Flap cut 1 @ 5 x 5, Contrast on Outside cover cut 1 @ 10 x 15. Fabric 3- accent for Right Flap pocket cut 1 @ 2 x 13, Pencil pocket accent 1 @ 2 x 10, accent for Snap Flap 1 @ 2 x 5, Accent for contrast on outside cover 2 @ 2.5 x 15 and 2 @ 2 x 13. Random Lining fabric- Inside flaps lining cut 2 @ 10 x 13, Right flap lining cut 1@ 7 x 13, pencil pocket lining cut 1 @ 5 x 10, inside center facing cut 2 @ 2 x 8.


Seam allowances are 1/2" unless otherwise noted. Measurements of your binder may vary.....adjust measurements of pattern accordingly! The binder I used was a 1 inch Economy Binder that measured 11.5 inches tall x 22.5 inches (open ) Interface every piece, except lining and accent pieces, with a Fusible Craft Interfacing. Mark the pieces, with thier name, as you cut them. I use masking tape on the wrong side of the fabric. This helps to make it less confusing. You need 4 different fabrics Fabric 1 (berry looking)-main fabric for body of cover Fabric 2(flowers)-contrast piece used for pencil pocket, and on outside Fabric 3(dark brown)- accent used in small quantity Random lining fabric Cut everything out and fuse interfacing before you start. Fabric 1 - Outside of Cover cut 1 @ 13 x 24, Inside Flaps cut 2 @ 10 x 13, Right Flap pocket cut 1 @ 5 x 13, inside of Snap Flap cut 1 @ 5 x 5. Fabric 2- Pencil Pocket cut 1 @ 5x10, Contrast on Right Flap pocket cut 1 @ 3 x 13, Outside of Snap Flap cut 1 @ 5 x 5, Contrast on Outside cover cut 1 @ 10 x 15. Fabric 3- accent for Right Flap pocket cut 1 @ 2 x 13, Pencil pocket accent 1 @ 2 x 10, accent for Snap Flap 1 @ 2 x 5, Accent for contrast on outside cover 2 @ 2.5 x 15 and 2 @ 2 x 13. Random Lining fabric- Inside flaps lining cut 2 @ 10 x 13, Right flap lining cut 1@ 7 x 13, pencil pocket lining cut 1 @ 5 x 10, inside center facing cut 2 @ 2 x 8.

layer Pencil pocket piece, Pencil pocket accent, and Pencil pocket lining with right sides together. Stitch edge with accent.

Open, fold lining under, and press seam flat. Fold accent piece under 1/2" and press. Lay it on pocket front and top stitch down.

Place pencil pocket on the bottom of one of the inside flap pieces and pin in place. Measure over 1.5" and draw a line (I just used pencil). From that line measure over 1 and 1/4" and mark a line. Repeat 2 more times.

Stitch down lines to form 4 pencil slots. The rest of the pocket can be left for a calculator, or whatever!

Layer inside flap lining with Pencil Pocket flap piece- right sides together. Stitch down the right side. Open, fold under, and press. Edge stitch sewn edge down.

Now we're going to work on the right flap pocket. Stitch flap pocket pieces (of fab 1 and fab 2) along long edge, at 1/2". Open and press flat.

Take Right flap accent piece and place it along contrast on right flap edge. Sandwich it with the lining RST. Stitch along this edge. Open seam, fold it under, and press.

Press raw edge of accent piece under 1/2". Fold it onto pocket and top stitch it down. You can also add stitching along center-ish seam. Pin into place along edge of Inside Flap piece.

Sandwich this piece with inside flap lining. Stitch edge opposite pocket at 1/2". Open, fold under, and press.

top stitch down this edge.

Now both of the inside flaps are completed!!! Now it is on to the Outside contrast piece. Pin the longer accent pieces along long edges of contrast piece. Stitch, then press open. Top stitch along seamed edge.

Pin short contrast pieces along short edges. Stitch, open, and press. Top stitch along these seams also. Fold raw edges, of short sides, under 1/2 " and press. Center completed contrast piece onto outside piece and pin in place. Top stitch folded accent pieces onto the Outside cover piece.

The Snap Flap. Measure down 1" from edge of Inside Snap Flap piece. Center Magnetic snap washer, and mark with pencil. Cut slits on pencil marks.

Stick top of Snap through front of fabric.

On back of snap I like to put a piece of thick interfacing (cut slits, and poke it through). Place washer on prongs.

Fold prongs over to secure snap.
Not pictured. Place accent piece along top of Outside Snap Flap. Stitch along top edge at 1/2". Press accent piece (raw edge) under 1/2" and top stitch it down . Now put inside and outside right sides together. Stitch around edges , leaving a 3 " opening at bottom.

Clip all 4 corners (not just the top two like I did here). Turn right side out. Press opening to the inside.

Center Snap flap onto one of the short ends of Outside Cover. Place it about 1 and 1/2 inches from raw edge. Stitch along edge .

Flip snap flap back, and pin it out of the way!

The ultimate sandwich....the end is near!!! Lay the Outside cover face up. Place Flap pocket piece (face down with raw edge on outside edge) on the end with the snap flap. Place pencil pocket flap ( face down with raw edge on outside edge). Pin in place. Take inside center facings and pin along center top and bottom. Stitch around entire sandwich at a scant 1/2".

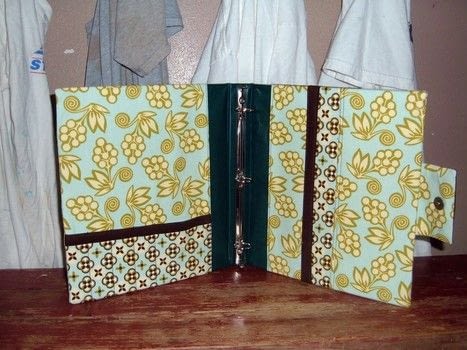
Turn it right side out and press all seams!!! Now you have to figure out where to put the other piece of your snap. Fold cover in half, matching short ends. Fold snap flap over and mark where the center of snap hits opposite side of cover. Put washer over mark, mark and cut the slits (only through the outside layer of fabric...not through inside flap). Poke posts of bottom of snap through the holes, place washer on the back and fold posts over. You're DONE!!!! Stuff your binder into the cover. The fit is usually a little tight, but stuff it in anyway!!!

Now fill your binder full of goodies and enjoy!