


About
Completely customiseable embossed decorative, wool sided box.
I made this little box from my own design (see 'Picture_5.png') as a valentine gift for my gf. Its great for jewellery, rolled up messages, or to hold little keepsakes like all those cinema ticket stubs. Unfortunately, I made the box before I knew about CO+K, so I have no pics showing how it was made.
Hopefully my descriptions will be clear enough.
If you have any questions just ask :o)
Tags
Downloads
- Missing file
-
 tiffany.robinson.900 favorited Beer Can Box
21 Jun 16:13
tiffany.robinson.900 favorited Beer Can Box
21 Jun 16:13
-
 Lady Maiya favorited Beer Can Box
12 Feb 04:37
Lady Maiya favorited Beer Can Box
12 Feb 04:37
-
 Robin L. favorited Beer Can Box
03 Dec 05:18
Robin L. favorited Beer Can Box
03 Dec 05:18
-
 Sheri O. added Beer Can Box to To-make list
14 Sep 16:40
Sheri O. added Beer Can Box to To-make list
14 Sep 16:40
-
Step 1
❦ Using sturdy scissors and a knife for piercing, Cut the ends off two beer cans, then cut down one side of each.
Roll out and bend the sheets of aluminium until they are flat and even. Be careful with all the sharp edges.
-
Step 2
❦ Using a ball point pen, either print out, fix your design to the sheets with tape and trace through hard, or draw it on freehand.
The design should be around 100mm or less, to fit on the sheet comfortably.
One of the patterns should be around 5mm larger than the other. This pattern should have the main design as it will become the top of the box.
If you are using a paper pattern, make sure you don't miss out tracing any details before you remove it later on.
-
Step 3
❦ Draw on an *odd* number of tabs 5mm wide by 50mm long, all the way round the shape on both sheets, with little or no gaps between. These tabs will come together later to make the sides of the box.
The tabs can be wider than 5mm if the box shape has less curves, but they should all be equal. To divide the edge of an irregular box shape into tabs, you can measure around the the shape first with a length of string.
If you plan on using a paper pattern, then it is easier to add these tabs around the box shape before you print it out.
If you are drawing the shape freehand, cut a rectangle the size of your tab from a sheet of paper or card. You can then make all your tabs the same size by moving the rectangle around the outside of your shape, tracing inside it each time.
-
Step 4
❦ Remove any pattern you have used and turn the whole sheet over. Retrace the lines of the design with a HB pencil. This pushes the pattern back through to the other side of the metal.
Keep retracing the lines from each side of the sheet until the design is as defined as you want it to look on the shiny, metal side of the sheet. This will be the top of the box.
-
Step 5
❦ Cut out the patterns with their tabs from both sheets *carefully*.
Use sturdy scissors for the longer sections and a strong, *sharp* knife for the fiddly bits between tabs.
-
Step 6
❦ Once the patterns are cut out, lay the sheets shiny side down and use a pencil to mark a line 40mm from the base of every tab (the grey area on my pattern). Fold back that last 10mm or so beyond the mark on each tab, flat.
The metal will easily break, so be careful and try to resist the urge to score before any folding. If you can, try folding against a slightly rounded edge, like the ruler, or a large paperclip if you have one.
-
Step 7
❦ On both patterns, fold all the tabs up at 90° to meet, again being careful not to break the metal at the bends.
-
Step 8
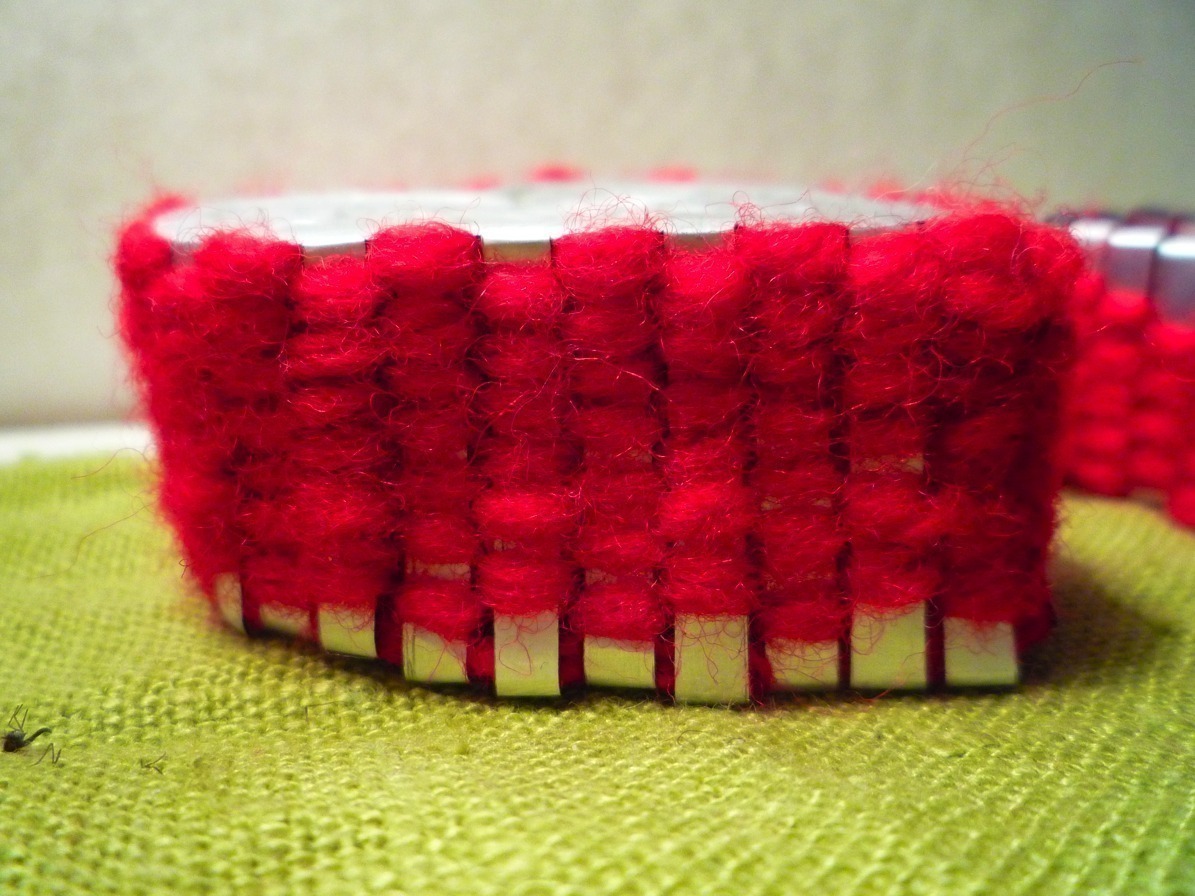
❦ Measure two 4m lengths of wool, one for each part of the box.
Leave 30mm of of wool loose, then starting from the base of one of the tabs, weave the wool around the box, in and out between the tabs, to create the sides.
Leave another 60mm loose at the end, once you have finished each part of the box.
-
Step 9
❦ Cut two shapes from the felt sheet to match the inside top and bottom of the box.
Pull the loose ends tight and lay them together against the back of the inside of the box.
Use a moderate amount of superglue to stick the felt shapes in place to hide the decoration, and to secure the loose ends of wool.
-
Step 10
Once the glue has dried, put the lid on and... Bazinga! You got a box!


thank you for the tute , really great idea!!!!
I'd love to see versions :o)