About
Bee Watercolor Step by Step Tutorial
A step by step tutorial to paint yourself a buzzing watercolor bee.
Check out my Instagram account for more tutorials!
https://www.instagram.com/ladybug_watercolour/
Tags
-
 Sheleen H. favorited Bee Watercolor Tutorial
08 Jul 14:47
Sheleen H. favorited Bee Watercolor Tutorial
08 Jul 14:47
-
 christina p. favorited Bee Watercolor Tutorial
05 Feb 19:06
christina p. favorited Bee Watercolor Tutorial
05 Feb 19:06
-
Raven favorited Bee Watercolor Tutorial
04 Jan 08:44
-
 Susu added Bee Watercolor Tutorial to Tutorials
02 Dec 21:14
Susu added Bee Watercolor Tutorial to Tutorials
02 Dec 21:14
-
Katherine C. favorited Bee Watercolor Tutorial
13 Aug 03:23
-
 Nothing favorited Bee Watercolor Tutorial
27 Apr 17:02
Nothing favorited Bee Watercolor Tutorial
27 Apr 17:02
-
 Laura R. favorited Bee Watercolor Tutorial
18 Apr 14:21
Laura R. favorited Bee Watercolor Tutorial
18 Apr 14:21
-
 KMOM14 favorited Bee Watercolor Tutorial
28 Mar 08:06
KMOM14 favorited Bee Watercolor Tutorial
28 Mar 08:06
-
Natasha B. added Bee Watercolor Tutorial to Watercolour
10 Dec 06:49
-
Natasha B. favorited Bee Watercolor Tutorial
10 Dec 06:49
You Will Need
-
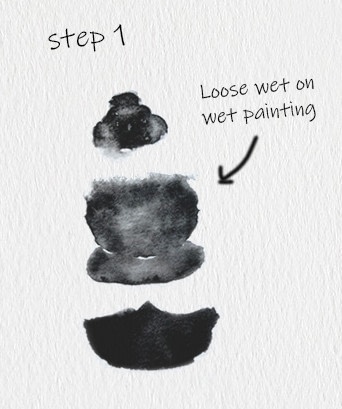
 Step 1
Start by painting the shapes in black with just water. Then when the water has soaked in a little, using black paint, dab colour on to the water areas, watch it bloom over the water! You can use a clean, wet brush, to pull some of the colour a little if you would like softer edges.
-
 Step 2
When your black paint is nearly dry, using the wet on wet technique again, add in the yellowy-orange areas. If your black paint blends in to the orange too much, you can dab it away a little with some tissue or kitchen paper.
-
 Step 3
The next step is the wings. Using a thin brush and a light brown colour, you can paint the brown wing lines. Once they are dry, paint a wing shape over with clean water and dab on light blues, greys and whites to fill the wing areas. Concentrate the darker colours on the edges to show off the shape.
-
 Step 4
Using a thin brush, you can now paint on the legs. I used a mixture of brown and black here. Keeping the brown on one side of the legs helps to create a bit of a highlight.
-
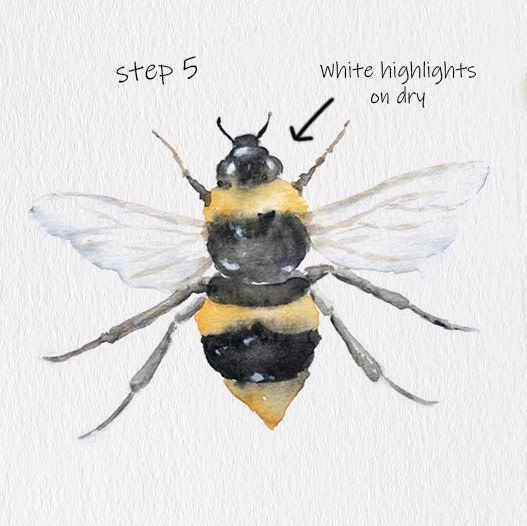
 Step 5
When your bee painting is completely dry, you can then use some white paint to add highlights to the body and head!