


About
A crash course on everything you need to start beading...
Sometimes you need to learn the very basics before you can move on...
-
 Nyctophilia N. favorited Beading Components Basics
19 Nov 15:44
Nyctophilia N. favorited Beading Components Basics
19 Nov 15:44
-
 Holly Deck favorited Beading Components Basics
02 Mar 17:52
Holly Deck favorited Beading Components Basics
02 Mar 17:52
-
 cristinakilljoyway favorited Beading Components Basics
15 Jan 15:04
cristinakilljoyway favorited Beading Components Basics
15 Jan 15:04
-
 Mochi Mochi favorited Beading Components Basics
24 Nov 03:18
Mochi Mochi favorited Beading Components Basics
24 Nov 03:18
-
 Kaitlin A. favorited Beading Components Basics
10 Jul 19:56
Kaitlin A. favorited Beading Components Basics
10 Jul 19:56
-
 Wendy B. favorited Beading Components Basics
05 Jul 19:48
Wendy B. favorited Beading Components Basics
05 Jul 19:48
-
 Katie G. favorited Beading Components Basics
26 Jun 06:20
Katie G. favorited Beading Components Basics
26 Jun 06:20
-
 Romana S. favorited Beading Components Basics
22 Jun 05:46
Romana S. favorited Beading Components Basics
22 Jun 05:46
-
 GothicYolita favorited Beading Components Basics
21 Jun 14:56
GothicYolita favorited Beading Components Basics
21 Jun 14:56
-
 Dragoness favorited Beading Components Basics
20 Jun 22:20
Dragoness favorited Beading Components Basics
20 Jun 22:20
You Will Need
-
 Step 1
Tools:
There are four basic tools that you will need for beading and jewelry work. These can be bought online, in bead stores and sometimes in hardware stores. From left to right:
A Flat Nose Pliers, the jaws are long, thin and flat where they touch against each other. I use them primarily for manipulating the wire.
Next, Round Nose Pliers, the jaws are short and round, and they go from thick (where they meet the pivot joint) to thin at the end. They come in different sizes, I like mine to be very very small at the tip.
Diagonal Cutters are... used for cutting
Crimping Pliers have been designed specifically for closing crimps, and have two notches in the jaws. These are to be used sequentially to create a secure crimp bead.
-
 Step 2
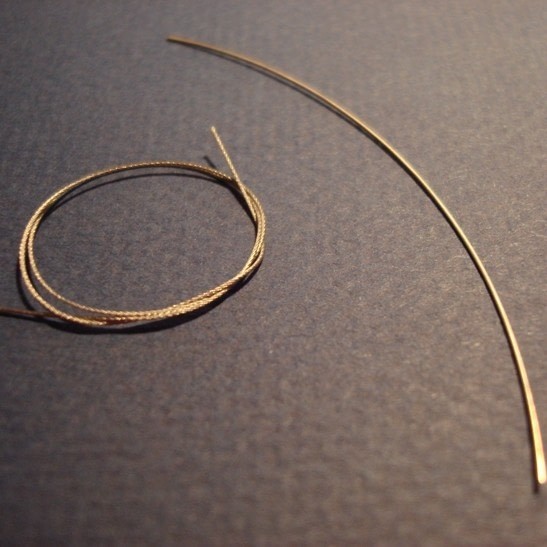
Wire: Both basic types come in several sizes and flexibilities; you may also use alternative materials such as elastic, ribbon, cord, etc.
On the left, beading wire; it consists of several very small strands of steel wire, wrapped around each other and coated in nylon. Good for necklaces, bracelets, etc.
On the right is sterling silver wire. It can be used to attach beads, make eyepins, headpins and jumprings, or to make into shapes.
-
 Step 3
Findings:
Findings are things that help you assemble, hold together or attatch things to one another.
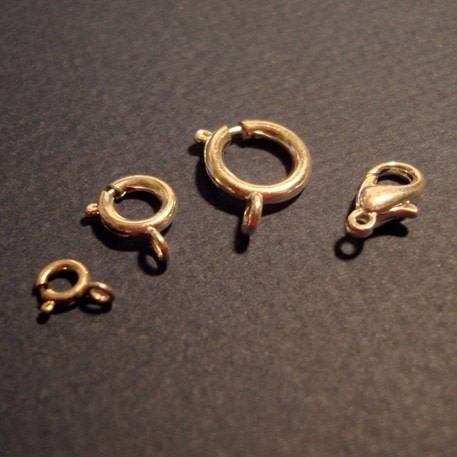
Clasps: Toggle Clasps: Consist of an "O" shaped piece and a "T" shaped piece. Once you slide the "T" part into the "O" part, the weight of the jewelry exerts enough tension to keep the clasp from undoing.
-
 Step 4
Clasps: Spring Clasps: Consist of a round circle of metal in which a spring is incorporated. They have a sliding piece that is kept shut by the spring. There are also lobster clasps, which work on the same principle but some people consider prettier and easier to operate.
-
 Step 5
Connectors: Jumprings: Are round pieces of metal that are used to link two other pieces. They must be opened in a specific way to avoid damaging them.
-
 Step 6
Connectors: Headpins: Are pieces of wire that have an end with a flat head, so as to stop a bead from sliding off. You place a bead and then do a loop or a wrapped loop (my preference) to secure the bead.
Connectors: Eyepins: Are pieces of wire that have an end with a loop, so as to stop a bead from sliding off. You place a bead and then do a loop or a wrapped loop (my preference) to secure the bead.
-
 Step 7
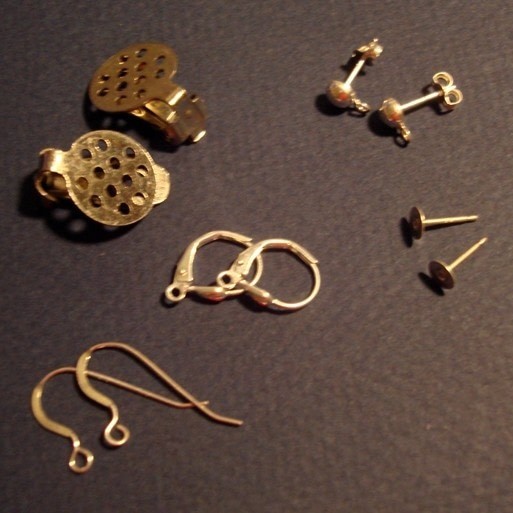
Earring findings: are the pieces that hold a piece of jewelry to one's ear. There are (clockwise from bottom left) earwires/french wires; lever backs; clip ons; posts with loops and flat posts. Each kind has it's own application, and are to be considered a design choice. Some earring designs look better with a post than a frenchwire, some earrings can only be made with flat posts.
-
 Step 8
Crimps: Are tubes of metal that are flattened or folded in a specific way around a wire; they will stay in place and keep your design whole without having to tie the wire.
-
 Step 9
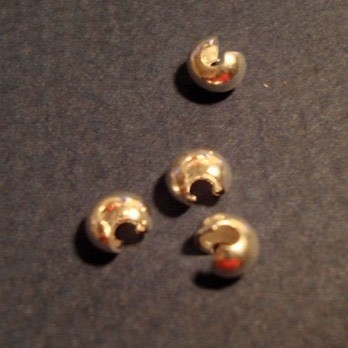
Crimp Covers: Not everyone likes the look of crimps, so crimp covers were invented. They are basically an 'open' bead. You use them on the first notch of your crimping pliers, place them around a secured crimp and close it. It hides the crimp and looks like a regular round bead.
-
 Step 10
Other findings:
Bails (Bottom Left): allow a pendant to have a place where a wire or thread can pass through.Ring blank with loops (Top Left): have eight loops on the top, allow you to attach a lot of beads on the top.
Eyeglass holder: the plastic goes around the 'feet' of your eyeglasses.
-
Step 11
Now that you know what things are called and what they look like, you can begin to learn some basic techniques!


Thanxs.