


About
Easy, beautiful and unique
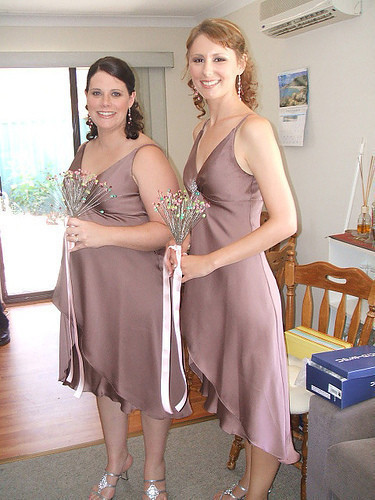
I made these for my wedding because I wasn't interested in carrying flowers. They were easy, beautiful and I could make them exactly the colours I wanted.
I wouldn't recommend throwing it, but it'll keep forever as a memento or gift.
Tip: for your colours, pick one clear, one or two matching colours, and then one contrast colour. I used clear, amber, and amethyst (purple) on gold wire; and pink, yellow, green and clear on silver wire.
Times and quantities are for one bouquet only. If you're making more than one, get a friend or two to help you, as it's very repetitive work.
Tags
-
 Brenda A. favorited Beaded Bouquet
26 Jun 07:03
Brenda A. favorited Beaded Bouquet
26 Jun 07:03
-
Cheryl S. added Beaded Bouquet to Beaded Flowers
19 Dec 10:47
-
 Rattiemama added Beaded Bouquet to Beaded Decor
05 Oct 02:10
Rattiemama added Beaded Bouquet to Beaded Decor
05 Oct 02:10
-
Rattiemama favorited Beaded Bouquet
05 Oct 02:10
-
 laceysmom added Beaded Bouquet to beaded flowers
17 Jul 06:24
laceysmom added Beaded Bouquet to beaded flowers
17 Jul 06:24
-
laceysmom favorited Beaded Bouquet
17 Jul 06:24
-
 Bdandi favorited Beaded Bouquet
14 Feb 11:12
Bdandi favorited Beaded Bouquet
14 Feb 11:12
-
Debbie S. favorited Beaded Bouquet
30 Mar 23:20
-
Jeanniece M. commented on Beaded Bouquet
30 Jan 22:27
-
 Katherine B. favorited Beaded Bouquet
26 Dec 01:46
Katherine B. favorited Beaded Bouquet
26 Dec 01:46
-
 Step 1
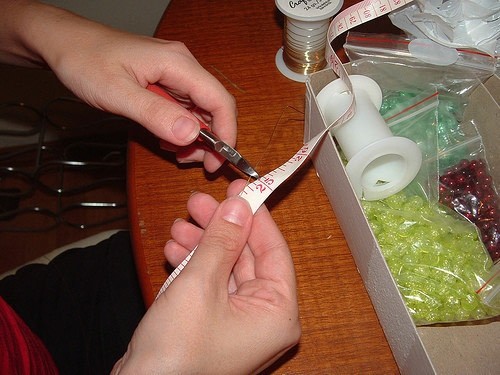
Cut your wire into straight lengths with pliers/clippers. We used 24 gauge (0.5mm) wire and cut it into 25 inch lengths for my bouquet, 20 inches for the bridesmaid's bouquets.
We found that 28 gauge wire was too flimsy to hold up a bead, and larger sizes would have been difficult to fit through the bead-hole.
-
 Step 2
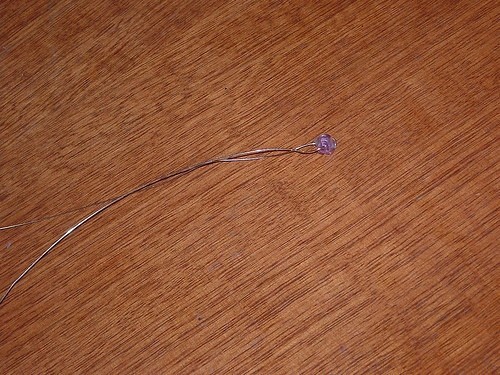
Thread the wire through the bead, to the halfway point. Fold the two sides of the wire together, and give them a couple of loose twists.
If you don't have a cordless drill, here is where you just keep on twisting that wire until it's wound all the way along itself. The drill does give a more polished look, which we preferred. It's also a lot faster, so I really recommend trying to borrow one if you don't have your own.
-
 Step 3
Attach a hook to your drill. We used a metal ring from the end of our BBQ tongs, but the end of a wire coat-hanger or any sturdy wire or plastic hook will do. We sort of shoved the hook into the drill, nothing fancy.
-
 Step 4
Place the loop of the loosely twisted wire over the hook. Hold on firmly to the ends of the wire.
Hint: moisturising your hands before doing this makes them too slippery to hold the wire!
-
 Step 5
Give the cordless drill a short burst - it will take a few tries to work out what speed you want and how long to do it for. The wire halves will twist around themselves.
-
 Step 6
When you've made enough stems, hold them together the way you'd like them to sit. Duct tape around the base of the bouquet. We found this easier to do with two people, one to hold the wires together in a bunch, and one to wrap the tape. Make sure you cover the end, otherwise the ends of the wires will stick out and be too scratchy, or catch on your clothes.
Bend the wire into whatever shape you like - we had grand plans of shaping them into a dome shape, but settled for spreading them out a bit. The wires are nice and springy, but they will twist around each other.
-
 Step 7
Wrap ribbon around the stem to cover the duct tape. This can be done by one person if you like, as the wires will stay in place now. We used about 2 or 3 metres of ribbon, but this will vary depending on how wide your ribbon is and how long you want the trailing ends to be. We used a bit of floral tape to stick the ribbon on at the top and bottom.
Tie bows, or not, however you like. We liked the look of a simple double knot.
-
 Step 8
The final product. Approximately 150 stems. The bridesmaids' bouquets were shorter, with fewer wires, and the flower-girl's bouquet was shorter and smaller again.
To make 1 bridal bouquet, 3 bridesmaids' bouquets and 1 flower-girl bouquet, it took approximately 10 hours with 3 or 4 of us working as a production line to get to the duct tape stage. This includes time for snacks and glasses of wine :) It then took 2 of us maybe an hour to wrap the all the stems with ribbon.
It took our flower-girl only 5 minutes to completely unravel her ribbon. If you give one of these to a child, either stick the ribbon down completely so it can't come off (floral tape is good for this), or don't stick it down at all so that repairs are easier :)


The lady who made them used really good wire and swarovski crystal. We made earrings!
Thanks for sharing.
And your dresses are beautiful, by the way. Congrats! =)
What a clever thing to do.
They look great with the dresses, too.
I made a silk flower bouquet to throw.
athenamat, I'm just not a floral kind of girl. I did look at some, but didn't feel comfortable carrying them. But I still wanted to carry something or else I'd end up biting my nails
CO + K User
Congratulations on your marriage!