About
A Sleeveless Blouse with a Really Big Bow
Today I want to share my "A Bow and Whimsy Tank Top" with you. I named it that because the oversized, diagonally-placed bow reminds me of carnivals, balloons, birthday parties, Sunday brunch and woodland picnics. What’s that you say? You want one? Well, you’re in luck because I have a tutorial for you today! So join me after the break to get the how-to!
P.S. You might need to click on these pictures to enlarge them for some of the steps. :)
Tags
-
 cristinakilljoyway favorited A Bow And Whimsy Top
03 Jan 22:45
cristinakilljoyway favorited A Bow And Whimsy Top
03 Jan 22:45
-
 Bakewells favorited A Bow And Whimsy Top
04 Aug 14:14
Bakewells favorited A Bow And Whimsy Top
04 Aug 14:14
-
 lajune.moreland favorited A Bow And Whimsy Top
30 Jul 17:24
lajune.moreland favorited A Bow And Whimsy Top
30 Jul 17:24
-
 Step 1
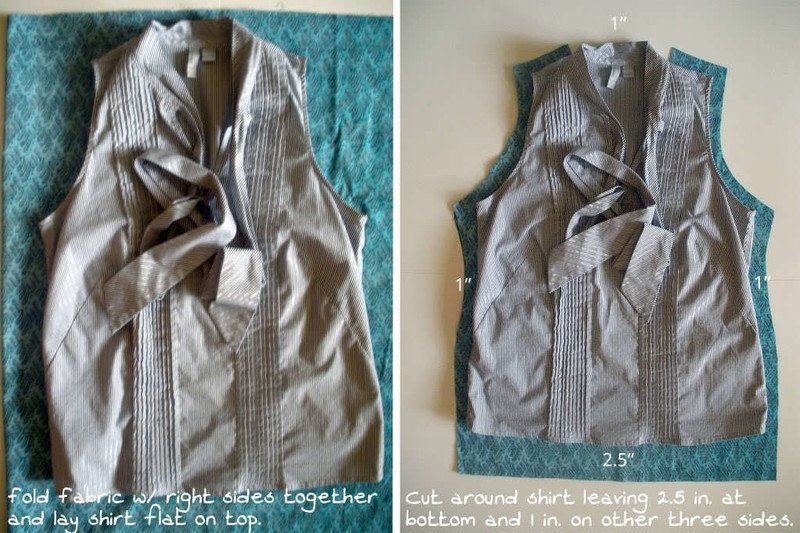
First we’ll cut the bodice. Begin by folding your main fabric in half with right sides facing together. Place the shirt you’re using to make your pattern on top of the fabric. Now we’re going to cut out our main bodice using the shirt as our guide. Make sure the shirt is laying nice and flat before you start cutting. As you cut, leave about 2.5 extra inches on the bottom (for the hem) and an extra inch all the way around the other three sides so you have plenty of room for sewing. It may help to pin your shirt down to the fabric or use fabric weights to keep from sliding around while you’re cutting. (And be careful not to cut your shirt!)
-
 Step 2
When you’re done cutting, remove the shirt and you should have two pieces of fabric that look like this.
-
 Step 3
Now fold both of the pieces in half along the length and trim up the sides as needed so that they match.
-
 Step 4
Now take just one of your pieces. Keep it folded along the length and cut out a deeper neckline. This will be the front of your shirt.
-
 Step 5
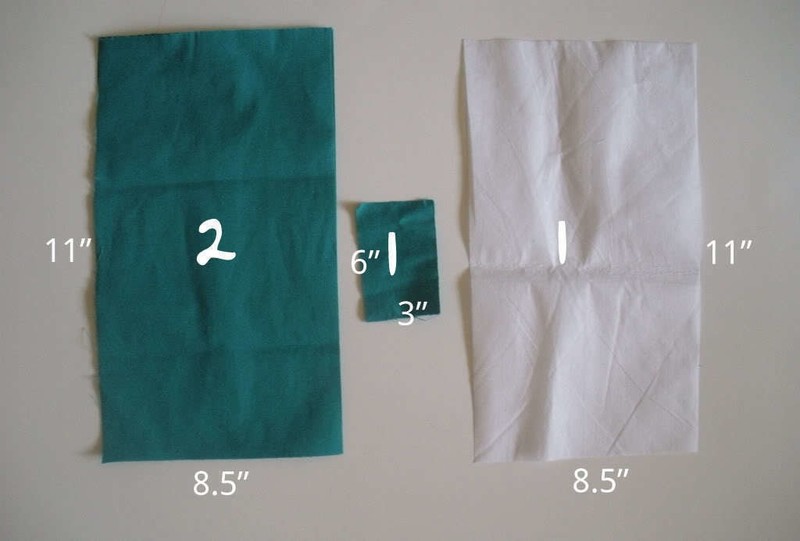
Now we’ll cut the fabric and interfacing for our big bow. From your fat quarter cut 2 rectangles measuring 8.5”x11”. You can use a piece of printer paper as your pattern if that makes it easier for you. You’ll also want to cut a piece of interfacing measuring 8.5”x11”.
-
 Step 6
With the scraps, cut a smaller rectangle that measures 3”X6”. So all together at this point you’ll have this (see picture).
As you can see, I used scrap fabric for my bow and didn’t have quite enough fabric. That being said, it’s okay if your measurements aren’t exactly the ones I’ve listed here, as long as they’re somewhere close.
Yay! We’re done cutting.
-
 Step 7
Now we’re going to sew our shirt together! Don’t worry. It’s really easy. Ready?
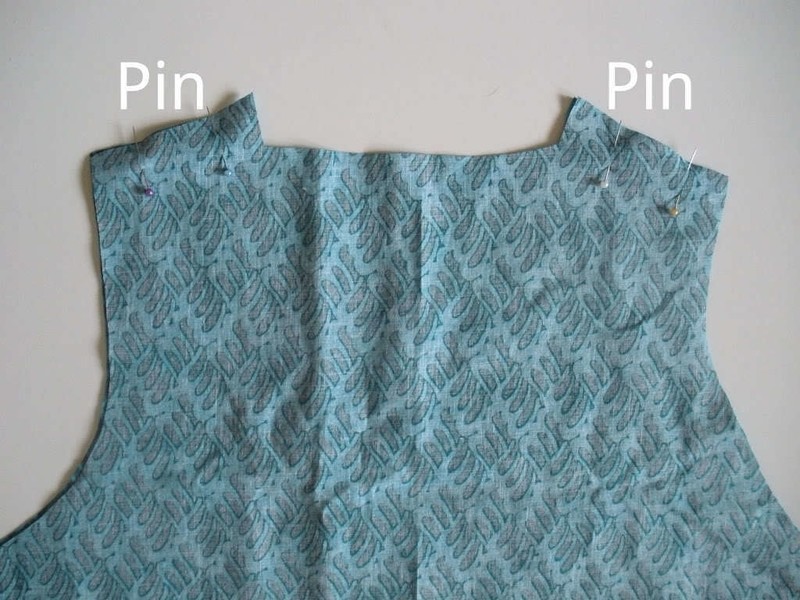
Start by placing your two pieces of main fabric with right sides together. Pin along the shoulders.
-
 Step 8
Sew the shoulder seams together with a ¼” seam allowance. When you’re finished, open it up and press the seam with your iron.
-
 Step 9
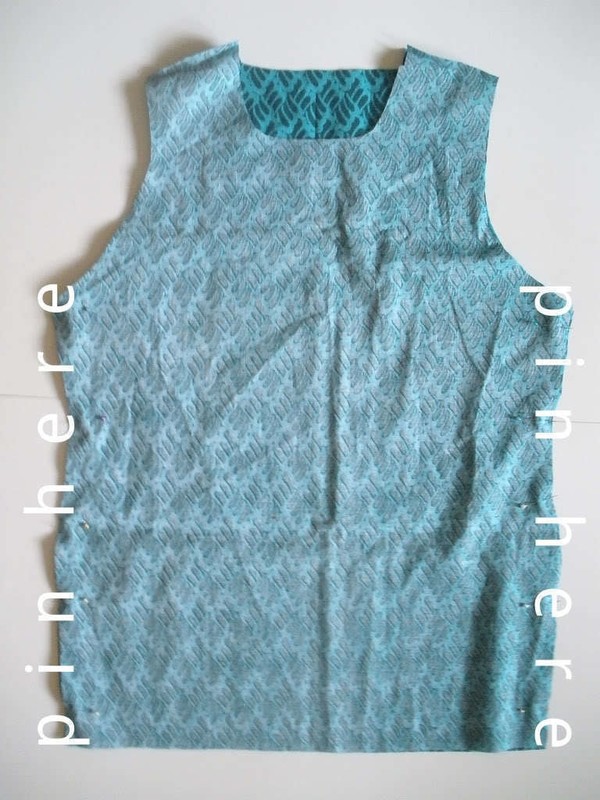
Again, place the fabric with right sides together and this time pin along the edges.
-
 Step 10
Sew down the side seams, flip right side out and iron the seams.
-
 Step 11
So now you should have this. Now is a good time to try the shirt on and see if it fits. Don’t worry if it doesn’t. You can make the adjustments! I had to cut my neckline a little bit deeper and I even considered adding some darts. Once you work out the fit, join me in the next step to finish the edges.
-
 Step 12
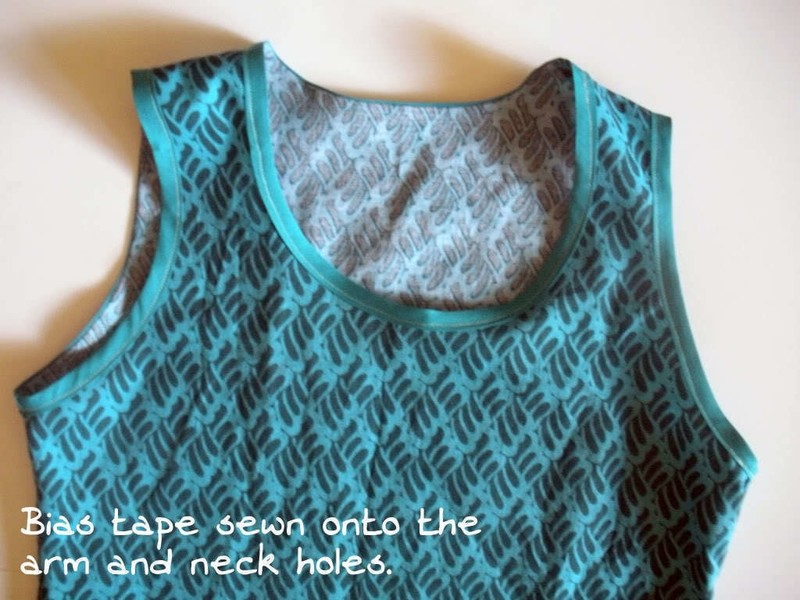
Now that your shirt fits, let’s finish off those edges. We’re going to finish the neck and arm holes by sewing bias tape onto them. I won’t bother trying to explain how to sew on bias tape because Dana over at MADE already has an amazing tutorial for it (go here: http://www.dana-made-it.com/2008/07/tutorial-heart-hotpads-how-to-sew-bias.html). So jump over and sew the bias tape to your neck arm holes and then meet me back here.
-
 Step 13
Back? Great! So now we have this.
-
 Step 14
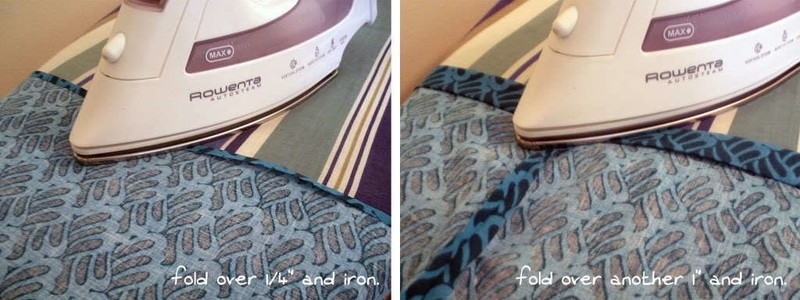
Now all that’s left to do for the shirt is hem the bottom. So fold the bottom of your shirt under ¼” and iron, then fold it under another 1”, iron and pin it down. The reason for the double fold hem is to prevent fraying.
-
 Step 15
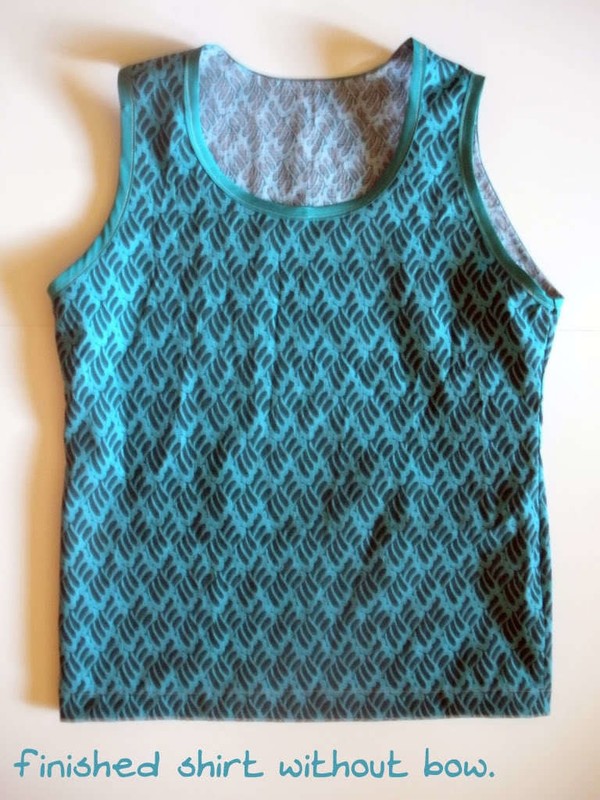
Sew all the way around the bottom and you should have this. Ta-da! Now you’ve got your shirt base and we can add the embellishment!
-
 Step 16
Let’s start by making the bow. Iron your interfacing to the wrong side of one of your 8.5”x11” pieces of fabric.
-
 Step 17
Now take your two pieces of 8.5”x11” fabric and pin them with right sides together. Sew along three of the edges with ¼” seam allowance. Be sure to leave one side unsewn so we can flip it right side out.
-
 Step 18
Snip the corners and flip your fabric right side out. Poke the corners right side out with a pencil if needed and iron the seams.
-
 Step 19
Next, fold under the unsewn edge ¼” and iron down. Pin in place and sew it closed. I top stitched on the other end, too, to make the two ends look the same.
-
 Step 20
So now you have this:
-
 Step 21
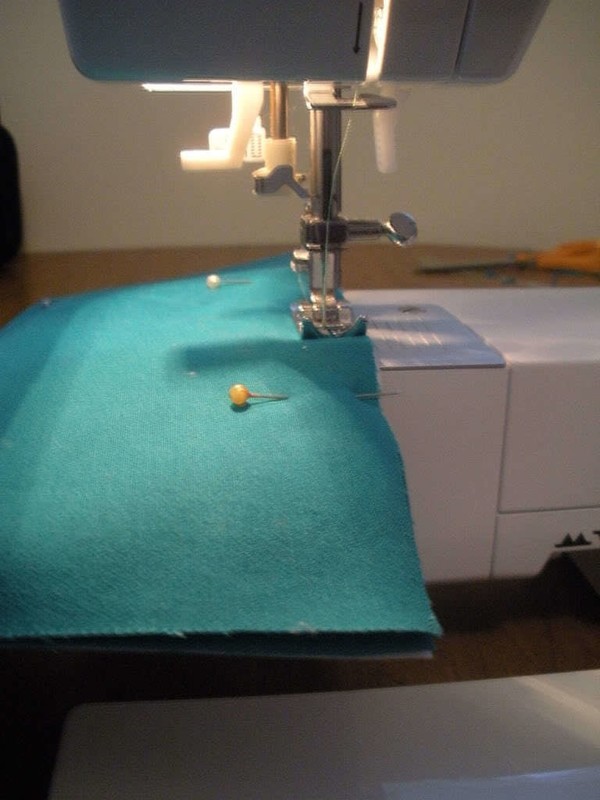
Now let’s take that 3”x6” piece of fabric and turn it into a tube. Fold it in half with right sides together so that it’s a 3”x3” square. Pin in place and sew down one edge to make a tube.
-
 Step 22
Flip your tube and iron so that you have this:
-
 Step 23
Let’s get that bow on our shirt! (Hang in there! We’re almost done!)
Take the tube you made and fold under the top and bottom raw edges of the tube just a little bit. Iron. (NOTE: If you’ve ever made belt loops before, we’re going to use the exact same process!)
-
 Step 24
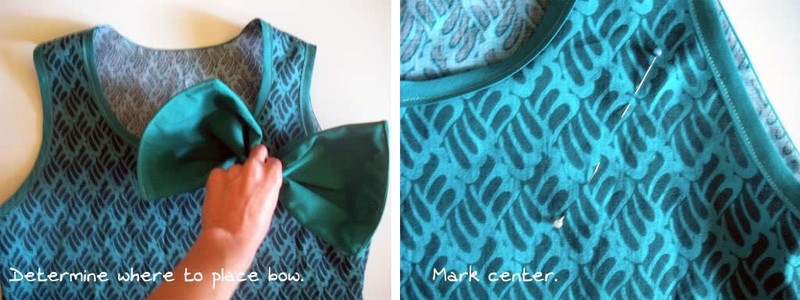
Decide where on your shirt you want your bow. To do this, I pinched my big rectangle of fabric in the middle (to make it look more like a bow) and held it up to the shirt. When you’ve decided where you want your bow, mark the center somehow (either with a fabric pen, pins, chalk, etc...I used pins).
-
 Step 25
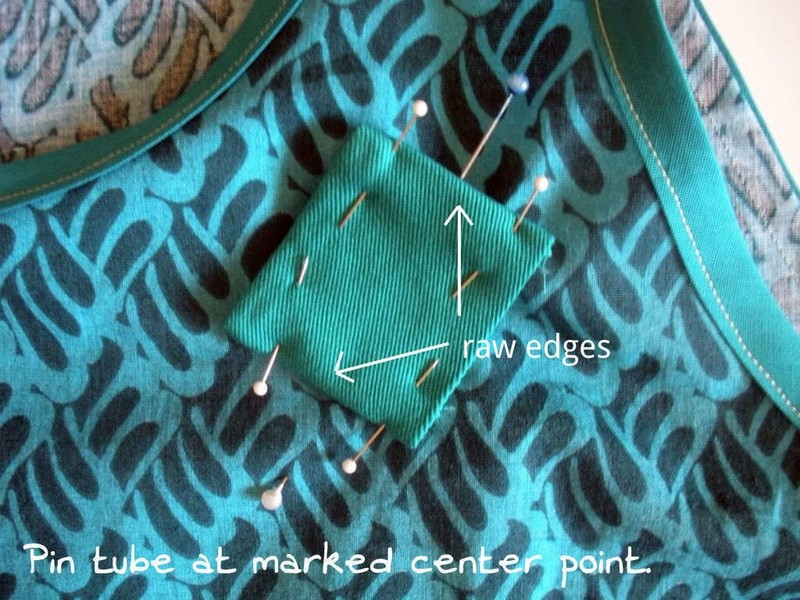
Place your tube at the center point you’ve marked and pin it in place, with the edges that you just ironed under as the “top” and “bottom”. (Boy, I hope this is making sense…Email me if not!)
-
 Step 26
Sew along the top and bottom of the tube, but not the sides. (We’ll be sliding the bow through here later.) Also be careful that you don’t sew the front of the shirt to the back of the shirt! This will be through several layers of fabric and may be a bit tricky, but I know you can do it!
-
 Step 27
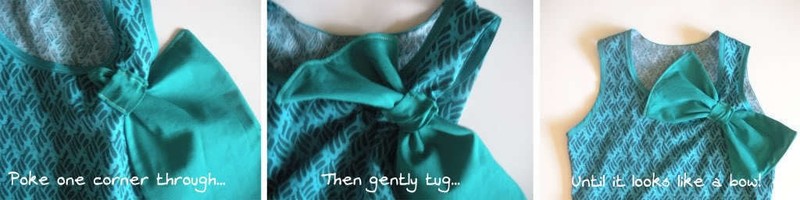
When you have the tube sewn down, simply slide your big rectangle through the whole until it is centered. It might be kind of difficult to get your giant bow through the tiny hole. It’s easier if you start with just the corner, then gently tug it until it comes through, like this:
-
 Step 28
El fin! Congratulations! You've made your very own A Bow and Whimsy Top! I knew you could do it!
Thanks for using my tutorial! See you next time. :)