About
Create your own 2015 memory jar!
Turn an old or broken Christmas ornament into a topper for your 2015 memory jar by following this tutorial! Now if you don't have an old/broken ornament or you don't want to scarifies any of your other good ornaments, then thats ok. At this time of year, stores are always having sales to get rid of there Christmas decorations. Most likely you will be able to find a bunch of ornaments you can either take apart or use for this project at a very cheap price.
Happy Crafting!
Tags
-
 Mia added 2015 Memory Jar Diy to Room Decor
18 Jan 08:21
Mia added 2015 Memory Jar Diy to Room Decor
18 Jan 08:21
-
 Mia_Ferry added 2015 Memory Jar Diy to Room Decor
18 Jul 10:51
Mia_Ferry added 2015 Memory Jar Diy to Room Decor
18 Jul 10:51
-
 Sheri P. favorited 2015 Memory Jar Diy
15 Mar 08:07
Sheri P. favorited 2015 Memory Jar Diy
15 Mar 08:07
-
 Kimberly L. favorited 2015 Memory Jar Diy
05 Mar 07:25
Kimberly L. favorited 2015 Memory Jar Diy
05 Mar 07:25
-
 Jenna Joy favorited 2015 Memory Jar Diy
05 Jan 07:51
Jenna Joy favorited 2015 Memory Jar Diy
05 Jan 07:51
-
 Jeannette I. added 2015 Memory Jar Diy to Non-sewing projects
03 Jan 18:39
Jeannette I. added 2015 Memory Jar Diy to Non-sewing projects
03 Jan 18:39
-
Jeannette I. favorited 2015 Memory Jar Diy
03 Jan 18:38
-
 SugarNSpiceLily added 2015 Memory Jar Diy to upcycling
02 Jan 22:28
SugarNSpiceLily added 2015 Memory Jar Diy to upcycling
02 Jan 22:28
-
 Muhaiminah Faiz favorited 2015 Memory Jar Diy
02 Jan 17:27
Muhaiminah Faiz favorited 2015 Memory Jar Diy
02 Jan 17:27
-
 Katie K. published her project 2015 Memory Jar Diy
02 Jan 00:16
Katie K. published her project 2015 Memory Jar Diy
02 Jan 00:16
You Will Need
-
 Step 1
Take apart your old ornament. You can do this by using some pilers and possibly scissors. Remove the parts of the ornament you don't like until you have the piece or pieces you want to use for your jar. If you didn't have an old ornament, you could always go out and buy a cheap ornament that you would either want to take a part or use as a complete piece for your jar.
-
 Step 2
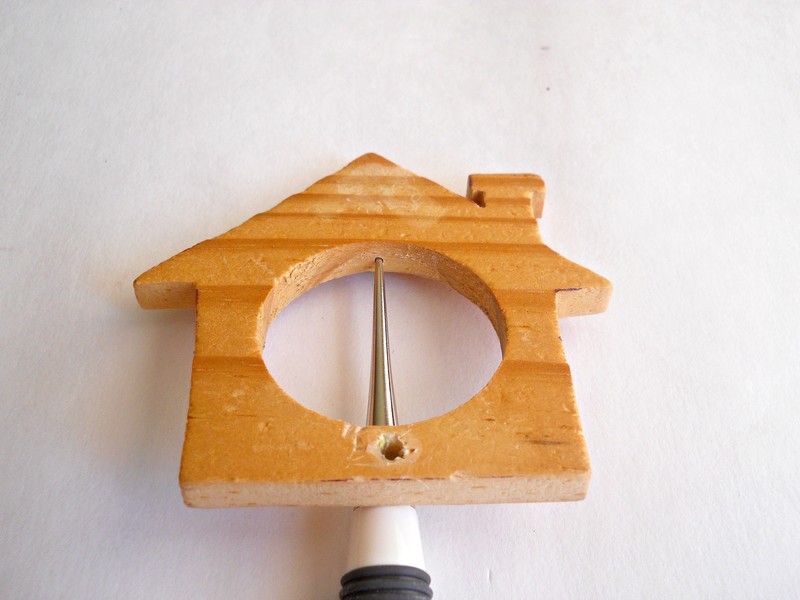
Now take your awl and poke a small hole where you want to place your charm.
-
 Step 3
Cover your ornament with some Mod Podge and add your choice of colored glitter. When your ornament is dry you can either seal it with another coat of Mod Podge or with a Clear Acrylic Sealer spray.
-
 Step 4
Using some wire and your pilers create a small loop. Then cut the small loop from the main piece of wire.
-
 Step 5
Now apply a small drop of E6000 at the end of your wire loop and place it inside the hole you made in step 2. Then set the whole piece aside to dry.
-
 Step 6
While your ornament is drying you can work on the lid of your jar. With some scrapbooking paper, cut out a circle that will cover the top of your jar. Once you have the circle cut out, glue it to the jar lid with some Mod Podge and let it dry.
-
 Step 7
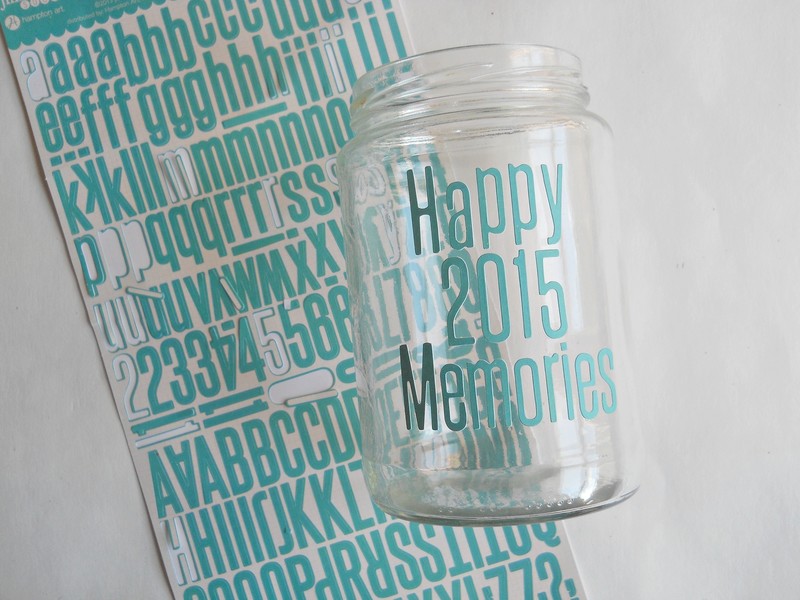
With your letter stickers, spell out a phrase to put on the front of your jar. I wrote Happy 2015 Memories but you could use your favorite quote, your name or you can leave your jar blank.
-
 Step 8
Now grab your ornament, charm and cardstock numbers and assemble your pieces together. First what I did was add my charm to a jump ring and then added it on the loop I glued in the middle of my ornament. Then I glued down the whole ornament to the top of my jar lid. Finally,I glued the cardstock numbers in place. As a side note, when I got done when this step I ended up finding some teal pom pom trim. Since I felt the gold lid was competing with the sliver glitter, I decided to add the pom pom trim around the rim of the jar.