
Features


Learn how-to bind curves in #TechniqueTuesday with Jemima Schlee and make an ear phone holder.
-
 Step 1
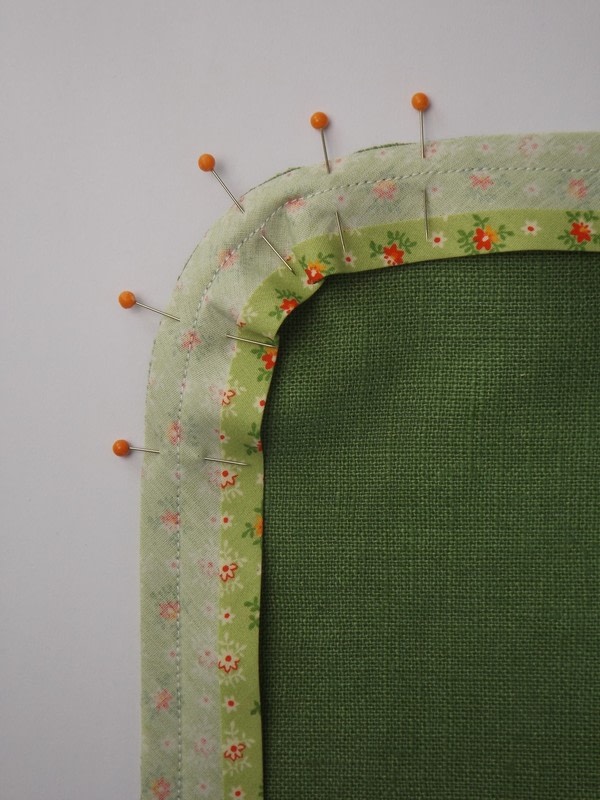
Open out the binding. Place it on your work right sides together and position the upper fold in the binding along your stitch line so that
its top raw edge aligns perfectly with the raw edge of your work. Pin or tack in position. Take your time to encourage the bias binding to follow the curve in your fabric smoothly. -
 Step 2
Tack the bias binding in place and sew slowly and carefully along the fold crease. Fold down the tape to meet the stitch line so that it encases
the raw edge of your work. sew by hand with hemstitch. -
 Step 3
Turn your work back over again and give it a good press with a hot iron.
-
 Step 4
Cut 4 3/8in x 4 3/8in (11cm x 11cm) circles from both fabrics and your stabiliser. Lay one piece of fabric right side down (the lining), and then lay the stabiliser on top. Finally, place the second piece of fabric (the outer) right side up on top of the stabiliser.
-
 Step 5
Align all the raw edges so that you have the stabiliser sandwiched between the two fabrics, both of which have their right sides facing out. Use a hot iron to fuse all three layers together – this is most efficiently done if you iron on both sides. Stitch in large zigzags around the circumference through all three layers to prevent fraying whilst you work.
-
 Step 6
With the outside fabric facing you, take your wide bias binding and open it out, laying it right side down on your circle of fabrics. Fold one end over by 11 3/16in (5mm) and position it so that the top/outer edge of it aligns with the raw edge of the fabric. Tack the binding to the circle of fabric all the way around, easing it carefully to fit and align with the curved edge to make it fit in as smooth a circle as you can. Tack along the fold crease in the bias binding nearest the edge of the circle. When you’ve completed the circumference, trim the bias so that it overlaps the other folded end by about 3/8in (1cm).
-
 Step 7
Sew around the bias binding, Your stitch line should be along the binding fold where you have tacked it down. Work slowly in order to retain a smooth, even stitch line. Turn your work over. Fold the binding over the raw edge of the fabrics and pin down, an inch (couple of cms) or so at a time. Sew down the binding by hand with hemstitch.
-
 Step 8
Give both sides of your work a good press with a hot iron.
-
 Step 9
Finally, with your work right side up, mark a point 3/4in (2cm) from the edge, and another directly opposite it and 3/4in (2cm) from the edge. These two points are for your snap fastener positioning. Follow the instructions with your kit to fix the two parts of a snap fastener in the positions you have just marked.


Got the hang of this technique?
Put your new skill to the test with this tutorial:
Is there a certain technique you'd love to learn or one that you could teach us? Send us a message!
Share
Follow


