
Features


 By
Daniela S.
By
Daniela S.

Learn how-to create a Shibori inspired tie dye with Daniela from Green Bird in #TechniqueTuesday with and then make her Shibori inspired dishtowels.
-
Step 1
Start with cutting your fabric to the desired size. I wanted to make dishtowels so i cutted four 47x53 cm big pieces of fabric.
-
Step 2
Then you can experiment with binding your fabric. The binded parts of the fabric will take no color.
-
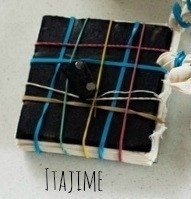
 Step 3
The itajime shibori technique is a folding and binding technique. Fold the fabric like an accordion. Fold it again in the other direction - also like an accordion. Use the wooden plates and rubber bands to fix the folded fabric.
This results in square shaped undyed spots.
-
 Step 4
The itajime technique works with all forms of wooden plates. The result differs when you take rectangular plates.
The result will be a dyed fabric with rectangular undyed spots.
-
 Step 5
The Kanoko Shibori technique is a all binding technique. You will eventually know it from summer holidays as a child because it's the classic tie-dye technique.
For this technique you grab the fabric and bind it at many places. The result are round undyed spots.
-
 Step 6
You can also get another result with this technique.
Grab the fabric in the middle and lift it up. The corners look now all downwards. Take the rubber bands and start to bind the fabric, begin with the spot near your holding hand and move downwards.
The result will be a sun-like shape. -
 Step 7
The last technique I will show you is the Kumo Shibori technique. It is a folding and binding technique.
It involves binding the fabric in very close sections, which results in several spider like designs. Start by folding the fabric lengthwise into an accordion. Pinch and bind into equal sections.
Do the same with the opposite side, in staggered sections. Continue binding with rubber bands, working your way towards the center.
Keep binding until you can’t go any further. Add additional rubber bands to make the fabric into a tight bundle.


Got the hang of this technique?
Put your new skill to the test with this tutorial:
Is there a certain technique you'd love to learn or one that you could teach us? Send us a message!
Share
Follow


